background image

www.baldormotion.com

Input / Output 4-11

MN1941

4.3.2 Digital outputs and relay

The digital outputs are available on connectors X4 and X11, as shown in section 4.1.1.
A digital output can be configured in Mint as a general purpose output, a drive enable output or
a global error output. Outputs can be controlled directly from Mint WorkBench, or by the Mint

OUT

and

OUTX

keywords. Outputs can be shared between axes and can be configured using Mint

WorkBench (or the

OUTPUTACTIVELEVEL

keyword) to determine their active level.

4.3.2.1 DOUT0 - DOUT7

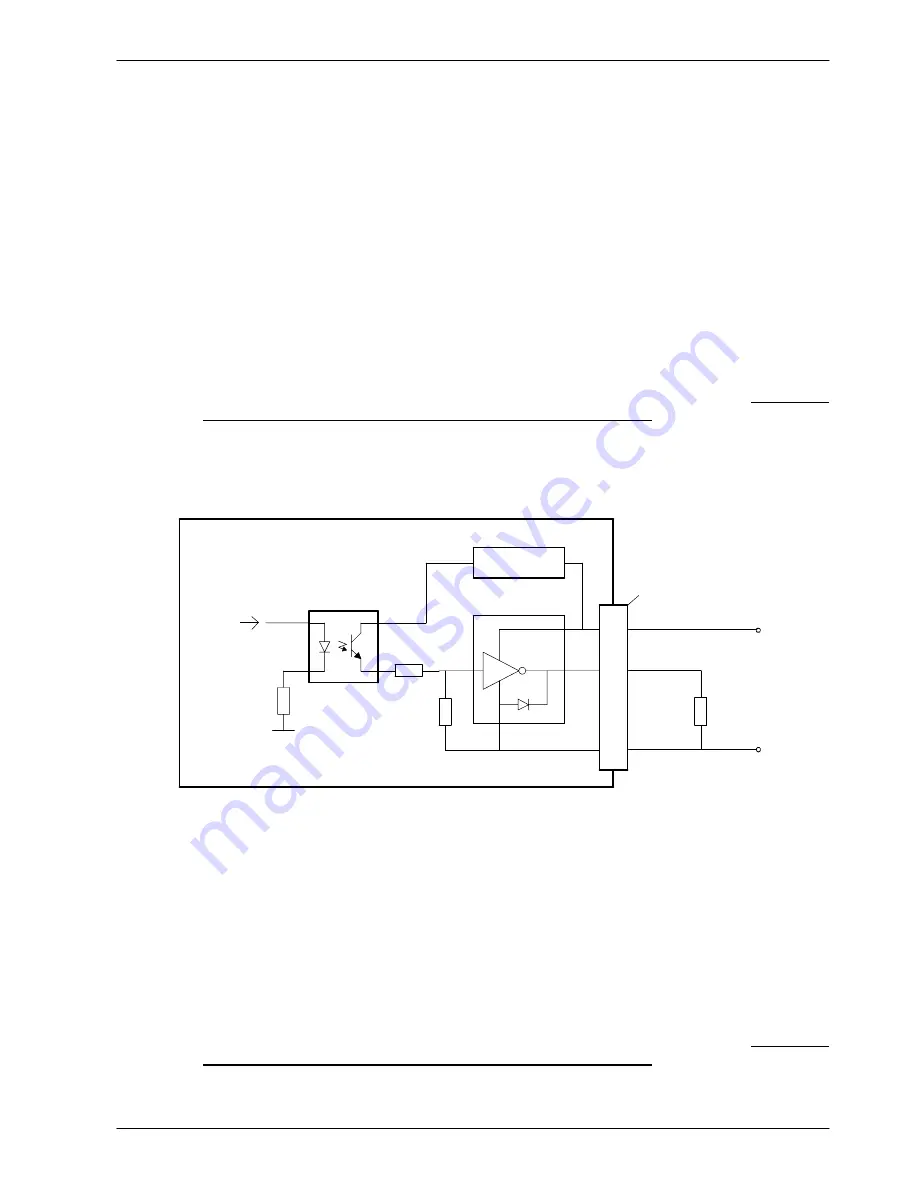
An external supply (typically 24 VDC) is used to power the UDN2982 output devices, as shown
in Figure 15. When an output is activated, current is sourced from the user supply through a
UDN2982 output driver.

H

A total of 500 mA may be sourced by DOUT0 - DOUT7, providing an average 62.5 mA per
output when all outputs are on (100% duty cycle, 24 V supply). If the total current exceeds
1 A a self-resetting fuse will operate, which may take a few minutes to reset.

H

An individual output can provide a maximum continuous current of 350 mA, but if other
outputs are being used the total current must not exceed 500 mA.

H

The maximum allowable power dissipation for the UDN2982 driver is 1.5 W.

If an output is used to drive an inductive load such as a relay, a suitably rated diode must be fitted
across the relay coil, observing the correct polarity. The use of shielded cable is recommended.

TLP281

NextMove

e

100

Mint

OUTX(0)

DOUT0

USR GND

1

10

UDN2982

User
supply

24 V

User
supply

GND

Output
Load

USR V+

9

GND

Voltage

regulator

‘X11’

Figure 15 - Digital outputs (DOUT0-7) - DOUT0 shown

4.3.2.2 DOUT8 - DOUT11

DOUT8 - DOUT11 use the same type of output circuitry as DOUT0 - DOUT7, with their own
UDN2982 output driver. Because only four of the UDN2982’s eight outputs are being used, the
average current available on DOUT8 - DOUT11 is increased:

H

A total of 500 mA may be sourced by DOUT8 - DOUT11, providing an average 125 mA per
output when all outputs are on (100% duty cycle, 24 V supply). If the total current exceeds
1 A a self-resetting fuse will operate, which may take a few minutes to reset.

H

An individual output can provide a maximum continuous current of 350 mA, but if other
outputs are being used the total current must not exceed 500 mA.

H

The maximum allowable power dissipation for the UDN2982 driver is 1.5 W.

Содержание NXE100-1608Dx

Страница 1: ......

Страница 2: ......

Страница 3: ...alog I O 4 3 4 2 1 Analog inputs 4 3 4 2 2 Analog outputs 4 5 4 3 Digital I O 4 7 4 3 1 Digital inputs 4 7 4 3 2 Digital outputs and relay 4 11 4 3 3 Stepper control outputs models NXE100 16xxDx 4 13 4 3 4 Stepper control outputs models NXE100 16xxSx 4 14 4 4 Other I O 4 15 4 4 1 Encoder inputs 0 2 4 15 4 4 2 Node ID selector switches 4 17 4 5 USB and serial communication 4 20 4 5 1 USB port 4 20 ...

Страница 4: ...l 5 8 5 4 Mint WorkBench 5 9 5 4 1 Help file 5 10 5 4 2 Starting Mint WorkBench 5 11 5 5 Configuring axes 5 13 5 5 1 Local axes remote axes and profilers 5 13 5 5 2 Configuring remote axes 5 14 5 5 3 Configuring local axes 5 16 5 5 4 Selecting a scale 5 17 5 5 5 Setting the drive enable output optional 5 19 5 5 6 Testing the drive enable output 5 21 5 6 Local stepper axis testing 5 22 5 6 1 Testin...

Страница 5: ...4 Communication 6 4 6 2 5 Motor control 6 4 6 2 6 Mint WorkBench 6 5 6 2 7 Ethernet 6 6 6 2 8 CANopen 6 6 7 Specifications 7 1 7 1 Introduction 7 1 7 1 1 Input power 7 1 7 1 2 Analog inputs 7 1 7 1 3 Analog outputs 7 1 7 1 4 Digital inputs 7 2 7 1 5 Digital outputs 7 2 7 1 6 Relay output 7 2 7 1 7 Stepper control outputs 7 3 7 1 8 Encoder inputs 7 3 7 1 9 Serial port 7 3 7 1 10 Ethernet interface ...

Страница 6: ...ines B 1 B 1 Outline B 1 B 1 1 EMC Conformity and CE marking B 1 B 1 2 NextMove e100 compliance B 1 B 1 3 Use of CE compliant components B 2 B 1 4 EMC installation suggestions B 2 B 1 5 Wiring of shielded screened encoder cables B 2 ...

Страница 7: ...nd has been used in accordance with the instructions and or ratings supplied This warranty is in lieu of any other warranty or guarantee expressed or implied BALDOR shall not be held responsible for any expense including installation and removal inconvenience or consequential damage including injury to any person or property caused by items of our manufacture or sale Some countries and U S states ...

Страница 8: ...use can cause serious or fatal injury The stop input to this equipment should not be used as the single means of achieving a safety critical stop Drive disable motor disconnect motor brake and other means should be used as appropriate Improper operation or programming may cause violent motion of the motor shaft and driven equipment Be certain that unexpected motor shaft movement will not cause inj...

Страница 9: ...plus external axes over the ETHERNET Powerlink connection H Point to point moves software cams and gearing complex path control splines etc H 20 general purpose digital inputs software configurable as level or edge triggered H 12 general purpose digital outputs and 1 relay output H 2 differential analog inputs with 12 bit resolution H 4 single ended analog outputs with 12 bit resolution H USB 1 1 ...

Страница 10: ...int WorkBench will install ActiveX interfaces that allow PC applications to be written that communicate with the NextMove e100 This manual is intended to guide you through the installation of NextMove e100 The chapters should be read in sequence The Basic Installation section describes the mechanical installation of the NextMove e100 The following sections require knowledge of the low level input ...

Страница 11: ...red in a location that conforms to the storage humidity and temperature specifications shown in section 3 1 1 2 2 1 Identifying the catalog number Different models of NextMove e100 are available As a reminder of which product has been installed it is a good idea to write the catalog number in the space provided below NextMove e100 catalog number NXE100 16___D_ or NXE100 16___S_ Installed in ______...

Страница 12: ... in Automation International Users and Manufacturers Group e V CTRL E on the PC keyboard press Ctrl then E at the same time DAC Digital to Analog Converter DS301 CiA CANopen Application Layer and Communication Profile DS401 CiA Device Profile for Generic I O Devices DS402 CiA Device Profile for Drives and Motion Control DS403 CiA Device Profile for HMIs EDS Electronic Data Sheet EMC Electromagneti...

Страница 13: ... below water steam pipes Avoid locating the NextMove e100 in the vicinity of corrosive substances or vapors metal particles and dust The safe operation of this equipment depends upon its use in the appropriate environment The following points must be considered H The NextMove e100 is designed to be mounted indoors permanently fixed and located H The NextMove e100 must be secured by the slots in th...

Страница 14: ...e vertical surface Orientation must be as shown in Figure 1 with the two slots in the metal carrier heat sink assembly at the bottom 140 5 51 129 5 08 170 6 69 250 9 84 All dimensions shown as mm inches 40 3 1 59 Mounting keyhole and slot detail A B C A 4 5 mm B 10 mm C 11 mm A Drawings not to scale Figure 1 Package dimensions There must be at least 20 mm 0 8 in clearance between the NextMove e100...

Страница 15: ...II 4 or equivalent 1 GHz or faster RAM 128 MB 1 GB Hard disk space 50 MB 50 MB CD ROM A CD ROM drive Communication USB port RS232 RS485 422 serial port or Ethernet port Screen 1024 x 768 16 bit color 1152 x 864 16 bit color Mouse A mouse or similar pointing device Operating system Windows 2000 Windows XP or Windows Vista The Ethernet configuration used by a normal office PC is not suitable for dir...

Страница 16: ...www baldormotion com 3 4 Basic Installation MN1941 ...

Страница 17: ...al Output AIN Analog Input AOUT Analog Output Common electrical connections use the following abbreviations AGND Analog ground Used by the analog input and output circuits USR V User power supply V Provides power to the digital outputs USR GND User power supply ground Return connection for the user power supply CREFx Common reference The common connection for a group of digital inputs DGND Digital...

Страница 18: ...T5 DOUT6 DOUT7 USR V USR GND 1 2 3 4 5 6 7 8 9 10 X10 DIN 0 3 fast interrupts DIN3 Shield CREF0 DIN2 Shield CREF0 DIN1 Shield CREF0 DIN0 1 2 3 4 5 6 7 8 9 10 X9 DIN 4 11 DIN11 DIN10 DIN9 DIN8 DIN7 DIN6 DIN5 DIN4 CREF1 Shield 1 2 3 4 5 6 7 8 9 10 X8 DIN 12 19 DIN19 DIN18 DIN17 DIN16 DIN15 DIN14 DIN13 DIN12 CREF2 Shield 1 2 3 4 5 6 7 8 9 10 X13 AOUT 0 3 demands Demand0 AGND Shield Demand1 AGND Shiel...

Страница 19: ...d The analog inputs pass through a differential buffer and second order low pass filter with a cut off frequency of approximately 1 kHz Both inputs are normally sampled at 2 kHz However an input can be disabled by setting ADCMODE to 4 _acOFF With one input disabled the remaining input will be sampled at 4 kHz In Mint analog inputs can be read using the ADC keyword See the Mint help file for full d...

Страница 20: ...0 1 2 3 X12 AIN0 Differential connection Single ended connection AIN0 1 2 3 AIN0 GND Figure 3 AIN0 analog input wiring AIN0 1 kΩ 0 25 W potentiometer ADC 0 2 1 X12 1 5 kΩ 0 25 W 0 V 24 VDC 3 Figure 4 Typical input circuit to provide 0 10 V approx input from a 24 V source ...

Страница 21: ...e section 5 5 3 All of the outputs may be used as general purpose analog outputs provided they have not been assigned to an axis see the DAC keyword in the Mint help file The analog outputs may be used to drive loads of 1 kΩ or greater Shielded twisted pair cable should be used The shield connection should be made at one end only NextMove e100 Demand0 Demand 100 AGND TL084 1 2 15 V 15 V X13 Figure...

Страница 22: ...ove e100 Demand0 AGND 2 FlexDriveII servo amplifier AIN0 AIN0 Connect overall shield at one end only 3 Shield Servo amplifier 10 VDC demand input 1 2 1 X1 X13 Figure 7 Analog output typical connection to a Baldor FlexDriveII Flex DriveII or MintDriveII ...

Страница 23: ... can be assigned to a special purpose function such as a home limit stop or error input See the keywords HOMEINPUT LIMITFORWARDINPUT LIMITREVERSEINPUT STOPINPUT and ERRORINPUT in the Mint help file 4 3 1 1 DIN0 DIN3 Digital inputs DIN0 to DIN3 can be assigned as fast interrupts These are used as high speed position latches allowing any combination of axes to be captured by the hardware The latency...

Страница 24: ...9 General purpose digital input DIN11 shown If an input is configured as edge triggered the triggering pulse must have a duration of at least 1 ms one software scan to guarantee acceptance by Mint The use of shielded cable for inputs is recommended 4 3 1 3 DIN12 DIN19 Digital inputs DIN12 to DIN19 have the same electrical specification as DIN4 11 except that they use CREF2 as their common connecti...

Страница 25: ...100R Figure 12 Digital input typical active low input connection using a switch Note The circuits shown in Figures 11 and 12 are not suitable for use with fast inputs DIN0 to DIN3 Using a mechanical switch relay contacts or other source liable to signal bounce could cause unwanted multiple triggering NextMove e100 Status Status 8 9 MicroFlex e100 equipment output DIN4 CREF1 TLP 127 TLP281 User sup...

Страница 26: ...41 NextMove e100 USR V DOUT0 8 9 FlexDriveII equipment output NEC PS2562L 1 X1 User supply GND User supply 24 V 6 18 DIN4 CREF1 X9 TLP281 6k2 100R Figure 14 Digital input typical connections from a Baldor FlexDriveII Flex DriveII or MintDriveII ...

Страница 27: ...0 mA but if other outputs are being used the total current must not exceed 500 mA H The maximum allowable power dissipation for the UDN2982 driver is 1 5 W If an output is used to drive an inductive load such as a relay a suitably rated diode must be fitted across the relay coil observing the correct polarity The use of shielded cable is recommended TLP281 NextMove e100 Mint OUTX 0 DOUT0 USR GND 1...

Страница 28: ...OM is connected to REL NO In the event of an error or power loss the relay is de energized and REL COM is connected to REL NC For control purposes the relay is considered to be another digital output DOUT12 and can be controlled directly using the Mint OUT or OUTX keywords The relay can be configured as the global error output by setting GLOBALERROROUTPUT to 12 See the Mint help file Relay REL COM...

Страница 29: ...60 Hz and 5 MHz Values less than 60 Hz will produce no output see the Mint help file The DS26LS31 drivers are static sensitive devices Take appropriate ESD precautions when handling the NextMove e100 When connecting the outputs to single ended inputs as shown in Figures 17 and 18 do not connect the STEPx or DIRx outputs to ground leave them unconnected STEP0 DGND 1 DS26LS31 STEP0 3 NextMove e100 S...

Страница 30: ...N2003 drivers are static sensitive devices Take appropriate ESD precautions when handling the NextMove e100 A 5 V supply is provided on connectors X2 and X3 for powering external circuits as shown in Figure 19 The same 5 V supply is also present on connectors X5 X6 and X7 for powering encoders Ensure that the total combined current demand of all 5 V outputs does not exceed 600 mA In situations whe...

Страница 31: ...g the encoders On models NXE100 16xxSx the same 5 V supply is also present on connectors X2 and X3 for powering external circuits see section 4 3 4 Ensure that the total combined current demand of all 5 V outputs does not exceed 600 mA If the total current exceeds 1 A a self resetting fuse will operate which may take a few minutes to reset 4 4 1 1 Encoder input frequency The maximum encoder input ...

Страница 32: ...FlexDriveII Flex DriveII MintDriveII encoder output 5 DGND Connect internal shield to DGND Do not connect other end CHA CHA 1 6 X7 CHB CHB MAX3096 120R 2 7 Twisted pair CHB CHB 2 7 CHZ CHZ MAX3096 120R 3 8 Twisted pair CHZ CHZ 3 8 to CPU to CPU Vcc 10k Vcc 10k X5 DGND 5 Figure 20 Encoder input 0 typical connection from a servo amplifier e g Baldor MicroFlex FlexDriveII Flex DriveII or MintDriveII ...

Страница 33: ...194 C 2 3 0 3 67 4 3 131 8 3 195 C 3 4 0 4 68 4 4 132 8 4 196 C 4 5 0 5 69 4 5 133 8 5 197 C 5 6 0 6 70 4 6 134 8 6 198 C 6 7 0 7 71 4 7 135 8 7 199 C 7 8 0 8 72 4 8 136 8 8 200 C 8 9 0 9 73 4 9 137 8 9 201 C 9 10 0 A 74 4 A 138 8 A 202 C A 11 0 B 75 4 B 139 8 B 203 C B 12 0 C 76 4 C 140 8 C 204 C C 13 0 D 77 4 D 141 8 D 205 C D 14 0 E 78 4 E 142 8 E 206 C E 15 0 F 79 4 F 143 8 F 207 C F 16 1 0 80...

Страница 34: ...175 A F 239 E F 48 3 0 112 7 0 176 B 0 240 F 0 49 3 1 113 7 1 177 B 1 241 F 1 50 3 2 114 7 2 178 B 2 242 F 2 51 3 3 115 7 3 179 B 3 243 F 3 52 3 4 116 7 4 180 B 4 244 F 4 53 3 5 117 7 5 181 B 5 245 F 5 54 3 6 118 7 6 182 B 6 246 F 6 55 3 7 119 7 7 183 B 7 247 F 7 56 3 8 120 7 8 184 B 8 248 F 8 57 3 9 121 7 9 185 B 9 249 F 9 58 3 A 122 7 A 186 B A 250 F A 59 3 B 123 7 B 187 B B 251 F B 60 3 C 124 7...

Страница 35: ...pt commands from the manager node H Node ID 240 F0 causes the node to become the manager node a node that will control the timing and issue commands to controlled nodes There must only be one manager node on the network H Node IDs 241 255 F1 FF are reserved for special purposes and cannot be used For all other communication channels such as CANopen USB and serial the node ID is set in software Eac...

Страница 36: ...it is connected to a slower USB1 0 host PC or hub communication speed will be limited to the USB1 0 specification 1 5 Mbps If it is connected to a faster USB2 0 480 Mbps host PC or hub communication speed will remain at the USB1 1 specification of the NextMove e100 Ideally the NextMove e100 should be connected directly to a USB port on the host PC If it is connected to a hub shared by other USB de...

Страница 37: ...lue is restored at power up The port is capable of operation at up to 115 2 Kbaud 4 5 3 Using RS232 The NextMove e100 has a full duplex RS232 serial port with the following preset configuration H 57 6 Kbaud H 1 start bit H 8 data bits H 1 stop bit H No parity H Hardware handshaking lines RTS and CTS must be connected The RS232 port is configured as a DCE Data Communications Equipment unit so it is...

Страница 38: ...ngle point to point applications involving only one Baldor controller If firmware is updated over RS485 RS422 it can only be downloaded to the controller that was chosen in the Select Controller dialog in Mint WorkBench Master and final slave are shown with terminating resistors TR typical value 120 Ω Network slave TR RXB DGND RXA TXA TXB RXB DGND RXA TXA TXB RXB DGND RXA TXA TXB Twisted pairs TR ...

Страница 39: ...complexity of the system 4 5 5 Connecting serial Baldor HMI Operator Panels Serial Baldor HMI Operator Panels use a 15 pin male D type connector marked PLC PORT but the NextMove e100 Serial connector uses a 9 pin male D type connector The NextMove e100 may be connected as shown in Figure 24 7 RTS 8 CTS 3 TXD 2 RXD 5 GND 1 RXD 2 TXD 3 GND 5 Baldor HMI PLC PORT NextMove e100 Serial Port Twisted pair...

Страница 40: ...rmware to be sent to the controller over the Ethernet network When operating in standard Ethernet mode TCP IP cannot be used to communicate with a controller on a daisy chained network This is due to cumulative timing errors caused by each controller s internal hub It is necessary to connect the host PC to the controller either directly or via a switch or hub as shown in Figure 26 A switch is pref...

Страница 41: ...equipment This allows nodes to be connected as a daisy chain network of up to 10 nodes avoiding the need for additional hubs If the network comprises more than 10 nodes an external hub must be used The structure of the physical network is informal so does not need to reflect the logical relationship between nodes Ethernet switches must not be used in EPL networks as their timing cannot be guarante...

Страница 42: ...e network consists of only Baldor EPL controllers and drives and any hub straight or crossed cables may be used This is because many Ethernet devices including hubs and all Baldor EPL products incorporate Auto MDIX switching technology which automatically compensates for the wiring of the straight cable However if other manufacturer s EPL nodes are included in the EPL network crossover cables shou...

Страница 43: ...emale D type Pin Name Description 1 NC 2 CAN CAN channel negative 3 CAN GND Ground earth reference for CAN signals 4 NC 5 Shield Shield connection 6 CAN GND Ground earth reference for CAN signals 7 CAN CAN channel positive 8 NC 9 CAN V CAN power V 12 24 V 4 7 2 CAN wiring A very low error bit rate over CAN can only be achieved with a suitable wiring scheme so the following points should be observe...

Страница 44: ...he CAN connector From this supply an internal voltage regulator provides the 5 V at 100 mA required for the isolated CAN circuit A connector such as the Phoenix Contact SUBCON PLUS F3 Phoenix part 2761871 provides a 9 pin D type female connector with easily accessible terminal block connections CAN cables supplied by Baldor are category 5 and have a maximum current rating of 1 A so the maximum num...

Страница 45: ...of a CANopen network must be carried out by a single node acting as the network master This role can be performed by the NextMove e100 when it is configured to be the Network Manager node node ID 1 or by a third party CANopen master device Up to 126 CANopen nodes node IDs 2 to 127 can be added to the network by a NextMove e100 Manager node using the Mint NODESCAN keyword If successful the nodes ca...

Страница 46: ...ired to allow the NextMove e100 and a single axis servo amplifier to work together Details of the connector pins are shown in Table 2 Servo amplifier axis 0 Encoder output from drive or motor Gnd Enable Demand Demand Host PC 24 V control supply 24V 0V X13 X5 X1 NextMove e100 1 2 3 9 10 X12 Common earth ground USB connection USB Figure 31 Example minimum system wiring ...

Страница 47: ...y ground 2 24 V Control supply 24 V input X5 Encoder0 Encoder0 feedback input Encoder output X12 9 REL NO Normally open relay contact closed to enable drive Enable 24 V 10 REL COM Common relay connection Enable GND X13 1 Demand0 Demand output 0 Demand 2 AGND Analog GND Demand 3 Shield Shield connection Do not connect Table 2 Connector details for minimum system wiring shown in Figure 31 ...

Страница 48: ...d to allow the NextMove e100 and a single axis EPL servo amplifier e g MicroFlex e100 to work together Details of the connector pins are shown in Table 3 Remote EPL servo amplifier MicroFlex e100 Drive Enable Host PC 24 V control supply 24V 0V E1 E2 Ethernet X1 NextMove e100 9 10 X12 Common earth ground USB connection USB Ethernet Figure 32 Example minimum system wiring ...

Страница 49: ...ns may be labeled differently X1 1 0 V Control supply ground 2 24 V Control supply 24 V input X12 9 REL NO Normally open relay contact closed to enable drive Drive Enable 10 REL COM Common relay connection Drive Enable E1 E2 Ethernet Ethernet EPL communication E1 E2 Table 3 Connector details for minimum system wiring shown in Figure 32 ...

Страница 50: ...www baldormotion com 4 34 Input Output MN1941 ...

Страница 51: ...T5e Ethernet cable between the PC and one of the NextMove e100 Ethernet ports You cannot connect an ordinary office PC to the NextMove e100 without first altering the PC s Ethernet adapter configuration However if you have installed a second Ethernet adapter dedicated for use with the NextMove e100 then this adapter s configuration can be altered without affecting the PC s office Ethernet connecti...

Страница 52: ...tallation 1 Insert the CD into the drive 2 After a few seconds the setup wizard should start automatically If the setup wizard does not appear select Run from the Windows Start menu and type d start where d represents the drive letter of the CD device Follow the on screen instructions to install MMC including Mint WorkBench The setup wizard will copy the files to appropriate folders within the C P...

Страница 53: ...NextMove e100 to the PC using the USB connection it will be necessary to install the USB driver When the NextMove e100 is powered Windows will automatically detect the controller and request the driver The driver consists of two files USBmotion inf and USBmotion sys Both files must be present for installation 1 Follow the on screen instructions to select and install the driver The driver files are...

Страница 54: ...ettings Network Connections 2 In the Network Connections Window right click the Local Area Connection entry for the required Ethernet adapter and choose Properties 3 In the Local Area Connection Properties dialog in the This connection uses the following items list select the Internet Protocol TCP IP entry and click Properties 4 In the Internet Protocol TCP IP Properties dialog on the General tab ...

Страница 55: ...C to scan for all connected controllers Clicking once on a controller s name causes various options to be displayed in the information pane Double clicking on a controller s name launches an instance of Mint WorkBench that is automatically connected to the controller Application View allows the layout and organization of controllers in your machine to be modelled and described on screen Controller...

Страница 56: ...Mint Machine Center USB RS232 RS485 422 MintDriveII MicroFlex e100 MintDriveII MicroFlex e100 USB Mint WorkBench Ethernet Mint WorkBench Mint WorkBench Mint WorkBench Mint WorkBench Host PC Figure 34 Typical network visibility provided by Mint Machine Center ...

Страница 57: ...that Host is selected In the information pane click Scan 3 When the search is complete click once on NextMove e100 in the controller pane to select it then double click to open an instance of Mint WorkBench The NextMove e100 will be already connected to the instance of Mint WorkBench ready to configure Go straight to section 5 5 to continue the configuration in Mint WorkBench ...

Страница 58: ... ID selector switches are not set to F0 Although F0 is the correct node ID to make the NextMove e100an EPLmanager node the remote nodes have not yet been configured for EPL operation so will be ignored if the NextMove e100 is operating as a manager node In this example communications will use standard Ethernet not EPL 1 In the controller pane ensure that Host is selected In the information pane cl...

Страница 59: ...tions can be accessed from the menu or by clicking a button use whichever you prefer Most buttons include a tool tip hold the mouse pointer over the button don t click and its description will appear Mint WorkBench can be started directly from the Windows Start menu or automatically by double clicking on a controller in the MMC s controller pane see section 5 3 1 Toolbox Menu system Toolbars Contr...

Страница 60: ... The Index tab provides an alphabetic list of all topics in the file and allows you to search for them by name The Search tab allows you to search for words or phrases appearing anywhere in the help file Many words and phrases are underlined and highlighted with a color normally blue to show that they are links Just click on the link to go to an associated keyword Most keyword topics begin with a ...

Страница 61: ... you have already used MMC to start an instance of Mint WorkBench then the following steps are unnecessary Go to section 5 5 to continue configuration 1 On the Windows Start menu select Programs Mint Machine Center Mint WorkBench 2 In the opening dialog box click Start New Project ...

Страница 62: ... e100 When the search is complete click NextMove e100 in the list to select it and then click Select Note If the NextMove e100 is not listed check the USB or serial cable between the NextMove e100 and the PC Check that the NextMove e100 is powered correctly and has completed its startup sequence indicated by the slowly flashing green Status LED Click Scan to re scan the ports 4 A dialog box may be...

Страница 63: ...tMove e100 s edge connectors STEP DIR for stepper axes Demand and ENC for servo axes 5 5 1 2 Remote axes In addition to the 7 local axes the NextMove e100 can also control several remote axes Remote axes are drive amplifiers such as MicroFlex e100 connected to the NextMove e100 over the EPL connection There are three ways for the NextMove e100 the manager node to control a remote axis a controlled...

Страница 64: ...on Wizard is used to assign the node IDs and axis numbers 1 In the Toolbox click the System Configuration icon 2 On the EPL Devices page click Add Device 3 In the central drop down box select the type of EPL device for example MicroFlex e100 At the top of the window selectthe nodeID of the EPL device The node ID allows the NextMove e100 to uniquely identify the EPL device on the network Click OK T...

Страница 65: ...Move e100 contains a statement such as MOVER 5 20 the NextMove e100 will send a demand to the remote axis 5 to move 20 units 6 Click Close in the Resource Mapping window The EPL device is now listed in the EPL Devices page Note As shown in the preceding example the EPL device s assigned axis number 5 and node ID 8 do not have to be the same However in small networks it may be beneficial to assign ...

Страница 66: ...Add Local Axis to display the Configure Local Axis window 4 In the Configure Local Axis window select one of the available axis numbers This is the axis number thatwill beassigned tothe local axis To create a servo axis Select the Servo radio button In the Servo frame choose which encoder input s will be used as the feedback input s and which DAC output Demandx output will be used for the axis To ...

Страница 67: ...e number of steps per revolution Typically this would be 200 for a motor with a 1 8 step angle or 400 if driven in half step mode By setting a SCALEFACTOR of 200 or 400 if driven in half step mode the user unit becomes revolutions In applications involving linear motion a suitable value for SCALEFACTOR would allow commands to express values in linear distance for example millimeters inches or feet...

Страница 68: ...arameters tool Note The parameter list also contains entries for PosScaleFactor VelScaleFactor and AccelScaleFactor These parameters are provided to comply with the CANopen DS402 Device Profile for Drives and Motion Control which specifies separate scaling for position velocity and acceleration Each can be set to different values so that for example position could be specified in mm velocity in m ...

Страница 69: ... e g MicroFlex e100 a physical drive enable connection from the NextMove e100 may not be required The remote axis drive enable input can be wired to external safety stop circuits to provide a fail safe method for disabling the drive while in normal operation commands over the EPL network can be used to enable disable the drive 1 In the Toolbox click the Digital I O icon 2 At the bottom of the Digi...

Страница 70: ...le axes to use the relay output repeat this step for the other axes If you are going to use a digital output drag the bright blue OUT icon to the grey Drive EnableOP axis iconon the right of the screen To configure multiple axes with the same drive enable output repeat this step for the other axes 5 Click Apply at the bottom of the screen This sends the output configuration to the NextMove e100 ...

Страница 71: ... selected axes are toggled When the button is in the pressed down position the drive amplifier should be enabled When the button is in the raised up position the drive amplifier should be disabled If this is not working or the action of the button is reversed check the electrical connections between the NextMove e100 and drive amplifier If you are using the relay check that you are using the corre...

Страница 72: ...the Command window 4 Type JOG 0 2 where 0 is the axis to be tested and 2 is the speed The JOG command specifies the speed in user units per second so the speed is affected by SCALEFACTOR section 5 5 4 If you have not selected a scale the command JOG 0 2 will cause rotation at only 2 half steps per second so it may be necessary to increase this figure significantly to 200 for example If you have se...

Страница 73: ...own 2 In the Toolbox click the Edit Debug icon 3 Click in the Command window 4 Type TORQUEREF 0 5 where 0 is the axis to be tested In this example this shouldcause ademand of 5 of maximum output 0 5 V to be produced at the DEMAND0output connector X13 pin1 In Mint WorkBench look at the Spy window located on the right of the screen In the Axis selection box at the top select Axis 0 The Spy window s ...

Страница 74: ...DERMODE keywords should be used The DACMODE keyword is used to invert the demand output voltage The ENCODERMODE keyword must then also be used to reverse the incoming feedback signal to correspond with the inverted demand output Note that if ENCODERMODE had already been used to compensate for a reversed encoder count as described in step 4 above it will be necessary to change it back to its origin...

Страница 75: ...the gas pedal so hard you go right past Demand To try and stay level you ease off the gas but end up falling behind a little You keep repeating this and after a few tries you end up level with Demand traveling at a steady speed This is what you wanted to do but it has taken you a long time If the Proportional gain is increased still further the system becomes unstable you keep pressing and then le...

Страница 76: ...gain has a de stabilizing effect but a small amount can be used to reduce any steady state errors By default KINTMODE is always on mode 1 H KINTLIMIT The integration limit determines the maximum value of the effect of integral action This is specified as a percentage of the full scale demand H KDERIV This gain has a damping effect dependent on the rate of change of error and so is particularly use...

Страница 77: ...www baldormotion com Operation 5 27 MN1941 Figure 37 The NextMove e100 servo loop ...

Страница 78: ...ck signal Note The method explained in this section should allow you to gain good control of the motor but will not necessarily provide the optimum response without further fine tuning Unavoidably this requires a good understanding of the effect of the gain terms 1 In the Toolbox click the Fine tuning icon The Fine tuning window is displayed at the right of the screen The main area of the Mint Wor...

Страница 79: ...units could be expressed in revolutions or other unit of your choice then those are the units that will be used here If you did not set a scale the amount you enter will be in encoder counts 6 Click in the Duration box and enter a duration for the move in seconds This should be a short duration for example 0 15 seconds 7 Click Go The NextMove e100 will perform the move and the motor will turn As t...

Страница 80: ...8 then the value for KDERIV should be increased to add extra damping to the move If the overshoot is excessive or oscillation has occurred it may be necessary to reduce the value of KPROP Measured position Demand position Figure 38 Underdamped response 9 Click in the KDERIV and or KPROP boxes and make the required changes The ideal response is shown in section 5 8 4 ...

Страница 81: ...own in Figure 39 then the value for KDERIV should be decreased to reduce the damping of the move If the overdamping is excessive it may be necessary to increase the value of KPROP Measured position Demand position Figure 39 Overdamped response 10 Click in the KDERIV and or KPROP boxes and make the required changes The ideal response is shown in section 5 8 4 ...

Страница 82: ...esponse If the graph shows that the response reaches the demand quickly and only overshoots the demand by a small amount this can be considered an ideal response for most systems See Figure 40 Measured position Demand position Figure 40 Critically damped ideal response ...

Страница 83: ...that a positive demand causes a positive feedback signal 5 9 1 Calculating KVELFF To calculate the correct value for KVELFF you will need to know H The speed in revolutions per minute produced by the motor when a maximum demand 10 V is applied to the drive amplifier H The axis position loop update rate the Control Rate setting selected in the Config Local Axis dialog see section 5 5 3 H The resolu...

Страница 84: ... desired position 6 In the Move Type drop down box check that the move type is set to Trapezoid 7 Click intheDistancebox andenter adistance for the step move It is recommended to set a value that will cause the motor to make a few revolutions for example 10 Note The distance depends on the scale set in section 5 5 4 If you set a scale so that units could be expressed in revolutions or other unit o...

Страница 85: ...y to make changes to the calculated value of KVELFF If the trace for Measured velocity appears above the trace for Demand velocity reduce the value of KVELFF If the trace for Measured velocity appears below the trace for Demand velocity increase the value of KVELFF Repeat the test after each change When the two traces appear on top of each other approximately the correct value for KVELFF has been ...

Страница 86: ...y 1 Click in the KPROP box and enter a starting value of 0 1 2 Click Go The NextMove e100 will perform the move and the motor will turn As the soon as the move is completed Mint WorkBench will upload captured data from the NextMove e100 The data will then be displayed in the Capture window as a graph Note The graph that you see will not look exactly the same as the graph shown here Remember that e...

Страница 87: ...r which represents the following error Adjust KPROP by small amounts until the two traces appear on top of each other approximately as shown in Figure 42 Note It may be useful to use the zoom function to magnify the end point of the move In the graph area click and drag a rectangle around the end point of the traces To zoom out right click in the graph area and choose Reset Zoom ...

Страница 88: ...ive amplifiers a non zero demand output is required to hold the load in the correct position to achieve zero following error Care is required when setting KINT since a high value will cause instability during moves A typical value for KINT would be 0 1 The effect of KINT should also be limited by setting the integration limit KINTLIMIT to the smallest possible value that is sufficient to overcome ...

Страница 89: ...me or Limit input There is one Axis x row for each local axis configured in section 5 5 3 In the following example digital input 1 will be set to trigger on an active low input and allocated to the forward limit input of axis 0 1 In the Toolbox click the Digital I O icon 2 At the bottom of the Digital I O screen click the Digital Inputs tab The left of the screen shows a column of yellow icons Hig...

Страница 90: ...send the changes to the NextMove e100 Note If required multiple inputs can be configured before clicking Apply 5 11 2 Digital output configuration The Digital Outputs tab allows you to define how each digital output will operate and if it is to be configured as a drive enable output see section 5 5 5 Remember to click Apply to send the changes to the NextMove e100 ...

Страница 91: ...en be e mailed saved as a text file or copied to another application The PC must have e mail facilities to use the e mail feature If you prefer to contact Baldor technical support by telephone or fax contact details are provided at the front of this manual Please have the following information ready H The serial number of your NextMove e100 if known H Use the Help SupportMe menu item in Mint WorkB...

Страница 92: ...d The green LED indicates the state of the node s internal CANopen state machine The red LED indicates the state of the physical CANopen bus Green run X Off Node initializing or not powered 1 flash Node in STOPPED state 3 flashes Software is being downloaded to the node Continuous flashing Node in PRE OPERATIONAL state Flickering very fast flashing Auto baudrate detection or LSS services in progre...

Страница 93: ...ed by the manager node 1 flash Node in PRE OPERATIONAL1 state EPL mode is starting 2 flashes Node in PRE OPERATIONAL2 state EPL mode is starting 3 flashes Node in READY TO OPERATE state The manager node is starting to transmit to controlled nodes that are ready A controlled node is signalling its readiness to operate Blinking continuous flashing Node in STOPPED state A controlled node has been dea...

Страница 94: ...g check that the NextMove e100 s node ID for the bus is not higher than this value or search up to a greater node ID Cannot communicate with the controller H Verify that Mint WorkBench is loaded and that NextMove e100 is the currently selected controller Cannot communicate with the controller after downloading firmware H After firmware download always power cycle the controller remove 24 V power a...

Страница 95: ...om electrical noise they are correctly wired to the controller when the motor turns the two square wave signals are approximately 90 degrees out of phase Also check the complement signals H Ensure that the encoder cable uses shielded twisted pair cable with the outer shield connected at both ends and the inner shields connected only at the NextMove e100 end H Local stepper outputs only The motor i...

Страница 96: ...umber of Tx and or Rx errors greater than the passive threshold of 127 Check H 12 24 V is being applied between pin 9 24 V and pin 6 or 3 0 V of the CAN connector to power the opto isolators H There is at least one other CANopen node in the network H The network is terminated only at the ends not at intermediate nodes H All nodes on the network are running at the same baud rate H All nodes have be...

Страница 97: ...at process H Try power cycling the node in question If the node in question does not conform to DS401 or DS403 and is not a Baldor CANopen node communication is still possible using a set of general purpose Mint keywords See the Mint help file for further details The node has been successfully scanned recognized by the Manager node but communication is still not possible For communication to be al...

Страница 98: ...www baldormotion com 6 8 Troubleshooting MN1941 ...

Страница 99: ... Description Unit Value Type Differential Common mode voltage range VDC 10 Input impedance kΩ 120 Input ADC resolution bits 12 includes sign bit Equivalent resolution 10 V input mV 4 9 Sampling interval μs 500 both inputs enabled 250 one input disabled 7 1 3 Analog outputs Description Unit Value Type Bipolar Output voltage range VDC 10 Output current maximum mA 10 Output DAC resolution bits 12 Equ...

Страница 100: ... Digital outputs Description Unit Value USR V supply voltage Nominal Minimum Maximum VDC 24 12 30 Output current Max source per output one output on Max source per output all outputs on Maximum total output current mA DOUT0 7 DOUT8 11 350 350 62 5 125 500 500 Update interval Mint Immediate Switching time No load on output With 7 mA or greater load 100 ms 10 μs 7 1 6 Relay output All models Unit Al...

Страница 101: ...inputs Description Unit Value Encoder input RS422 A B Differential Z index Maximum input frequency quadrature MHz 20 Output power supply to encoders 5 V 5 500 mA maximum total for all axes Maximum allowable cable length 30 5 m 100 ft 7 1 9 Serial port Unit All models Signal RS232 or RS485 422 non isolated Bit rates baud 9600 19200 38400 57600 default 115200 7 1 10 Ethernet interface Description Un...

Страница 102: ...r temperatures up to 31 C 87 F decreasingly linearly to 50 relative humidity at 45 C 113 F non condensing according to DIN40 040 IEC144 Maximum installation altitude above m s l m ft 2000 6560 Shock 10 G according to DIN IEC 68 2 6 29 or equivalent Vibration 1 G 10 150 Hz according to DIN IEC 68 2 6 29 or equivalent See also section 3 1 1 7 1 13 Weights and dimensions Description Value Weight Appr...

Страница 103: ...0 22 9 5 8 2 10 16 4 20 24 6 30 32 8 49 2 50 65 6 75 Available in North and South America only Table 4 Drive amplifier to NextMove e100 feedback cables If you are not using a Baldor cable be sure to obtain a cable that is a shielded twisted pair 0 34 mm2 22 AWG wire minimum with an overall shield Ideally the cable should not exceed 30 5 m 100 ft in length Maximum wire to wire or wire to shield cap...

Страница 104: ...s are available The supplies include short circuit overload over voltage and thermal protection Baldor catalog Input voltage Output voltage Output rating Baldor catalog number Input voltage Output voltage Output rating DR 75 24 75 W 3 2 A DR 120 24 110 230 VAC 24 VDC 120 W 5 A DRP 240 24 240 W 10 A Table 6 24 V power supplies ...

Страница 105: ...he responsibility of the system integrator to ensure that the entire system complies with all relative directives at the time of installing into service Motors and controls are used as components of a system per the EMC directive Hence all components installation of the components interconnection between components and shielding and grounding of the system as a whole determines EMC compliance The ...

Страница 106: ... mark compliance rests entirely with the party who offers the end system for sale such as an OEM or system integrator B 1 4 EMC installation suggestions To ensure electromagnetic compatibility EMC the following installation points should be considered to help reduce interference H Earthing grounding of all system elements to a central earth ground point star point H Shielding of all cables and sig...

Страница 107: ...ing steady state errors 5 38 overdamped response 5 31 selecting a scale 5 17 selecting servo loop gains 5 28 servo axis testing and tuning 5 23 setting the drive enable output 5 19 stepper axis testing 5 22 underdamped response 5 30 Connection summary 4 30 4 32 Connectors CAN 4 27 Ethernet 4 26 locations 4 2 serial 4 21 USB 4 20 Critically damped response 5 32 D Demand outputs 4 5 5 23 Digital I O...

Страница 108: ...9 help file 5 10 starting 5 11 N Node ID selector switches 4 17 O Operation 5 1 configuring the TCP IP connection 5 4 connecting to the PC 5 1 installing Mint Machine Center 5 2 installing Mint WorkBench 5 2 installing the USB driver 5 3 power on checks 5 3 preliminary checks 5 3 starting NextMove e100 5 3 Operator panels HMI operator panels 4 23 Overdamped response 5 31 P Power sources 3 3 7 1 24...

Страница 109: ...T TCP IP description 4 24 Testing demand output 5 23 drive enable output 5 21 servo axis 5 23 stepper axis 5 22 stepper output 5 22 Troubleshooting 6 1 CAN LEDs 6 2 CANopen 6 6 communication 6 4 Ethernet 6 6 ETHERNET LEDs 6 3 help file 5 10 Mint WorkBench 6 5 motor control 6 4 problem diagnosis 6 1 STATUS LED 6 2 SupportMe 6 1 TCP IP 6 6 Tuning See Configuration U Underdamped response 5 30 Units a...

Страница 110: ...Index MN1941 ...

Страница 111: ...e your comments in the space provided below remove this page from the manual and mail it to Manuals Baldor UK Ltd Mint Motion Centre 6 Bristol Distribution Park Hawkley Drive Bristol BS32 0BF United Kingdom Alternatively you can e mail your comments to manuals baldor co uk Comment continued Comments ...

Страница 112: ...Comments MN1941 Thank you for taking the time to help us ...

Страница 113: ......

Страница 114: ......

Отзывы: