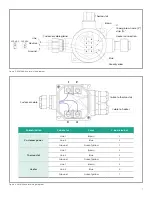
4. Turn the locking mechanism clockwise until it first
touches the top of the thread-o-let.
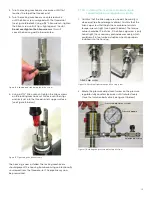
5. Turn the locking mechanism counterclockwise
until the Allen screw is aligned with the thread slot
(see Figure 14 below). Using a 1/8” Allen wrench, tighten
the Allen screw until its tip is tight against the slot.
Do not overtighten the Allen screw
as this will
cause the housing wall to be indented.
Figure 14: Aligning and tightening the Allen screw
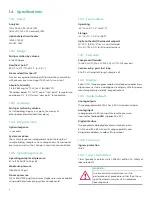
6. Using a 3/32” Allen wrench, tighten the Allen screws
on the locking mechanism’s surface until their tips
are firmly set into the thread-o-let’s upper surface
(see Figure 15 below).
Figure 15: Tightening the Allen screws
The housing is now installed. The locking mechanism
should prevent the housing from becoming unintentionally
unscrewed from the thread-o-let. The pipeline my now
be pressurized.
2.7.2b Installing the insertion membrane liquid
separator/pressure regulator assembly
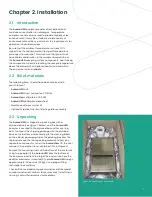
1. Confirm that the Allen cap screw head’s hex cavity is
clean and free from foreign material. Confirm that the
Allen cap screw that holds the membrane ferrule is
torque-wrench tight (see Figure 16 below). The torque
value should be 10 inch-lbs. If the Allen cap screw is only
hand-tight, the screw may protrude excessively, which
could result in foot valve actuation when the probe is
installed into the housing.
Allen cap screw
Figure 16: Checking/tightening the Allen cap screw
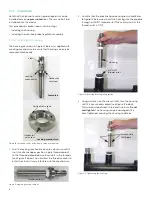
2. Rotate the pressure adjustment screw on the pressure
regulator fully counterclockwise until it rotates freely.
Close the isolation ball valve (see Figure 17 below).
Pressure adjustment screw
Pressure gauge
Isolation ball valve
Figure 17: Rotating the pressure adjustment screw
15
Содержание Panametrics Aurora H2O
Страница 2: ...ii...
Страница 4: ...no content intended for this page proceed to next page iv...
Страница 20: ...no content intended for this page 10...
Страница 32: ...no content intended for this page 22...
Страница 65: ...2 AuroraView boots up and displays a screen similar to Figure 55 below Figure 55 AuroraView main screen 55...
Страница 71: ...Figure 74 Exporting a simplified image Figure 75 Selecting enhanced metafile 61...
Страница 80: ...no content intended for this page 70...


