


95
Image
Meter 1/2 Group
Select the audio meter’s group (embedded audio).
Meter 3/4 Group
Width
Select the audio meter’s width.
(
2
/
4
/
6
/
8
/
10
/
12
/
14
)
Vertical Offset
(0 to 144)
Specify the location of the meter appearing on screen by setting the
vertical coordinate.
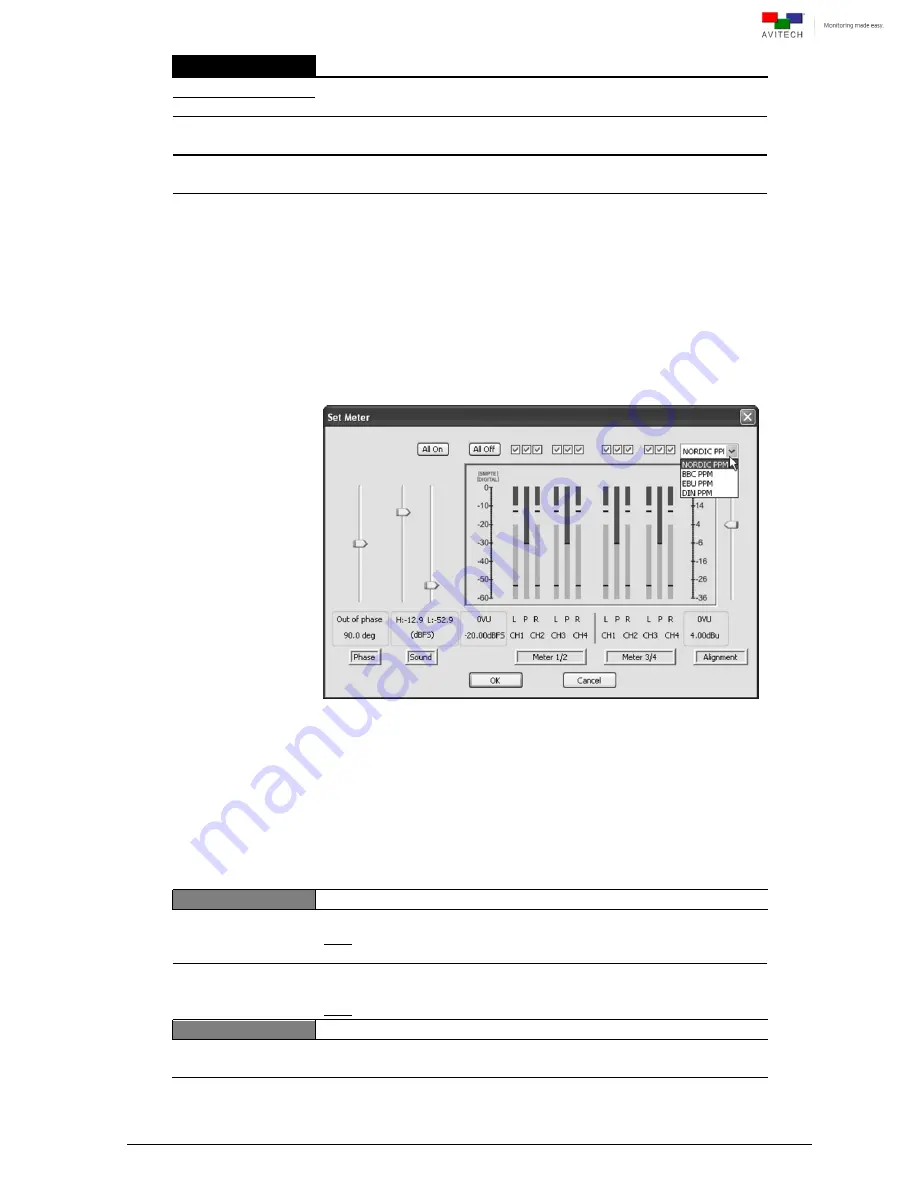
Ballistics
PPM
VU
Select the meter’s ballistics. Meters which monitor audio levels are
typically one of two varieties: VU (Volume Unit) or PPM (Peak Program
Meters). Though both perform the same function, they accomplish the
function in very different manners. A VU meter displays the average
volume level of an audio signal. A PPM displays the peak volume level of
an audio signal.
For a steady state sine wave tone, the difference between the average
level (VU) and the peak level (PPM) is about 3 dB. But for a complex audio
signal (speech or music), the difference between the average level (VU)
and the peak level (PPM) can be 10 to 12 dB. This difference between the
reading of a VU meter and a PPM is known as the crest factor.
Upon selecting PPM, clicking
Layout and Alarm Trigger
Change . . .
allows the selection of the type of PPM scale (
Nordic
/
BBC
/
EBU
/
DIN
).
Whereas the VU meter has fairly equal attack and release times, the PPM
is characterized by having a very slow fall-back time, taking over 1.5
seconds to fall back 20dB (the specifications vary slightly for Type I and II
meters). The reasoning for the slow fall-back was to reduce eye-fatigue
and make the peak indication easier to assimilate. The specifications of all
types of PPM are detailed in IEC 60268-10 (1991), and the scale used by
the BBC comprises the numbers 1-7 in white on a black background.
There are 4dB between each mark, and PPM 4 is the reference level
(0dBu). EBU, DIN and Nordic variants of the PPM exist with different
scales. The EBU version replaces the BBC numbers with the equivalent
dBu values, while both the Nordic and DIN versions accommodate a
much wider dynamic range.
Safe Area
Enable
(On / Off)
Display the safe area markers.
Note: Default settings are 0% and 100% thus the need to first create and
save parameters using Phoenix-Q before safe area will display a result.
Left/Right
Top/Bottom
(0 to 100)
Freely adjust the horizontal (
Left
and
Right
) and vertical (
Top
and
Bottom
) markers.
Note: This item is only available when the previous item is set
On
.
Image Border
Enable
(On / Off)
Display the border of the image.
Содержание Rainier 3G Plus
Страница 1: ...User Manual Rainier 3G Plus Multiviewing experience taken to the next level Revision 1 0 0 May 2014 ...
Страница 99: ...93 Image Layout and Alarm Trigger Change Audio meter scale ...
Страница 111: ...105 Figure A 4 LCD Panel Menu Tree ...
Страница 129: ...123 Sample illustration 3 Figure B 3 Audio Output From Chassis ID 2 Card ID 4 Image 3 Plus Chassis ID 1 Headset ...


