background image

18

~

~

~

~<MFZ>

shx12_e_03.fm
[18/21]

Ge
tt

in

g

 R
e

a

d

y

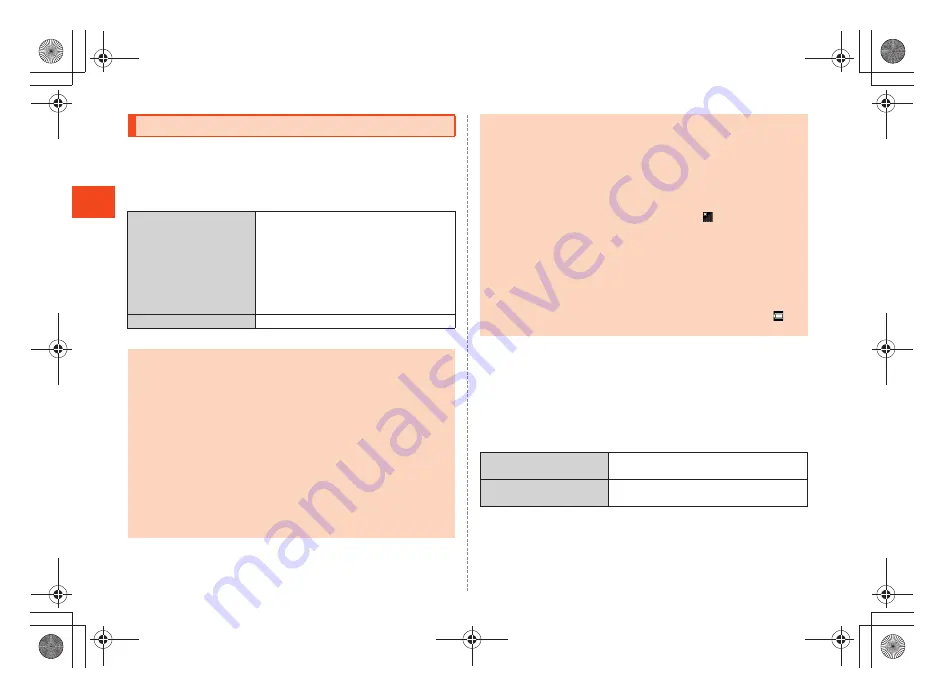
The battery pack is not fully charged at the time of purchase. Charge 
the battery pack when you use the INFOBAR C01 for the first time or 
the battery level becomes low. Charging is finished when the red 
charging/incoming indicator goes out.
The usage times are as follows.

* These times are based on the case when the INFOBAR C01 is used in Japan.

Charging the Battery Pack with the Specified AC 

Adapter (sold separately)/DC Adapter (sold 

separately)

The followings are the explanation of how to connect the common AC 
adapter 03 (sold separately)/the common DC adapter 03 (sold 
separately) to charge. 
Charging time is as shown below.

Charging the Battery Pack

Continuous stand-by 
time

Approx. 350 hours (while Wi-Fi

®

 and 

Pedometer are not used)
Approx. 340 hours (while Wi-Fi

®

 is not 

used and Pedometer is used)
Approx. 170 hours (while Wi-Fi

®

 is used 

and Pedometer is not used)
Approx. 160 hours (while Wi-Fi

®

 and 

Pedometer are used)

Continuous talk time

Approx. 370 min

The INFOBAR C01 and battery pack may become warm during charging 
but this is not a malfunction.

Charging the INFOBAR C01 while using the camera function etc. may 
lengthen the charging time.

If you perform various operations with a specified charger (sold separately) 
connected to the INFOBAR C01, charging/battery level consumptions may 
take place in a short time. Frequently charging the battery pack shortens its 
service life.

If the charging/incoming indicator of the INFOBAR C01 flashes in red, 
check whether the battery pack is properly attached, an external device is 
properly connected to the cell phone, etc. If the cell phone flashes even 
after you have checked that, stop recharging the cell phone and please 
contact an au shop or Customer Service Center.

Properly close the external connection jack cover. Also, do not pull it 
forcibly or twist it.

Each of the continuous talk time and continuous stand-by time is an 
average usage time combining the time during which a cell phone is carried 
around by a user and properly receives radio waves plus the time during 
which a cell phone is stationary and properly receives radio waves. 
According to usage conditions such as battery level status and 
temperature, the signal strength in a place where the cell phone is used, 
settings of functions, etc., the usage times may be reduced to less than half 
under the following cases.

A cell phone is frequently used in a place where 

(out of service area 

indicator) appears on it.

The Wi-Fi

®

 function, Bluetooth

®

 function, mail function, camera function, 

1Seg function, location information, etc. is used.

A cell phone is set not to enable the sleep mode because of an 
application etc.

Applications which remain activated in the background are used.

If you stop charging while the charging/incoming indicator still illuminates 
during charging, the cell phone may be left not fully charged even if 


appears on it. In such case, the average usage times shorten.

Specified AC adapter 
(sold separately)

Approx. 150 min

Specified DC adapter 
(sold separately)

Approx. 200 min

shx12_ue.book  18 ページ  2012年2月16日 木曜日 午後2時56分

Содержание Infobar C01

Страница 1: ...January 2012 Edition ...

Страница 2: ...ou can activate intended functions from an explanation screen depending on the functions On the iida Home tap Instruction Manual To use the application for the first time you need to download and install it by following on screen instructions Downloading Manuals You can download the Basic Manual this manual and the Instruction Manual Accessory Japanese or full Instruction Manual Japanese in PDF fo...

Страница 3: ...nfidential call communications The au phone is a wireless station which is compliant with the Radio Act and may be subject to inspections regulated by the Radio Act When you insert the au IC Card the product number information of your au phone is sent to KDDI CORPORATION for the security and operation status notification of the au phone Always be considerate of others around you when using your au...

Страница 4: ... a loud voice Obtain the permission of other people before you take their photos with the cell phone s camera Be considerate of people around you Some people close to you in crowded places such as packed trains may be using a cardiac pacemaker Turn the cell phone off in such places Abide by the rules of hospitals and other medical institutions where it is forbidden to use or carry cell phones Chec...

Страница 5: ...e INFOBAR C01 is NISHIKIGOI as an example Explanations of this manual are based on the case when the INFOBAR C01 is held vertically If you hold it horizontally menu items icons on screen keys etc may be different Explanations of this manual are based on touch panel operations when you can operate with either touch panel or keys Menu items layers and icons described in this manual may be different ...

Страница 6: ... Code You can set the INFOBAR C01 to require PIN code entry every time the power is turned on to prevent unauthorized use of the au IC Card by a third party Actual screen In this manual part of the screen such as icons are abbreviated In this manual Security Code and PIN Code Security Code and Passwords Usage Example A Using the Answering Service Voice Mail and Call Transfer remotely from a fixed ...

Страница 7: ...ten times consecutively contact an au shop PiPit or the Customer Service Center When the PIN code is locked the INFOBAR C01 may be restarted for the security reasons PIN code cannot be reset even if you carry out the operation on the iida Home tap Settings Privacy Reset all Back up notes on the memory contents of the INFOBAR C01 Please back up notes on the important information whose contents are ...

Страница 8: ...ing Notification Status Panel 32 Switching Orientation 33 Displaying Available Menu 33 Character Input Hardware Keyboard 34 Viewing the Character Entry Screen 34 Switching Character Entry Modes 35 Entering Emoji Symbol Facemark 35 Character Input Software Keyboard 36 Switching Software Keyboards 36 Viewing the Character Entry Screen 37 Switching Character Entry Modes 39 Entering Emoji Symbol Facem...

Страница 9: ...e Market 79 Using GREE Market 79 Using au Customer Support 79 au Customer Support 79 Using Anshin Security Pack 80 Using 3LM Security 81 Using Remote Support 81 Using VirusBuster Mobile for au 81 Managing Applications 82 Checking Your Profile 83 Changing the Incoming Ring Tone 83 Changing the Wallpaper 83 Initializing microSD Memory Card 84 Using Global Passport CDMA GSM 85 GLOBAL PASSPORT 85 For ...

Страница 10: ...e character You can return the determined characters to the undetermined state Displays the characters assigned to the same key in the reverse rotation for entering characters Inserts a line feed at the cursor position before entering characters after determining characters F Proximity sensor Light sensor Proximity sensor prevents operating the touch panel incorrectly during a call Light sensor de...

Страница 11: ...ble disable Manner mode Bottom L External connection jack cover M External connection jack Use it to connect the INFOBAR C01 to the microUSB 3 5φ conversion cable the common AC adapter 03 sold separately the microUSB cable 01 sold separately SHARP microUSB 18 pin charger conversion cable 01 sold separately the microUSB stereo earphone conversion adapter 01 sold separately etc shx12_ue book 9 ページ 2...

Страница 12: ...around the internal antennas area Otherwise the quality of calls communications will deteriorate O Camera lens P Infrared port Sends and receives data via infrared communication Q Speaker Emits ring tones alarm tones etc R Battery pack cover S FeliCa mark Hold it over a reader writer when using Osaifu Keitai Sends and receives data via IC communication T Strap eyelet String the hole with the cord ...

Страница 13: ...ack Remove the battery pack by pulling up the protruding edge in the direction of the arrow Use the specified battery pack for the INFOBAR C01 and attach it properly A Align the contacts on the battery pack with those of the INFOBAR C01 and then insert the battery pack securely with the protruding edge facing up on the battery pack Removing Attaching the Battery Pack Removing the Battery Pack Conc...

Страница 14: ...nd strap through the strap eyelet of the battery pack cover B Put the string of the hand strap on the strap hook of the INFOBAR C01 and pull the string lightly in the direction of the arrow to secure it When you put the string make sure that it is not twisted Before attaching the battery pack make sure that the au IC Card is inserted properly Failure to follow the correct procedure when attaching ...

Страница 15: ...he string passes through the gap Do not put multiple hand straps on the strap hook When you attach the battery pack cover make sure that the hand strap does not come off The hand strap may come off when attaching the battery pack cover with the string not secured properly on step B Also be sure that there is no space between the battery pack cover and the INFOBAR C01 when attaching the battery pac...

Страница 16: ...d Ambulance and 118 Regional Coast Guard and making a call to 157 Customer Service Center are also unavailable Restriction Settings with PIN Code You can set the INFOBAR C01 to restrict the use of the phone by others through changing the PIN code or locking the UIM card in order to protect your important private information while you are using your au IC Card For details refer to PIN Code If you h...

Страница 17: ...the au IC Card A Pull the tab of the tray in the direction of the arrow B Place the au IC Card on the tray with the IC metal surface side down and insert it securely Insert the au IC Card according to the orientation of its cutout C Attach the battery pack and battery pack cover Removing au IC Card Inserting au IC Card Tab Inserting the tray not deeply enough may prevent the INFOBAR C01 from funct...

Страница 18: ...rd manufacturer microSD microSDHC Memory Card Confirmed operation Unconfirmed operation or not for sale As of November 2011 4 GB or more are for microSDHC memory card Operation is confirmed for microSD memory cards that are sold as of November 2011 For the latest information on operation confirmation visit the au homepage or contact the Customer Service Center Using microSD Memory Card microSD Mem...

Страница 19: ...emory Card Do not touch the terminal part of microSD memory card Do not remove the microSD memory card forcefully It may result in damage to the microSD memory card or the INFOBAR C01 or data loss Application installed to microSD memory card cannot be used once you removed microSD memory card The microSD memory card may be warm after a long time use It is normal Inserting microSD Memory Card Inser...

Страница 20: ...ming indicator of the INFOBAR C01 flashes in red check whether the battery pack is properly attached an external device is properly connected to the cell phone etc If the cell phone flashes even after you have checked that stop recharging the cell phone and please contact an au shop or Customer Service Center Properly close the external connection jack cover Also do not pull it forcibly or twist i...

Страница 21: ...indicator goes out D When charging is finished pull the microUSB plug of the common AC adapter 03 sold separately common DC adapter 03 sold separately straight out from the external connection jack of the INFOBAR C01 E Close the external connection jack cover of the INFOBAR C01 F Unplug the common AC adapter 03 sold separately power plug from the power outlet Unplug the common DC adapter 03 sold s...

Страница 22: ... then sleep mode is set Disabling Sleep Mode A f 5 while sleep mode is set If you charge the INFOBAR C01 when the battery has run out the charging incoming indicator may not illuminate soon However charging is in progress If you use the microUSB cable to charge the INFOBAR C01 it may take the INFOBAR C01 longer to be fully charged than if you use the specified AC adapter sold separately Turning th...

Страница 23: ...s a Google account before setting one up the Google account adding screen is displayed A On the Google account adding screen Next B Create Sign in If you have already had a Google account tap Sign in enter the user name and password and tap Sign in If you have not had a Google account tap Create and follow the on screen instructions to register one A On the iida Home au one ID setting Alternativel...

Страница 24: ... or icon displayed on the screen Double tap to enlarge reduce the screen Long Touch Keep touching an item key etc Display context menu etc Slide Gently touch a screen and then trace it to the desired direction Scroll screen or switch pages In addition operate gauge and bar when adjusting volume and brightness Flick Touch a screen and then quickly flick your finger up down left or right Switch page...

Страница 25: ...Move an icon on the screen to the desired position Home consists of two screens which are the iida Home and widget Home You can paste applications shortcuts etc on the iida Home and you can paste widgets on the widget Home Flick the screen to the left right to switch the iida Home and widget Home iida Home and widget Home widget Home iida Home Widget Flick to the left Flick to the right shx12_ue b...

Страница 26: ... theme of the iida Home Quick Launch Assigns applications to each number key Quick Search Box Sets whether to display hide the quick search box Scroll Absorption Sets whether to adjust the stop position when scrolling the iida Home System Settings Performs the various settings for the INFOBAR C01 Quick Launch Hold down the number key on the iida Home widget Home to quickly activate the assigned ap...

Страница 27: ...ontact Adds a shortcut to the selected contact that enables you to call create a mail etc from the iida Home Direct Dial Adds a shortcut that enables you to call to the selected contact Direct Message Adds a shortcut that enables you to create a mail by using a selected contact as the destination Directions Navigation Adds a shortcut of the Google navigation to the destination Energy save Adds a s...

Страница 28: ...e position to move to and release your finger If you change the size of a displayed panel the displayed contents are changed Tap the panel whose size can be changed to switch the size of the displayed panel Tap a section bar to edit the section title Using the widget Home Using the Menu of the widget Home Add Widgets Adds a widget Wallpapers Sets by selecting a wallpaper from the data in the micro...

Страница 29: ...ly be modified showing taste like miniature or toy camera Polaroid PoGo App You can take a picture with Polaroid vintage color and variety of frames It s available with PoGo printer and Photo Air Summit Global Japan K K Snapeee Edit images shot with a Smartphone using stamps and frames and share them with other people Task Cleaner This is an application for saving battery consumption You can cut b...

Страница 30: ... Countermeasure This is an application in which you can use Disaster Message Board and Early warning mail earthquake early warnings and disaster evacuation information Browser Browse web sites on the Internet Icon Name of icon Description Calculator Use calculator Calendar Save and manage schedules Camera Take photos still images Camera Reader Switch Barcode reader Business card reader Kanji Engli...

Страница 31: ...s such as downloading and viewing applications Maps Use Google Maps Market Use Android Market Memo Register and check memos Icon Name of icon Description Movie Edit Clip movies recorded with INFOBAR C01 in the specified range and save Navigation Search for routes to the destination on Google Maps News Weather Displays news and weather Notepad Create memos One Seg Watch 1Seg Osaifu Keitai Use Osaif...

Страница 32: ...nical supports on the phone operations by sharing the screen that you are watching with au operators 安心アプリ制限 Restrict Applications Restrict inappropriate applications Wi Fi communication etc for children When you use functions of applications call fees may apply depending on the function If you have not subscribed to IS NET au NET charges 525 yen including tax for the used month and communication ...

Страница 33: ... mode When multiple notifications of the same type exist the number of them is displayed on the lower right of some indicators Indicator Description Indicator Description Time Alarm set Battery level Battery level display No battery Battery level unknown While charging the battery icon appears with superimposed The charge indicator other than is displayed as an animation Offline mode set Signal st...

Страница 34: ...pplication depending on the information C VeilView You can set VeilView D Auto rotate You can set the automatic rotation of the display E Time Displays the current time You can tap to set the alarm F Clear You can clear all the notifications by tapping the key During a call using hands free Microphone set to mute during a call Home Network status Suspending Yellow Preparing Blue Running Wi Fi sign...

Страница 35: ...id in parallel to the ground On the iida Home tap Settings Display settings Auto rotate screen to set whether to switch portrait display and landscape display In some applications such as Video Camera the screen display may not be switched regardless of the orientation or setting of the INFOBAR C01 Landscape display Portrait display Displaying Available Menu More When the number of available optio...

Страница 36: ... enabled the prediction candidates list is displayed when characters are entered If the relational prediction function is enabled the relational prediction candidates list is displayed when an entry is selected from the prediction candidates list Enter characters and tap to display the normal conversion candidates list You can enlarge the candidates list area by tapping Tap to return it to the ori...

Страница 37: ...ion candidates When you switch the character types the display changes as follows Kanji Half width alphabet Half width numeric Half width Katakana Full width alphabet Full width numeric Full width Katakana Character code G Delete key Deletes the selected character or the character on the left of the cursor When the cursor is at the beginning the character on the right of the cursor is deleted A On...

Страница 38: ...s displayed vertically on the character entry screen long touch the character entry mode key Change settings Display Layout settings enable Always show keyboard The following software keyboards are available for the INFOBAR C01 A On the character entry screen Change input UI Set 12 keyboard Set QWERTY keyboard OK Flick input When the software keyboard is 12 Key you can enter a desired character by...

Страница 39: ... is displayed when characters are entered If the relational prediction function is enabled the relational prediction candidates list is displayed when an entry is selected from the prediction candidates list Enter characters and tap to display the normal conversion candidates list Keep touching Flick left Viewing the Character Entry Screen Character entry screen QWERTY Character entry screen 12 Ke...

Страница 40: ...ay the menu etc by tapping the key G Delete key Deletes the selected character or the character on the left of the cursor When the cursor is at the beginning the character on the right of the cursor is deleted H Emoji Symbol and Facemark key Kana and Alphanumeric key Displays the emoji symbol facemark list Displays katakana alphabet number and predicted date and time assigned to the entered key as...

Страница 41: ...or each category Long touch a facemark to edit it However facemarks in History cannot be edited C Close key Returns to the character entry screen D Page switch key Displays the previous next categories or pages E Character entry mode switch key Displays emojis converted automatically when sent to a cell phone of other carrier Displays normal emojis Displays full width symbols Displays half width s...

Страница 42: ...ark A On the character entry screen long touch the character entry screen Input method B Select an input software There are some lists that cannot be displayed and some emojis symbols facemarks that cannot be entered depending on the screen you operate Switching Input Software When using an installed application enable it in Language keyboard in advance Refer to Using Android Market to install an ...

Страница 43: ... Talk Press u or d during a call to adjust the other party s voice D End call Making a Call Phone number entry screen Also you can make a call by entering the phone number on the iida Home widget Home If you cover the screen while dialing calling it may be turned off depending on the orientation of the INFOBAR C01 The call fees when calling with 1401 will be subtracted from the balance registered ...

Страница 44: ...d Ambulance 118 Emergency call to Regional Coast Guard 157 Customer Service Center Maritime telephone The numbers are emergency call numbers The INFOBAR C01 notifies your present location to the emergency call destination with a signal from a base station when you call to the agency that received the emergency call The following NTT services are unavailable Collect call Message service Dial Q2 116...

Страница 45: ... s voice A On the iida Home Phone Outgoing History Incoming History A Called Received date and time B Contents of the phone number name reason of user unset call network service C Image Face registered in address book D Make a call icon Tap to make a call E Group icon The histories are collected in a group when the outgoing histories incoming histories from the same party are continued Tap a group...

Страница 46: ...ng The INFOBAR C01 can store up to 100 entries in each of the outgoing and incoming histories If the history exceeds 100 entries the exceeded entries are automatically deleted from the oldest one The number of the saved entries may be reduced depending on the amount of free space Turning On Manner Mode The use of cell phones while driving a car motorcycle is dangerous and is prohibited by law Set ...

Страница 47: ...Date and time when the Answering memo is recorded B Select the Answering memo to play The Answering memo is played Playing a Message in Answering Memo Stop Stop playing the Answering memo On Off Protect Unprotect the Answering memo not to be automatically deleted Delete Delete the Answering memo being played Answering memo list screen Speaker on Speaker off The Answering memo can be heard on the s...

Страница 48: ... the lamp and the vibration when an incoming call is received Tap to display the entry items which are not displayed Tap to add delete the item If the phone number is for a fixed line phone enter the phone number starting with the area code If you save multiple phone numbers mail addresses tap to change it to so that you can set the phone number mail address for usual use Depending on an item you ...

Страница 49: ...e a mail message using the selected mail address as an address The application set in the chat address type starts and start a chat with the selected chat address When a corresponding application has not been installed you have not signed in your account etc the application may not start The Google map starts based on the selected address GPS information Displays the mail creation screen on which ...

Страница 50: ...and call Displays the phone number entry screen with the selected phone number entered Create mail Create an SMS C mail message using the selected phone number as an address Call added special number Add the specific number to the selected phone number Set main phone number Set the phone number for usual use Create shortcut Create a shortcut to call to the selected phone number or to activate SMS ...

Страница 51: ...o For details refer to Global Passport Owner s Guide Japanese The packet communication charge for sending and receiving e mail varies according to the amount of data sent and received For using overseas high charges can be incurred For details refer to the au comprehensive catalogue or au homepage Sending and receiving e mails may take some time if attached data are included in them or depending o...

Страница 52: ...ng one included in the list of entries from the mail send history Tap e Delete Select an e mail address Delete Delete to delete the history Profile Enter an e mail address as the destination by selecting one registered in the profile Paste Paste a copied e mail address The decoration animation is not supported You cannot enter half width katakana and half width symbols long vowel dakuten handakute...

Страница 53: ...it changes to blue after you check the mails C Outbox E mail messages will be received in the background even during operations of e mail or other functions appears on the status bar and the e mail ring tone sounds On the iida Home tap E mail e E mail settings Receive display settings Uncheck Auto receive After that e mail messages will not be received in the background When Auto receive is disabl...

Страница 54: ...o be sent E Template F Create new folder G Action bar B Select a box folder Inbox Outbox Unsent Mail list screen two line display Mail list screen message preview display Mail list screen two line display Mail list screen message preview display Mail list screen two line display Mail list screen message preview display shx12_ue book 52 ページ 2012年2月16日 木曜日 午後2時56分 ...

Страница 55: ...ity If the e mail address is not registered in the address book and the name of the sender is not set for the received e mail the e mail address is displayed D E mail which has been replied E mail for replying E mail which has been forwarded E mail for forwarding E mail which has been replied and forwarded E Two line display Message preview display switching key Appears only on the portrait displa...

Страница 56: ...tached data exist J Flags exist K Protected e mail L Action bar Reply Create an e mail for replying Forward Create an e mail for forwarding Protect Unprotect Protect Unprotect the e mail Flag Unflag Flag Unflag the e mail Resend Send the same e mail as you have sent again Edit copy Copy and edit the e mail Edit Edit the e mail Unsent mail message screen E mails which have not reached the other par...

Страница 57: ...ayed C Setting Mail Filters オススメの設定はこちら 登録 迷惑メールフィルター 送信 カンタン設定 Simple Settings 1 携帯 PHS PC メールを受信 1 Receive Mail Messages from Cell Phone PHS or PC Reject spoofing or auto forwarded mail messages and receive mail messages from cell phones PHSs or PCs 2 携帯 PHS メールのみを受信 2 Receive only Mail Messages from Cell Phone or PHS Reject mail messages from PCs spoofing mail messages or auto forwarded mail me...

Страница 58: ... during a single day the mail filter setting operation will be disabled until the next day Note that you cannot receive e mail messages once rejected by mail filters Be careful when you set mail filters Mail filters functions apply to new e mail messages in order of the followings 指定受信リスト設定 なりすまし 転送メール許可 Allowed Address List Setting Spoofing or Forwarded Mail Messages なりすまし規制 Spoof Restriction 指定拒...

Страница 59: ...il messages whose message entry field includes a URL such as e mail magazines and information providing e mail messages or member subscriptions to some cell phone sites etc may not be available If you set HTMLメール規制 HTML Mail Restriction e mail messages in the HTML format may not be received when they are among other e mail messages sent from e mail magazines or PCs Also decorated e mail messages f...

Страница 60: ... SMS C mail center depending on usage of the receiving users or types of the cell phones of the sending users SMSs C mails stored in the SMS C mail center will be sent in the following conditions Immediately after an SMS C mail is stored All the SMSs C mails stored in the SMS C mail center will be sent every time a new SMS C mail is stored in the SMS C mail center Via the retry function An SMS C m...

Страница 61: ...n the iida Home SMS C mail If there are unopened mails in Inbox the total number of the mails is displayed on the right side If there are unsent mails or mails failed to be sent in Outbox the total number of the mails is displayed on the right side B Inbox Outbox Receiving SMS C mail is free In a received SMS C mail you can check the phone number of the other party who sent the SMS C mail Dependin...

Страница 62: ...has been replied SMS C mail which has been checked for being received Unsent SMS C mail SMS C mail failed to be sent C Message Flick the message display area to the left right to display the next mail previous mail D Protected SMS C mail E Action bar Received mail message screen Sent mail message screen If the number of received mails exceeds its limit 1 000 mails the oldest mail will be deleted a...

Страница 63: ...lly set E Tap the account name entry field Enter an account name F Tap your name entry field Enter your name Done When setting a mail server manually D Manual setup Confirm the setting of the receiving mail server and sending mail server by contacting the provider you use in advance Rejecting Spam SMS C mail Messages Reject specified Phone No Set whether to reject SMSs C mails received from the sp...

Страница 64: ...ceived PC mail in the server IMAP path prefix Enter when necessary Use secure connection SSL Set whether to use the SSL when receiving PC mails Accept all SSL certificates Set whether to accept all the SSL certificates SMTP server Enter the server information Port Enter the port number Security type Set when necessary Require sign in Set when necessary Enter the User name and Password when enablin...

Страница 65: ...as draft PC mail is saved to draft without sending it If you tap Discard PC mail in process of composition is discarded A PC mail is received If PC mail is received appears on the status bar and the mail ring tone sounds B Tap the status bar C Select PC mail information D Select the received PC mail Gmail is a mail service provided by Google You can send and receive Gmail with the INFOBAR C01 Goog...

Страница 66: ...he menu G Star icon Tap to enable disable the setting of starring a message A On the iida Home Gmail e Compose B Tap the destination entry field Enter the destination C Tap the subject entry field Enter the subject D Tap the message entry field Enter the message E A Gmail is received When Gmail is received appears on the status bar and the mail ring tone sounds B Tap the status bar C Select mail i...

Страница 67: ...ltering function blocks inappropriate web pages for young people On the iida Home tap Settings Wireless networks Filtering settings Yes Enter a password OK Enter a password again OK The filtering function is not compatible with the application communication and the Wi Fi connection It is recommended to use the filtering function of ウイルスバスター VirusBuster and 安心アプリ制限 Restrict Applications The passwor...

Страница 68: ... Bookmarking a Web Page On the iida Home tap Browser Long touch a bookmark Delete bookmark to delete the bookmark Likewise on the iida Home tap Browser Most visited History Long touch a most visited site history Delete from bookmarks to delete the bookmark shx12_ue book 66 ページ 2012年2月16日 木曜日 午後2時56分 ...

Страница 69: ...blur Be careful of camera shakes especially in a place without enough light such as inside of a room Also images may blur when the subject of the images moves Before shooting images make sure that the subject is completely displayed If you shoot images while moving the camera the images may blur Indoor fluorescent lighting may cause flickers too fine to be seen with human s naked eyes to be detect...

Страница 70: ... long time which may result in a low temperature burn Also you may not be able to use the camera when the temperature of the INFOBAR C01 is increased When shooting images of strong light sources such as the sun or a lamp the images may appear dark or distorted When shooting images of moving subjects or changing the place from light place to dark place the display may whiten or darken for a moment ...

Страница 71: ... set the upload destination After selecting Miniaturize Cam you can edit shot images to make them look like they are miniatures by blurring some parts of them D AF mark On the iida Home tap Camera Tap the focus setting key Face AF to detect and focus on a person s face E Zoom bar Zoom in out the subject Slide your finger to the left right to display and set the bar F Video camera switching key G V...

Страница 72: ... Tap to stop a countdown E Various setting key Change the various settings F Mobile light ON OFF G Amount of the time left for recording If you operate nothing for approximately three minutes Camera is terminated If the mobile light is set to ON the mobile light is turned on and it is automatically turned off after approximately three minutes While activating Camera press 5 to display the operatio...

Страница 73: ...ng B Select an album The thumbnail display screen is displayed Tap to return to the album selection screen Tap to switch the date display and the thumbnail display of the images Slide to the left right to slide the thumbnails C Select an image The one image display screen is displayed If you tap an image you can hide show the informations except for the image informations If the battery level beco...

Страница 74: ...nd text data Others Displays other data D Searching icon Set the search criteria E Thumbnail Displays thumbnails of the data If the thumbnail is not available displays an icon for data type F File name Displays title name if the data contains title information Displays the program name if the data is recorded TV program B Select data An application corresponding to the data type is activated and t...

Страница 75: ...slideshow microSD phone space Display the space of the microSD memory card and the INFOBAR C01 App setting Retrieval condition setting Set the search range under various search criteria and whether to save the search criteria Initialize settings Reset the settings to default Update Information Update the information of the microSD memory card Slideshow settings Slideshow interval Set the interval ...

Страница 76: ...ud volume It may harm your hearing Behavior by Battery Level If the battery level becomes approximately 10 or lower while activating 1Seg it is terminated automatically If the battery level becomes so while recording TV programs the recorded content is saved and 1Seg ends The TV antenna is not built in the INFOBAR C01 When you activate 1Seg and set the watching area or when you watch record 1Seg c...

Страница 77: ...Select a locality Searching for local channels begins F OK A On the iida Home One Seg One Seg TV A Program information Tap to display the program name B Video image Tap to show hide the program information and operation key Double tap to switch screen sizes Long touch to display the channel list Slide Flick to the left right to switch channels C Operation key Switches channels or searches for a ch...

Страница 78: ...t in a channel being received K Language Operations While Displaying Channel List Select the broadcast station name Switches to the selected broadcast station Long touch the broadcast station Channel overwrite registration Yes Assigns the broadcast station being watched to the selected remote control number Long touch the broadcast station Delete channel Yes Deletes the broadcast station from the ...

Страница 79: ...e instructions on the screen for registration confirmation Using Early Warning Mail Early warning mail is a service to collectively deliver earthquake early warnings and disaster evacuation information to au phones in the specified areas From the spring of 2012 we will start providing Disaster evacuation information as early warning mail You will be notified on the au homepage for details At the t...

Страница 80: ...curs and automatically calculates its location scale and predicted strength of the shaking After that you will be notified of the earthquake as soon as possible within a few seconds to dozens of seconds before a strong shaking from the earthquake S wave principal shock occurs In the vicinity of the seismic center a strong shaking may reach you before an earthquake early warning Disaster Evacuation...

Страница 81: ...ge of your au phone etc easily and access au customer support site to change the subscription of your price plan option services etc For details while activating au Customer Support application tap e Help to refer to the help information by au Customer Support A On the iida Home au au Customer Support When you activate for the first time the setting menu is displayed and you can perform account se...

Страница 82: ... dangers in WEB Prevent you from accessing improper sites such as sites which distribute virus and improper applications and phishing sites Blocking incoming calls SMSs Other than rejecting nuisance calls and SMSs you can also reject messages which contain specific keywords TRENDMICRO VirusBuster are trademarks of Trend Micro Inc 確認する Confirm Check the subscription contents or monthly usage of you...

Страница 83: ...tomer Support Support Services Anshin Security Pack for au VirusBuster Mobile for au Alternatively on the iida Home tap VirusBuster When you activate VirusBuster Mobile for au for the first time the license agreement for VirusBuster Mobile for au is displayed so tap Agree after confirming the contents Also if you have not set up a Google account a message asking you to set up a Google account appe...

Страница 84: ...nstalled applications list is displayed B Select an application The detailed application information is displayed C Select the operation to perform Follow the on screen instructions to perform it Managing Applications When you select an application installed from Android Market etc Uninstall is displayed Tap it to remove the application shx12_ue book 82 ページ 2012年2月16日 木曜日 午後2時56分 ...

Страница 85: ...ion Send by Bluetooth Send your profile using Bluetooth Send by IC Send your profile using IC communication Attach to Mail Create a mail message using your profile as an attached data Send Setting Set the items to send You cannot disable Name and Own phone number Profile screen If au IC Card is not inserted or different au IC Card is inserted auIC Card UIM error Please insert card appears when che...

Страница 86: ...e microSD Erase microSD Enter Lock No OK Erase everything Initializing microSD Memory Card Initialize a microSD memory card while charging or with the battery fully charged To have the microSD memory card recognized after having unmounted it tap Mount microSD Do not unmount the microSD memory card while saving data on it since it may result in damage to data on the microSD memory card or data loss...

Страница 87: ...ve returned to Japan Using Global Passport CDMA GSM GLOBAL PASSPORT GSM is an acronym of Global System for Mobile Communications This is one of the wireless communication systems applied to digital cell phones and widely used around the globe such as in Europe America Asia Oceania and Africa GSM does not support CDMA PDC etc applied in Japan The international roaming service is a service which ena...

Страница 88: ...ier s networks that you connect to at your travel destination The PRL roaming area information contains information on roaming areas of overseas partner providers who have signed an international roaming contract with KDDI au You need to set the PRL when using the INFOBAR C01 in the CDMA network areas Please obtain the latest PRL before traveling A On the iida Home Settings Wireless networks Mobil...

Страница 89: ... South Korea A On the iida Home Phone B Enter 002 as the international access code for South Korea Hold 0 down to enter and the international access code of your travel destination is automatically added when calling C Enter 1 as the country code for the USA D Enter 212 as the area code If the area code starts with 0 dial it without including the 0 There are some exceptions such as fixed line phon...

Страница 90: ...d regardless of the travel destination since the call is made through Japan Example To have a call made to your au phone in Japan 090 1234 XXXX from the USA A Enter 011 as the international access code for the USA B Enter 81 as the country code for Japan C Omit the first 0 and enter 901234XXXX as the phone number of au phone Call Travel destination Number U S Mainland Hawaii Saipan 1 Area code Oth...

Страница 91: ... Are the charging devices connected properly zP 18 Is the battery pack attached properly zP 11 If you use Fast transfer mode make sure the USB driver is installed to the PC For the USB driver and install manual refer to the Support page in SH DASH http k tai sharp co jp support Cannot operate key touch panel Is the power turned on zP 20 Restart the INFOBAR C01 zP 20 Cannot operate touch panel as i...

Страница 92: ...NFOBAR C01 receive an adequate digital broadcasting signal zP 74 Is the microUSB 3 5φconversion cable connected zP 74 Is the selected area for the area where you use the INFOBAR C01 Cannot operate the respective address book settings Is the other party s phone number notified If there is no notification the settings of the address book are not enabled Images are not displayed on web page Make sure...

Страница 93: ...e camera 67 Cell phone etiquette 2 Index Change 80 Change input mode Hardware keyboard 35 Software keyboard 39 Character entry screen Hardware keyboard 34 Software keyboard 37 Character input hardware keyboard 34 Character input software keyboard 36 Charging Battery pack 18 Charging with the AC adapter 18 Charging with the DC adapter 18 Charging indicator 8 Chat 46 Check Settings Release Settings ...

Страница 94: ...y from your travel destination 87 Making a call within the same country while overseas 88 Manage applications 82 Manage apps 26 Manner mode 44 Market 79 Melody 83 Memo Add Edit Panel 25 Address Book 46 Menu in the contents screen 73 Menu key 8 Menu of the iida Home 24 Menu of the widget Home 26 Microphone 8 microSD memory card 16 microSD memory card slot 11 microSD phone space 73 mixi 46 Mobile li...

Страница 95: ... from this account by default 62 Send history E mail messages 50 SMS C mail messages 58 Send Setting 83 Server 62 Set main mail address 48 Set main phone number 48 Setting mail filter 55 Settings Add Edit Panel 25 Early warning mail 78 Simple Settings 55 Sleep mode 20 Slide 22 Slideshow 73 Slideshow settings 73 SMS C mail 57 SMS filter 61 SMTP server 62 Sort 73 Speaker 10 Speaker off 45 Speaker on...

Страница 96: ...January 2012 Edition ...

Отзывы: