


4-18
Chapter 4: BIOS setup
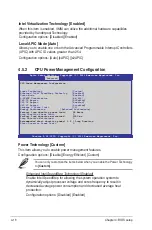
Power Technology [Custom]
This item allows you to enable power management features.
Configuration options: [Disable] [Energy Efficient] [Custom]
You can only customize the items below when you enable the Power Technology
to
[Custom]
.
Enhanced Intel SpeedStep Technology [Enabled]
Enable Intel SpeedStep for allowing the system operation system to
dynamically adjust processor voltage and cores frequency to result in
decreased average power consumption and decreased average heat
production.
Configuration options: [Disabled] [Enabled]
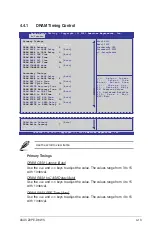
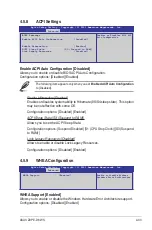
4.5.2
CPU Power Management Configuration
Enable the power
management features
→←:
Select Screen
↑↓:
Select Item
Enter: Select Item
+/-: Change Opt.
F1: General Help
F2: Previous Values
F5: Optimized Defaults
F10: Save & Exit
ESC: Exit
CPU Power Management Confguration
Power Technology
[Custom]
Enhanced Intel SpeedStep Technolog
[Enabled]
Turbo Mode
[Enabled]
P-STATE Coordination
[HW_ALL]
CPU C3 Report
[Disabled]
CPU C6 Report
[Enabled]
CPU C7 Report
[Disabled]
Package C State limit
[C6]
Energy Performance
[Balanced Performance]
Factory long duration power limit 95 Watts
Long Duration Power Limit
0
Factory long duration maintained 1000 ms
Long Duration Maintained
0
Recommended short duration power1 1.2 * Long Duration
Short Duration Power Limit
0
Aptio Setup Utility - Copyright (C) 2011 American Megatrends, Inc.
Advanced
Version 2.14.1219. Copyright (C) 2011 American Megatrends, Inc.
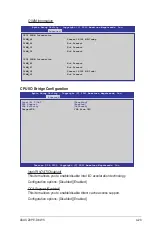
Local APIC Mode [Auto]
Allows you to enable one or both the Advanced Programmable Interrupt Controllers
(APIC) with APIC ID values greater than 254.
Configuration options: [Auto] [xAPIC] []x2APIC]
Intel Virtualization Technology [Enabled]
When this item is enabled, VMM can utilize the additional hardware capabilities
provided by Vanderpool Technology.
Configuration options: [Disabled] [Enabled]
Содержание Z9PE-D8 WS
Страница 1: ...Motherboard Z9PE D8 WS ...
Страница 15: ...1 Product introduction This chapter describes the motherboard features and the new technologies it supports ...
Страница 22: ...1 8 Chapter 1 Product introduction ...
Страница 27: ...ASUS Z9PE D8 WS 2 5 2 2 3 Motherboard layout Z9PE D8 WS ...
Страница 51: ...ASUS Z9PE D8 WS 2 29 2 9 Connectors 2 9 1 Rear panel connectors ...
Страница 63: ...ASUS Z9PE D8 WS 2 41 17 ASMB6 header ASMB6 This connector supports the ASUS Server Management Board 6 series ...
Страница 64: ...2 42 Chapter 2 Hardware information ...
Страница 65: ...3 Chapter 3 Powering up This chapter describes the power up sequence and ways of shutting down the system ...
Страница 66: ...ASUS Z9PE D8 WS Chapter summary 3 3 1 Starting up for the first time 3 3 3 2 Powering off the computer 3 4 ...
Страница 195: ...ASUS Z9PE D8 WS 6 29 9 Click Finish to complete the installation ...
Страница 198: ...6 32 Chapter 6 Driver installation 6 Click Finish to complete the installation and exit the wizard ...
Страница 201: ...ASUS Z9PE D8 WS 6 35 7 Click Install to begin installation 8 Click Finish to complete the installation ...
Страница 222: ...Appendix summary A ASUS Z9PE D8 WS A 1 Z9PE D8 WS block diagram A 3 ...
Страница 223: ...ASUS Z9PE D8 WS A 3 A 1 Z9PE D8 WS block diagram ...
Страница 224: ...A 4 Appendix A Reference information ...


