


4-10
Chapter 4: BIOS setup
4.3
Main menu
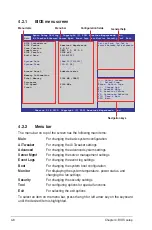
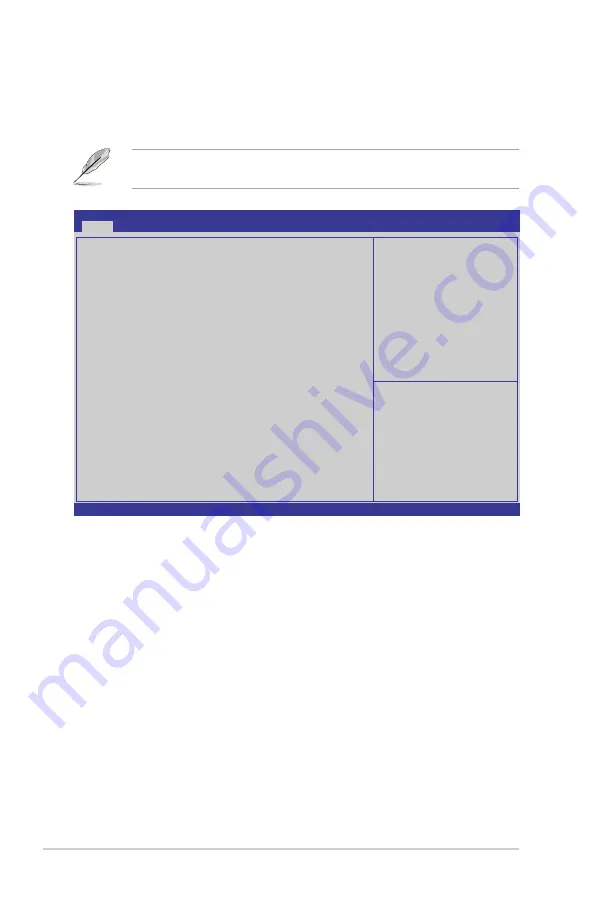
When you enter the BIOS Setup program, the Main menu screen appears. The
Main menu provides you an overview of the basic system information, and allows
you to set the system date, time, language, and security settings.
4.3.1
System Date [Day xx/xx/xxxx]
Allows you to set the system date.
4.3.2
System Time [xx:xx:xx]
Allows you to set the system time.
Version 2.14.1219. Copyright (C) 2011 American Megatrends, Inc.
Aptio Setup Utility - Copyright (C) 2011 American Megatrends, Inc.
Main
Ai Tweaker Advanced Server Mgmt Event Logs Boot Monitor Security Tool Exit
Set the Date, Use Tab to
switch between Data elements.
→←:
Select Screen
↑↓:
Select Item
Enter: Select Item
+/-: Change Opt.
F1: General Help
F2: Previous Values
F5: Optimized Defaults
F10: Save & Exit
ESC: Exit
BIOS Information
BIOS Vendor
American Megatrends
Core Version
4.6.4.1
Compliancy
UEFI 2.1; PI 0.9
BIOS Version
0208 x64
Build Date
12/14/2011
System Date
[Wed 10/19/2011]
System Time
[15:07:28]
Access Level
Administrator
Memory Information
Total Memory
1024 MB (DDR3)
Processor
CPU Speed
2000 MHz
Count:
2
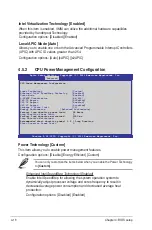
The Server Management tab and menu appear only when you install ASMB card
on the motherboard.
Содержание Z9PE-D8 WS
Страница 1: ...Motherboard Z9PE D8 WS ...
Страница 15: ...1 Product introduction This chapter describes the motherboard features and the new technologies it supports ...
Страница 22: ...1 8 Chapter 1 Product introduction ...
Страница 27: ...ASUS Z9PE D8 WS 2 5 2 2 3 Motherboard layout Z9PE D8 WS ...
Страница 51: ...ASUS Z9PE D8 WS 2 29 2 9 Connectors 2 9 1 Rear panel connectors ...
Страница 63: ...ASUS Z9PE D8 WS 2 41 17 ASMB6 header ASMB6 This connector supports the ASUS Server Management Board 6 series ...
Страница 64: ...2 42 Chapter 2 Hardware information ...
Страница 65: ...3 Chapter 3 Powering up This chapter describes the power up sequence and ways of shutting down the system ...
Страница 66: ...ASUS Z9PE D8 WS Chapter summary 3 3 1 Starting up for the first time 3 3 3 2 Powering off the computer 3 4 ...
Страница 195: ...ASUS Z9PE D8 WS 6 29 9 Click Finish to complete the installation ...
Страница 198: ...6 32 Chapter 6 Driver installation 6 Click Finish to complete the installation and exit the wizard ...
Страница 201: ...ASUS Z9PE D8 WS 6 35 7 Click Install to begin installation 8 Click Finish to complete the installation ...
Страница 222: ...Appendix summary A ASUS Z9PE D8 WS A 1 Z9PE D8 WS block diagram A 3 ...
Страница 223: ...ASUS Z9PE D8 WS A 3 A 1 Z9PE D8 WS block diagram ...
Страница 224: ...A 4 Appendix A Reference information ...


