


ASUS Z9PE-D8 WS
5-11
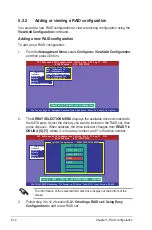
Using New Configuration
When a RAID set already exists, using the
New Configuration
command
erases the existing RAID configuration data. If you do not want to delete the
existing RAID set, use the
View/Add Configuration
command to view or create
another RAID configuration.
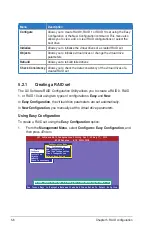
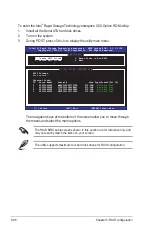
To create a RAID set using the
New Configuration
option
1. From the
Management Menu
, select
Configure > New Configuration,
and
then press <Enter>.
Management Menu
Configure
Initialize
Objects
Rebuild
Check Consistency
Clear Existing Configuration And Start A New Configuration
Configuration Menu
Easy Configuration
New Configuration
View/Add Configuration
Clear Configuration
Select Boot Drive
LSI Software RAID Configuration Utility Ver C.05 Sep 17, 2010
BIOS Version A.10.09231523R
Use Cursor Keys to Navigate Between Items And Press Enter To Select An Option
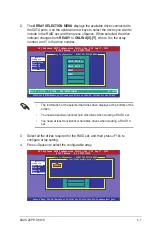
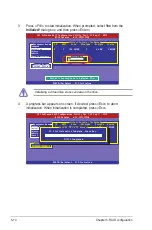
2. Follow step 2 to 9 of the previous section:
Using Easy Configuration
.
3. Select
Size
from the
Virtual Drive
menu, and then press <Enter>.
4. Key-in the desired virtual drive size, and then press <Enter>.
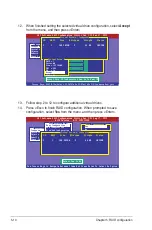
5. Follow step 10 to 14 of the previous section:
Using Easy Configuration
to
create the RAID set.
Management Menu
Configure
Initialize
Objects
Rebuild
Check Consistency
PORT #
LSI Software RAID Configuration Utility Ver C.05 Sep 17, 2010
BIOS Version A.10.09231523R
DNLIN A00-00
DNLIN A00-01
0
1
Easy Configuration - ARRAY SELECTION MENU
Virtual Drive(s) Configured
LD RAID Size #Stripes StripSz Status
0 1 148.580GB 2 64 KB ONLINE
Virtual Drive 0
RAID = 1
Units= MB
Size = 152146MB
DWC = Off
RA = On
Accept
SPAN = NO
Enter VD Size:
Enter VD Size: 152146_
Use Cursor Keys to Navigate Between Items And Press Enter To Select An Option
Содержание Z9PE-D8 WS
Страница 1: ...Motherboard Z9PE D8 WS ...
Страница 15: ...1 Product introduction This chapter describes the motherboard features and the new technologies it supports ...
Страница 22: ...1 8 Chapter 1 Product introduction ...
Страница 27: ...ASUS Z9PE D8 WS 2 5 2 2 3 Motherboard layout Z9PE D8 WS ...
Страница 51: ...ASUS Z9PE D8 WS 2 29 2 9 Connectors 2 9 1 Rear panel connectors ...
Страница 63: ...ASUS Z9PE D8 WS 2 41 17 ASMB6 header ASMB6 This connector supports the ASUS Server Management Board 6 series ...
Страница 64: ...2 42 Chapter 2 Hardware information ...
Страница 65: ...3 Chapter 3 Powering up This chapter describes the power up sequence and ways of shutting down the system ...
Страница 66: ...ASUS Z9PE D8 WS Chapter summary 3 3 1 Starting up for the first time 3 3 3 2 Powering off the computer 3 4 ...
Страница 195: ...ASUS Z9PE D8 WS 6 29 9 Click Finish to complete the installation ...
Страница 198: ...6 32 Chapter 6 Driver installation 6 Click Finish to complete the installation and exit the wizard ...
Страница 201: ...ASUS Z9PE D8 WS 6 35 7 Click Install to begin installation 8 Click Finish to complete the installation ...
Страница 222: ...Appendix summary A ASUS Z9PE D8 WS A 1 Z9PE D8 WS block diagram A 3 ...
Страница 223: ...ASUS Z9PE D8 WS A 3 A 1 Z9PE D8 WS block diagram ...
Страница 224: ...A 4 Appendix A Reference information ...


