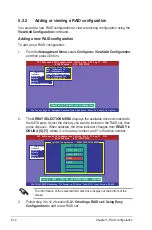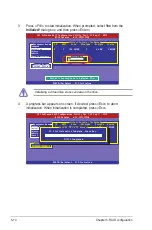
4-54
Chapter 4: BIOS setup
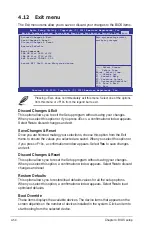
4.12 Exit menu
The Exit menu items allow you to save or discard your changes to the BIOS items.
Pressing <Esc> does not immediately exit this menu. Select one of the options
from this menu or <F10> from the legend bar to exit.
Discard Changes & Exit
This option allows you to exit the Setup program without saving your changes.
When you select this option or if you press <Esc>, a confirmation window appears.
Select
Yes
to discard changes and exit.
Save Changes & Reset
Once you are finished making your selections, choose this option from the Exit
menu to ensure the values you selected are saved. When you select this option or
if you press <F10>, a confirmation window appears. Select
Yes
to save changes
and exit.
Discard Changes & Reset
This option allows you to reset the Setup program without saving your changes.
When you select this option, a confirmation window appears. Select
Yes
to discard
changes and reset.
Restore Defaults
This option allows you to restore/load defaults values for all the setup options.
When you select this option, a confirmation window appears. Select
Yes
to load
optimized defaults.
Boot Override
These items displays the available devices. The device items that appears on the
screen depends on the number of devices installed in the system. Click an item to
start booting from the selected device.
Exit system setup without
saving any changes.
Version 2.14.1219. Copyright (C) 2011 American Megatrends, Inc.
Aptio Setup Utility - Copyright (C) 2011 American Megatrends, Inc.
Main Ai Tweaker Advanced Server Mgmt Event Logs Boot Monitor Security Tool
Exit
→←:
Select Screen
↑↓:
Select Item
Enter: Select Item
+/-: Change Opt.
F1: General Help
F2: Previous Values
F5: Optimized Defaults
F10: Save & Exit
ESC: Exit
Discard Changes & Exit
Save Changes & Reset
Discard Changes & Reset
Restore Defaults
Boot Override
IBA GE Slot 0600 v1376
IBA GE Slot 0700 v1376
AMI Virtual CDROM0 1.00
Launch EFI Shell from filesystem device
Содержание Z9PE-D8 WS
Страница 1: ...Motherboard Z9PE D8 WS ...
Страница 15: ...1 Product introduction This chapter describes the motherboard features and the new technologies it supports ...
Страница 22: ...1 8 Chapter 1 Product introduction ...
Страница 27: ...ASUS Z9PE D8 WS 2 5 2 2 3 Motherboard layout Z9PE D8 WS ...
Страница 51: ...ASUS Z9PE D8 WS 2 29 2 9 Connectors 2 9 1 Rear panel connectors ...
Страница 63: ...ASUS Z9PE D8 WS 2 41 17 ASMB6 header ASMB6 This connector supports the ASUS Server Management Board 6 series ...
Страница 64: ...2 42 Chapter 2 Hardware information ...
Страница 65: ...3 Chapter 3 Powering up This chapter describes the power up sequence and ways of shutting down the system ...
Страница 66: ...ASUS Z9PE D8 WS Chapter summary 3 3 1 Starting up for the first time 3 3 3 2 Powering off the computer 3 4 ...
Страница 195: ...ASUS Z9PE D8 WS 6 29 9 Click Finish to complete the installation ...
Страница 198: ...6 32 Chapter 6 Driver installation 6 Click Finish to complete the installation and exit the wizard ...
Страница 201: ...ASUS Z9PE D8 WS 6 35 7 Click Install to begin installation 8 Click Finish to complete the installation ...
Страница 222: ...Appendix summary A ASUS Z9PE D8 WS A 1 Z9PE D8 WS block diagram A 3 ...
Страница 223: ...ASUS Z9PE D8 WS A 3 A 1 Z9PE D8 WS block diagram ...
Страница 224: ...A 4 Appendix A Reference information ...

