ASUS Z9PE-D8 WS
7-7
7.2
NVIDIA
®
SLI™ technology
The motherboard supports the NVIDIA
®
SLI™ (Scalable Link Interface) technology
that allows you to install multi-graphics processing units (GPU) graphics cards.
Follow the installation procedures in this section.
7.2.1
Requirements
•
In Dual SLI mode, you should have two identical SLI-ready graphics cards
that are NVIDIA
®
certified.
•
In Triple SLI mode, you should have three identical SLI-ready graphics cards
that are NVIDIA
®
certified.
•
Ensure that your graphics card driver supports the NVIDIA SLI technology.
Download the latest driver from the NVIDIA website (www.nvidia.com).
•
Ensure that your power supply unit (PSU) can provide at least the minimum
power required by your system.
7.2.2
Installing two SLI-ready graphics cards
The following pictures are for reference only. The graphics cards and the
motherboard layout may vary with models, but the installation steps remain the
same.
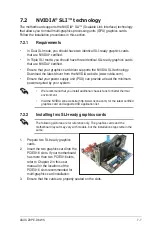
1. Prepare two SLI-ready graphics
cards.
2. Insert the two graphics card into the
PCIEX16 slots. If your motherboard
has more than two PCIEX16 slots,
refer to Chapter 2 in this user
manual for the locations of the
PCIEX16 slots recommended for
multi-graphics card installation.
3. Ensure that the cards are properly seated on the slots.
• We recommend that you install additional chassis fans for better thermal
environment.
• Visit the NVIDIA zone website (http://www.nzone.com) for the latest certified
graphics card and supported 3D application list.
Содержание Z9PE-D8 WS
Страница 1: ...Motherboard Z9PE D8 WS ...
Страница 15: ...1 Product introduction This chapter describes the motherboard features and the new technologies it supports ...
Страница 22: ...1 8 Chapter 1 Product introduction ...
Страница 27: ...ASUS Z9PE D8 WS 2 5 2 2 3 Motherboard layout Z9PE D8 WS ...
Страница 51: ...ASUS Z9PE D8 WS 2 29 2 9 Connectors 2 9 1 Rear panel connectors ...
Страница 63: ...ASUS Z9PE D8 WS 2 41 17 ASMB6 header ASMB6 This connector supports the ASUS Server Management Board 6 series ...
Страница 64: ...2 42 Chapter 2 Hardware information ...
Страница 65: ...3 Chapter 3 Powering up This chapter describes the power up sequence and ways of shutting down the system ...
Страница 66: ...ASUS Z9PE D8 WS Chapter summary 3 3 1 Starting up for the first time 3 3 3 2 Powering off the computer 3 4 ...
Страница 195: ...ASUS Z9PE D8 WS 6 29 9 Click Finish to complete the installation ...
Страница 198: ...6 32 Chapter 6 Driver installation 6 Click Finish to complete the installation and exit the wizard ...
Страница 201: ...ASUS Z9PE D8 WS 6 35 7 Click Install to begin installation 8 Click Finish to complete the installation ...
Страница 222: ...Appendix summary A ASUS Z9PE D8 WS A 1 Z9PE D8 WS block diagram A 3 ...
Страница 223: ...ASUS Z9PE D8 WS A 3 A 1 Z9PE D8 WS block diagram ...
Страница 224: ...A 4 Appendix A Reference information ...

