


5-26
Chapter 5: RAID configuration
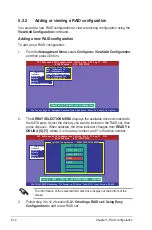
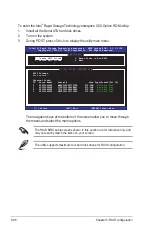
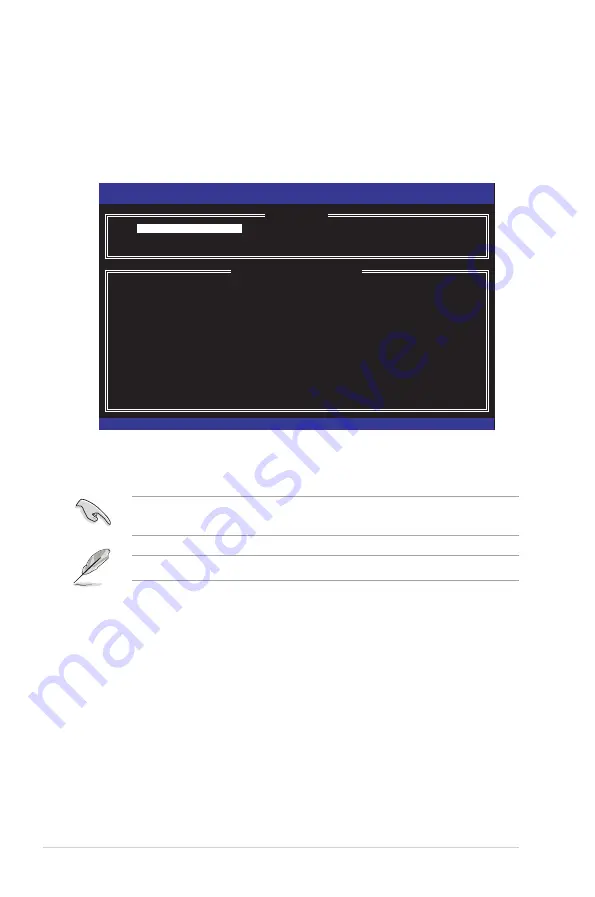
Intel(R) Rapid Storage Technology enterprise - SATA Option ROM - 3.0.0.1104
Copyright(C) 2003-11 Intel Corporation. All Rights Reserved.
[
MAIN MENU
]
1. Create RAID Volume
3. Reset Disks to Non-RAID
2. Delete RAID Volume 4. Exit
[
DISK/VOLUME INFORMATION
]
RAID Volumes:
None defined.
Physical Disks:
ID Drive Model Serial # Size Type/Status(Vol ID)
0 ST3300656SS HWAS0000991753TR 279.3GB
Non-RAID Disk
1 ST3300656SS 37VN00009846RAJ1 279.3GB
Non-RAID Disk
2 ST3300656SS 397600009846UEDY 279.3GB
Non-RAID Disk
3 ST3300656SS GWC50000991756G6 279.3GB
Non-RAID Disk
[
↑↓
]-Select
[ESC]-Exit [ENTER]-Select Menu
The utility supports maximum four hard disk drives for RAID configuration.
The navigation keys at the bottom of the screen allow you to move through
the menus and select the menu options.
The RAID BIOS setup screens shown in this section are for reference only and
may not exactly match the items on your screen.
To enter the Intel
®
Rapid Storage Technology enterprise SCU Option ROM utility:
1. Install all the Serial ATA hard disk drives.
2. Turn on the system.
3. During POST, press <Ctrl+I> to display the utility main menu.
Содержание Z9PE-D8 WS
Страница 1: ...Motherboard Z9PE D8 WS ...
Страница 15: ...1 Product introduction This chapter describes the motherboard features and the new technologies it supports ...
Страница 22: ...1 8 Chapter 1 Product introduction ...
Страница 27: ...ASUS Z9PE D8 WS 2 5 2 2 3 Motherboard layout Z9PE D8 WS ...
Страница 51: ...ASUS Z9PE D8 WS 2 29 2 9 Connectors 2 9 1 Rear panel connectors ...
Страница 63: ...ASUS Z9PE D8 WS 2 41 17 ASMB6 header ASMB6 This connector supports the ASUS Server Management Board 6 series ...
Страница 64: ...2 42 Chapter 2 Hardware information ...
Страница 65: ...3 Chapter 3 Powering up This chapter describes the power up sequence and ways of shutting down the system ...
Страница 66: ...ASUS Z9PE D8 WS Chapter summary 3 3 1 Starting up for the first time 3 3 3 2 Powering off the computer 3 4 ...
Страница 195: ...ASUS Z9PE D8 WS 6 29 9 Click Finish to complete the installation ...
Страница 198: ...6 32 Chapter 6 Driver installation 6 Click Finish to complete the installation and exit the wizard ...
Страница 201: ...ASUS Z9PE D8 WS 6 35 7 Click Install to begin installation 8 Click Finish to complete the installation ...
Страница 222: ...Appendix summary A ASUS Z9PE D8 WS A 1 Z9PE D8 WS block diagram A 3 ...
Страница 223: ...ASUS Z9PE D8 WS A 3 A 1 Z9PE D8 WS block diagram ...
Страница 224: ...A 4 Appendix A Reference information ...


