Astro Machine AstroJet L1 Скачать руководство пользователя страница 63

SECTION 4 

MAINTENANCE 


57 


Return Procedure: 


1.


Make sure Printer is powered up and connected via  
USB or network.


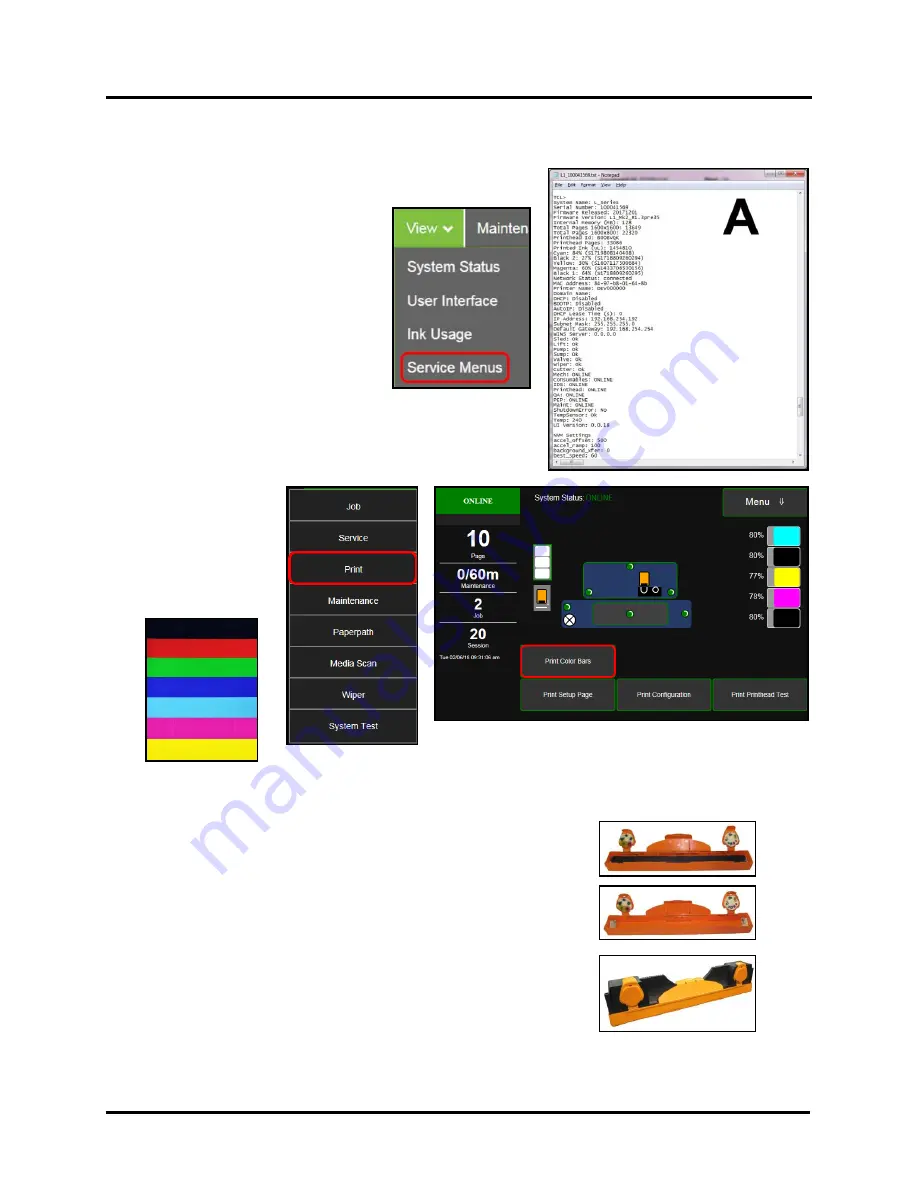
To check Printhead Page count: 

Open 

“View”

 drop-down menu in the 

computer's 

Toolbox

.  

Select 

“Service Menus”

. The 

“Diagnostics 

screen opens. Select 

“Upload Debug Log”

. Open and print 

the file 

[A]

 to include with your return.  


2.


From Touchscreen 
(

or open Printer 

Toolbox

).

 Open the 

“Print Menu”

 drop-

down. Tap 

“Print”

Then tap the 

“Print 

Color Bars” 

button. 


3.


Remove Printhead Cartridge from Printer per replacement instructions 
found in Operator's Manual.


4.


Snap Printhead back into orange plastic protective cover it was shipped 
in. 

IMPORTANT!


Make sure all foam pads that came with the 

protective cover are installed and in place (

two versions shown in 

images at right

). 

5.


Reseal Printhead and Cover in a plastic bag (

reuse and reseal original 

packaging if possible

).


6.


Place Printhead, Printhead Page Count printout and Color Bars printout in 
a shipping box. Remember to include your company name, contact 
information and return address as well.


7.


Return to your Astro Machine distributor.


Color Bars Printout


Содержание AstroJet L1

Страница 1: ...AstroJetTM L1 COLOR LABEL PRINTER OPERATOR MANUAL ASTRO MACHINE CORP 630 Lively Blvd Elk Grove Village IL 60007 Phone 847 364 6363 Fax 847 364 9898 www astromachine com...

Страница 2: ...ent walls or furniture DO NOT remove covers Covers enclose hazardous parts that should only be accessed by a qualified service representative Report any cover damage to your service representative Thi...

Страница 3: ...rtridge 17 Connect Printer to External Device 20 Load Media 20 SECTION 3 Operating Printer 21 Printer Driver Properties 21 General Tab 22 Layout Tab 23 Color Tab 23 Media Tab 24 Import Export Tab 26 U...

Страница 4: ...ONTENTS ii Appendices 67 Appendix A Printer Specifications 67 Appendix B Supplies and Optional Hardware 68 Appendix C Borderless Printing Borderless Print vs Oversize 69 Index 73 Printer Maintenance S...

Страница 5: ...___ ______________________________________________________ ______________________________________________________ ______________________________________________________ _______________________________...

Страница 6: ......

Страница 7: ...Exhaust Fan Draws ink vapor out of the Print Area and away from the Exit Sensor 7 Cutter Assembly Cuts media after each piece or at end of job 8 Fixed and Adjustable Exit Media Guides Loosen and tigh...

Страница 8: ...Adjusts to hold media against Stationary Media and Alignment Guides 7 Fixed Media Guide Keeps media aligned as it enters the Printer 8 Top Forwarding Wheels Assembly and Forwarding Rollers Move media...

Страница 9: ...ngs Connect ink hoses to Printhead Cartridge Printhead Latch extends and retracts couplings from Printhead 3 Printhead Cartridge Memjet Printhead produces an 8 5 wide full color print area 4 Service S...

Страница 10: ...helps media transport smoothly through Print Area 5 Clamshell Latch Release to raise Top Assembly to clear media jams or for cleaning and other maintenance 6 Transport Rollers Keep media moving throug...

Страница 11: ...ots NOTE Make sure both sides at bottom part of latch are engaged 3 Ink Tanks Printer has 5 Ink Tanks Cyan Yellow Magenta and two Black 4 Ink Waste Tray Catches any waste ink produced by system Tray i...

Страница 12: ...work Install Printer Driver Install Ink Tanks Install Printhead Align Printer with other in line devices If used Connect external device Winder Laminator Dryer etc to Printer If used Set up feed on Pr...

Страница 13: ...ECTION 2 INSTALLING PRINTER 7 Install Ink Drip Tray Assembly 1 Open Ink Tank Door A 2 Release Latch B to raise the Clamshell 3 Insert tabs on Ink Drip Tray into frame slots C as shown 4 Close Clamshel...

Страница 14: ...inter connects to computer through USB Port 2 Network Port 3 for operating in a network environment See Network Connection Setup in Using Control Panel Touchscreen Turning Power ON and OFF IMPORTANT C...

Страница 15: ...amework version 3 5 for 32 bit systems or Microsoft Net Framework version 4 for 64 bit systems must be installed NOTE Even if a higher NET Framework version is installed version 3 5 or 4 must also be...

Страница 16: ...ections Click Configure to print using USB Then click Next 5 Installing Printer Software Software download begins 6 Would You Like to Install This Device Software Click Install 7 Connect Device Now Tu...

Страница 17: ...t all networks that allow automatic assignment of the IP address factory default NOTE Copy the 12 digit Hardware ID number listed on the Printer s on the label located below the Ethernet port so you c...

Страница 18: ...Check the Printer column to verify you have an L Series printer Check the Hardware ID column and match the number listed to the number you copied previously from the Printer label Select that Printer...

Страница 19: ...configured printer L Series Network 1 and a USB configured printer L Series USB To open the Toolbox utility over an Ethernet network connection Click Start All Programs Memjet L Series Driver Toolbox...

Страница 20: ...by computer or laptop Once the Driver and Firmware are installed on the Printer use that same computer to open the Printer Toolbox In the View drop down menu click Service Menus When the Diagnostic sc...

Страница 21: ...ple rename a network configured printer L Series Network 1 and a USB configured printer L Series USB To open the Toolbox utility over an Ethernet network connection Click Start All Programs Memjet L S...

Страница 22: ...Disconnects Printer communication with Ink Tanks and allows safe installation and replacement Open Ink Tank Latches A 3 Remove new Ink Tank s from packaging 4 Insert Ink Tanks labels up into appropria...

Страница 23: ...thead can compromise print quality due to dehydration DO NOT place an unwrapped Printhead on any surface before installing Protect Printhead from scratches dust fibers dirt and other contaminants at a...

Страница 24: ...strip from Printhead DO NOT pull strip at less than a 45 angle from Printhead surface DO NOT allow removed strip to touch Printhead Nozzles 3 Wet Printhead Surface Ensures that Printhead will prime co...

Страница 25: ...con continues to display an outline or a question mark try the following procedures 1 Printhead icon shows an outline Printhead unprimed Click Circulate Ink under Maintenance drop down in Printer Tool...

Страница 26: ...edia Setting the Adjustable Media Sensor For irregular shaped media such as a circle loosen Sensor Reflector knob Slide the Sensor Reflector along track so the straight edge of the Sensor A aligns wit...

Страница 27: ...as Microsoft Word Other types of applications and database management software will work in a similar manner when using this Driver Printer Driver Properties The Printer Driver works the same as any...

Страница 28: ...to be printed Reverse Order When box is checked the job will start printing from the last page of a document and end on the first page Collate When printing multiple copies of multi page documents che...

Страница 29: ...omatically resizes document to fit on new page size Watermark Prints a light background watermark in paper while printing original document When selected First page only option prints watermark on fir...

Страница 30: ...rectly For example printing both front and back bottle labels in one pass A label frequency of 1 reads the gap between every label A setting of 2 will ignore the gap between the two labels A In effect...

Страница 31: ...m increments Bottom Adjustment Bottom of Form BOF Extends BOF in 0 1mm increments to allow printing over edge of a label full bleed label printing Max Page Width Sets width of actual print area 0 1mm...

Страница 32: ...holding file before downloading new firmware Import Return custom settings after firmware installation is complete The Import Export tab is also used to import custom media size packages or watermark...

Страница 33: ...functions and more can also be operated remotely from a computer using the Printer Toolbox See Using the Printer Toolbox following this section Tap the screen to view the Printer Touchscreen A System...

Страница 34: ...Touchscreen versions currently installed on the Printer Date and Time shows current date and time These can be configured and set by opening the Service screen then Network Config then Date and Time...

Страница 35: ...ary Print jobs can be saved to the Printer s Job Library by selecting the Printer Capture option under Job Management on the General Tab of the Printer Driver You can access jobs saved in the Printer...

Страница 36: ...s Bottom of Form BOF in 0 1mm increments to allow printing over the edge of a label full bleed label printing Interpage Gap Sets a gap between labels pages when using continuous media NOTE Minimum gap...

Страница 37: ...inter Date and Time See also System Settings in Using Printer Toolbox Restart Restarts the Printer without having to perform the shutdown routine purging ink tanks priming etc Print Screen Tapping Men...

Страница 38: ...ridge Paperpath Screen Tapping Menu then Paperpath opens the Paperpath screen These buttons are used to move media through the Printer when loading or unloading the Printer Unload Rewinds the media ba...

Страница 39: ...between the label surface and backing gap See Using Media Scan below NOTE If using notched Tags open the Top Cover and slide the white magnetic strip A back to uncover the See Thru Sensor B Cover the...

Страница 40: ...el reading This example uses a 1 8 3 5mm blackmark or gap with a 4 101 6mm long label 6 Manual Scan For Advanced Users Only Use Manual Scan if you wish to fine tune the results of the Auto Scan First...

Страница 41: ...ller Once the new Wiper is installed the Printer primes the system with ink and conditions the Wiper to optimal operating condition 1 Printer runs a System Deprime 2 Replace Wiper Roller or Wiper Modu...

Страница 42: ...the amount of usable memory left on the USB Flash Drive plugged into the Printer Backup Logs Backs up all of the Debug Log files currently on the Printer Backup Print Jobs Backs up all of the Print Jo...

Страница 43: ...onventional and touchscreen computer screens To open the Printer Toolbox from a computer Open Start Menu then click on Toolbox select L Series Driver NOTE Conventional Screens Use your cursor Touchscr...

Страница 44: ...rmed in relation to when Wipe Printhead or Printhead Cleaning is performed Example 3 1 Printer performs 3 Wipe Printheads before one Wiper Transfer is performed Ink Levels displays percentage of ink r...

Страница 45: ...r is stopped or paused KWS Setting Keep Wet Spitting Keeps Printhead hydrated while running a job Select from 4 settings None Light Medium default and Heavy to determine how much ink will spit from Pr...

Страница 46: ...procedure is an alternative method for downloading firmware See Updating Firmware Using bin File for the recommended procedure using the bin files WARNING This procedure should only be performed by q...

Страница 47: ...ck Submit to activate the Mode setting selected NOTE The estimating process takes as long as the job would take to print i e if a job would take one hour to print the estimate will take one hour to di...

Страница 48: ...tenance menus For authorized service personnel only Diagnostics This is the screen that opens when you select Service Menus From this screen you can see current status of the Printer Other features Up...

Страница 49: ...Connection Set Up 1 Printer is still connected to computer via USB cable To connect the Printer to a network From the Toolbox select View drop down menu click Service Menus then click System Settings...

Страница 50: ...ormat the Date and Time for the Printer 3 Click Submit Debug Level Set the detail level of the Debug Logs To change the Debug Level 1 From the Toolbox select View drop down menu click Service Menus an...

Страница 51: ...idle before automatically going to Sleep Mode 1 From the Toolbox select View drop down menu click Service Menus and then click System Settings 2 System Settings page opens Go to Screensaver Enter the...

Страница 52: ...s print or send activity logs for the Printer and for jobs run on the Printer These files are valuable for diagnosing and servicing problems All Shows all log files available Debug Shows only Debug lo...

Страница 53: ...nsor B Cover the Sensor for all other media Media Scan Procedure 1 Load media in Printer as if printing a job 2 From the Toolbox select the View drop down menu click Service Menus Click Media Scan 3 U...

Страница 54: ...r decrease the Sensor sensitivity by changing the Sensor sensitivity values You can also increase or decrease the length of media to be scanned by moving the slider on the Scan Length bar Press the Sc...

Страница 55: ...ed to keep Print Engine powered up ON OFF light illuminated at all times If turning the Printer off first power down the Print Engine using Shutdown button in Toolbox or ON OFF button on Control Panel...

Страница 56: ...ownload the bin file and save it to your desktop 2 From Start Menu open All Programs Open Memjet folder then L Series Driver Click Update Firmware 3 Click Browse button Find and select file just saved...

Страница 57: ...Tank Latches A and pull Ink Tank s B out of Printer 3 Remove new Ink Tank s from packaging 4 Slide new Ink Tanks labels up into appropriate color slots B Close Ink Tank Latches INSTALLATION TIP Make...

Страница 58: ...Chip contacts B with a clean dry lint free cloth NOTE Dampen cloth with distilled water to wipe Prism but DO NOT get QA Chip contacts wet 3 Reinstall Ink Tank s labels up close Ink Tank Latch es Close...

Страница 59: ...ting it toward ink lines then carefully lifting it out of the Printhead Compartment 3 Moisten Printhead nozzles using deionized distilled water reference ASTM D5127 90 Type E II Electronic Grade Water...

Страница 60: ...it toward ink lines then carefully lifting it out of the Printhead Compartment 3 A Carefully remove Printhead Cartridge from foil packaging Tear foil at notch or cut the end with scissors B Remove pr...

Страница 61: ...tap lines or click Circulate Ink on Touchscreen to clear them 8 Watch Control Panel Touchscreen Check that Printhead icon 7 in Printer image is primed solid color 9 When ONLINE 8 appears the Printer...

Страница 62: ...use the entire length of Printhead some nozzles do not fire as often The most often used Nozzles will degrade more quickly Noticing effects of failing nozzles depends partly on the relative position...

Страница 63: ...Remove Printhead Cartridge from Printer per replacement instructions found in Operator s Manual 4 Snap Printhead back into orange plastic protective cover it was shipped in IMPORTANT Make sure all foa...

Страница 64: ...signed to provide a long service life To access the Service Station for inspection and cleaning 1 Using the Touchscreen select Menu then tap Maintenance from the drop down menu Tap Inspect Sled The Se...

Страница 65: ...from unit 3 Replace with new Ink Waste Tray B Jams in Printer Clearing a jam depends on where jam occurred Print Area Open Ink Tank Door Pull Clamshell Latch A toward you to unlatch Clamshell Raise Cl...

Страница 66: ...ust particles NOTE Be careful around ink tray and capping station in Print Engine area as accumulated ink may splash onto other parts of Printer Take care not to damage PC Boards or electrical wiring...

Страница 67: ...t foam or lint free cotton swab to gently swab Sensors Take care not to drip water into Circuit Boards Use a clean dry swab to dab surfaces dry B Rubber Rollers Clean as needed using distilled water w...

Страница 68: ...OR LATCH MAY BREAK ONLY OPEN LATCH USING RELEASE PRINTHEAD BUTTON ON THE TOUCHSCREEN OR IN THE PRINTER TOOLBOX 2 Make sure Printhead Latch is fully opened to retract ink lines Remove used Printhead C...

Страница 69: ...SS MAIN POWER SWITCH ON REAR PANEL Remove Ink Tanks 1 After depriming the system Open Front Cover hinged at bottom Open the Ink Tank Latches A and pull Ink Tank s B out of Printer 2 Carefully package...

Страница 70: ...missing or misdirected nozzles or ink color mixing Debris on Printhead Perform startup routine Clean Printhead using a Cleaning Level on the Printer Touchscreen or in the Printer Toolbox Wipe Printhea...

Страница 71: ...on Feeder Uncurl media Minimum thickness for media is 0 004 No communication Improper cabling connector Unit not receiving power Use a proper USB cable see Operator Manual Check plug connections ON OF...

Страница 72: ...nthead Remove Printhead Cartridge Check clean electrical contacts Reinsert Printhead Replace Printhead If problem persists contact technical support Multiple Inks Low Reorder Ink Multiple Ink Tanks Ou...

Страница 73: ...IA SENSING Label gap notch tick mark Continuous blackmark diecut SOFTWARE WindowsTM Printer Drivers for WindowsTM 8 8 1 10 RIP available DIAGNOSTICS Viewable on 7 Touchscreen Display and L Series Tool...

Страница 74: ...S CHECK INK TYPE FOR YOUR PRINTER VersaPass TM DG Black Ink Cartridge 250 ML 123 2412 VersaPass TM DG Cyan Ink Cartridge 250 ML 123 2413 VersaPass TM DG Magenta Ink Cartridge 250 ML 123 2414 VersaPass...

Страница 75: ...ption when to use each prerequisite setup and other tips for getting the best result BORDERLESS PRINT CHECKBOX Borderless Print Checkbox is located in Printers Printing Preferences in Media section un...

Страница 76: ...le Borderless Print for a 4 x 8 label would actually be 4 800 dpi 21 dots 3221 dots x 8 800 dpi 21 dots 6421 dots Borderless Print Example Measurements and Relationships For barcodes and text use Over...

Страница 77: ...d choosing Oversize opens up more of target image for printing so that it can print beyond size of physical media However target image also needs to be created as oversized not size of physical media...

Страница 78: ...gap possibly below 3mm minimum This may also be beyond top of form TOF and bottom of form BOF If gap is less than minimum label gap labels are skipped since TOF and BOF are undetectable for next label...

Страница 79: ...box 42 Display Touchscreen 1 2 Disposal Ink Tanks 52 Door Ink Tank 1 2 Drip Tray 4 Drop Down Menu Job Status 28 Maintenance 32 49 Media Scan 33 47 Paperpath 32 Print 31 49 Service 31 49 System Test 35...

Страница 80: ...able Entry 2 4 Clean 61 Exit 4 Media Tab Printer Driver 24 Media Load 20 Minimum Requirements System 9 Misfeeds 59 N Network Connect 2 8 Settings Toolbox 43 Settings Touchscreen 31 O Operating Printer...

Страница 81: ...Service Life Printhead 56 Port 2 Toolbox 42 49 Service Station 3 Clean 58 Inspect 58 Inspection Motor 3 Set up Network Toolbox 43 Network Touchscreen 31 Printer 6 Shipping Transporting Printer 62 Spe...

Страница 82: ...ad 64 U Unpack 6 Update Firmware 50 USB Backup Touchscreen 1 36 USB Port 2 8 10 User Interface Toolbox 39 Using Media Scan Toolbox 47 Media Scan Touchscreen 33 Media Tab Printing Adjustments 25 Printe...

Страница 83: ...plings and Connections Inspection Cleaning EVERY PRINTHEAD REMOVAL Residue and Debris Removal CLEAN CLEAN CLEAN CLEAN CLEAN Optical Sensors Media Path CLEAN CLEAN CLEAN Wiper Assembly Inspection INSPE...

Страница 84: ...____________________ ______________________________________________________ ______________________________________________________ ______________________________________________________ ______________...

Страница 85: ......

Страница 86: ...Copyright 2019 ASTRO MACHINE CORP Elk Grove Village IL 60007 03 12 2019 Part Number 200 L1...

Отзывы: