


SECTION 3
OPERATING PRINTER
30
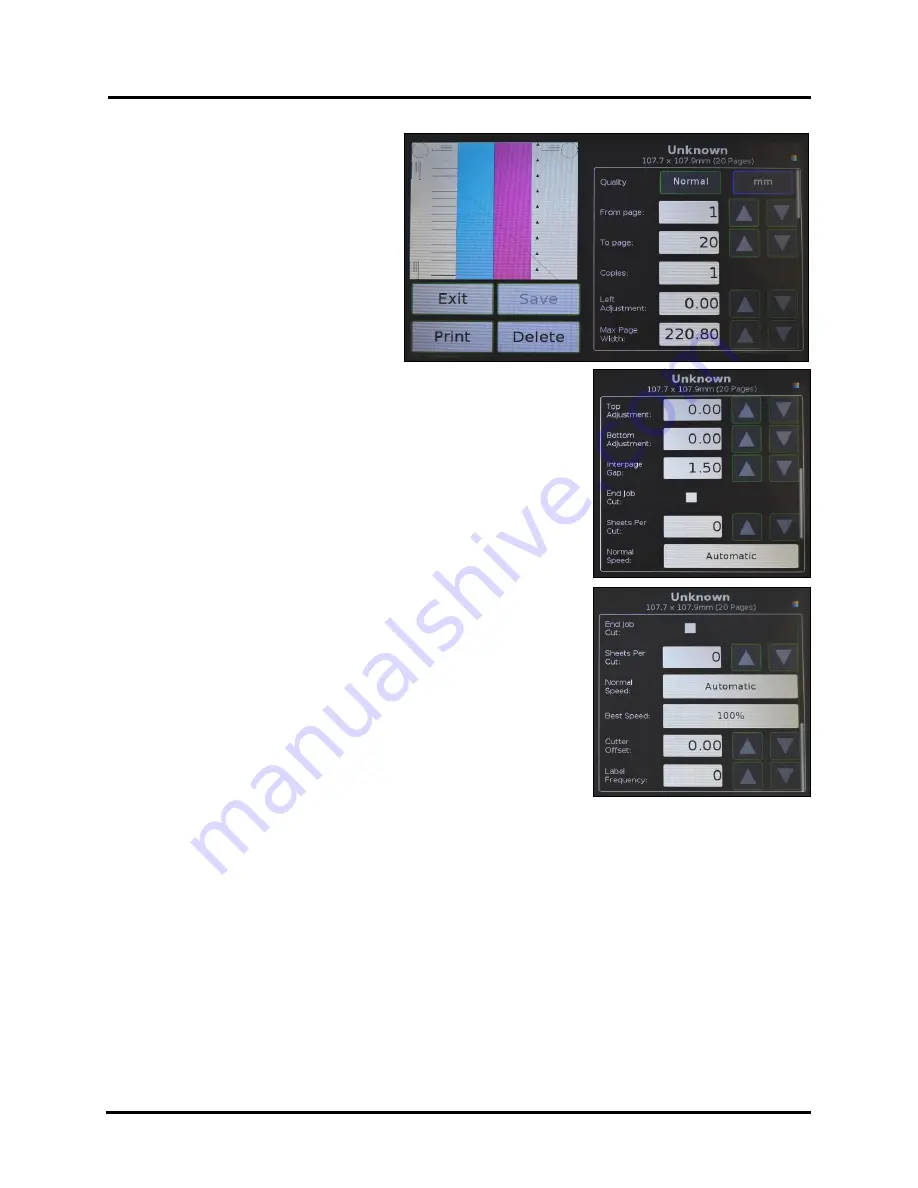
Select a job by tapping the job icon or the list
name. The
Job Print Options
screen opens.
The (4)
Control
buttons let you
Exit
,
,
Save
or
Delete
the print job. The
Save
button
saves any changes you make to the job
specifications in the
Print Options
on the
right side of the screen. If you do not tap
Save
,
the print job reverts to its original settings
when you
Exit
.
The
Print Options
allow you to change or
adjust print specifications for the print job.
Scroll down the screen to access all options.
Quality
– Tap the button to select
Normal
or
Best
.
Normal
is 1600 x 800 dpi.
Best
setting is 1600 x 1600 dpi.
mm or inches
– Tap the button to change measurements to millimeters or
inches.
From page
and
To page
– Select the first and last pages of a job (
or part
of a job
) to print using the Up or Down arrows.
Copies
– Enter the number of copies to be printed.
Left Adjustment
– Moves the image area away (-
3mm left to +200mm
right
) from the left edge of the media.
(
Up or down arrows move in
0.1mm increments
)
Max. Page Width
– Sets the width of the actual print area. (
Up or Down
arrows move in 0.1mm increments
) This shuts off nozzles in the non-
printing area (
not used for printing
) and saves ink.
NOTE: Can be no
larger than maximum print width for Printer (8.6"/220.8mm)
Top Adjustment
– Moves Top of Form (TOF) image up or down
(-
5mm up to +200mm down
) from top left corner of media used.
Bottom Adjustment
– Extends Bottom of Form (BOF) (
in 0.1mm
increments
) to allow printing over the edge of a label (
full bleed label
printing
).
Interpage Gap –
Sets a gap between labels (
pages
) when using
continuous media.
NOTE: Minimum gap (
default
) is 3mm
.
End Job Cut –
When checked, cuts the end of the media after the job
finishes printing.
Sheets Per Cut –
Set the number of labels (
sheets
) between cuts.
Example:
1 = cut after every label. 5 = cut after every fifth
label.
NOTE:
Since
End of Job Cut
will also be active, last cut may have fewer labels than set
Pages per Cut
number depending on total number of labels you are printing (
i.e. you print a total of 23 labels set to cut after
every fifth label, you will have 4 sets of 5 labels, 1 set of 3.
)
Normal Speed –
Adjust the Printer speed for the
Normal Quality
setting and for the media being used
(
i.e., slow the printing speed for higher quality on glossy stock
).
Best Speed --
Adjust the Printer speed for the
Best Quality
setting and the media being used (
i.e., slow the
printing speed for higher quality on glossy stock
).
Cutter Offset –
Allows fine tuning of the cut line position after making image positioning adjustments.
Label Frequency –
Allows Printer to ignore a set number of gaps between labels. This is particularly useful
when the labels are different shapes and the Printer sensor may not sense the edge of second label correctly. (
For
example, printing both front and back bottle labels in one pass
.) A label frequency of “1” reads the gap between
every label. A setting of “2” will ignore the gap between the two labels
[A]
. (
In effect, the Printer
“
sees
”
the two
labels as one label
). The
Label Frequency
can be set from
1-8
.
Содержание AstroJet L1
Страница 6: ......
Страница 85: ......
Страница 86: ...Copyright 2019 ASTRO MACHINE CORP Elk Grove Village IL 60007 03 12 2019 Part Number 200 L1...


