52
Premmia GL Series
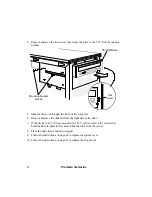
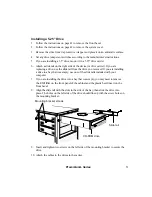
4. Remove and save the two screws that secure the drive to the 5.25” drive mounting
bracket.
Rail
screw
CD-ROM drive
Mounting bracket
screws
5. Slide the drive out through the front of the computer.
6. Remove and save the slide rail from the right side of the drive.
7. If the device is a 3.5” device mounted in a 5.25” carrier, remove the screws that
hold the drive in place in the carrier. Slide the drive from the carrier.
8. Place the drive in an anti-static wrapper.
9. Follow the instructions on page 42 to replace the system cover.
10. Follow the instructions on page 41 to replace the front bezel.
Содержание PREMMIA GL Series
Страница 1: ...Operator s Guide ...
Страница 13: ...Premmia GL Series 13 B D E F G H I J K L M N P R A C Q O ...
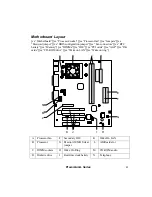
Страница 44: ...44 Premmia GL Series E Primary IDE J PCI card slots ...
Страница 93: ...Premmia GL Series 93 ...
Страница 95: ...Premmia GL Series 95 ...

