background image

12

10 

ADVANCED SETUP

ACTIVE SETTINGS

Fig. 27

Before carrying out the advanced setup procedure, select the type of 

Implement

Tractor 

and 

User 

you wish to use: all modifications made to the 

advanced setup will be applied to the ACTIVE SETTINGS
(in the example here 

imp00

,


tra00

,


usr00

).

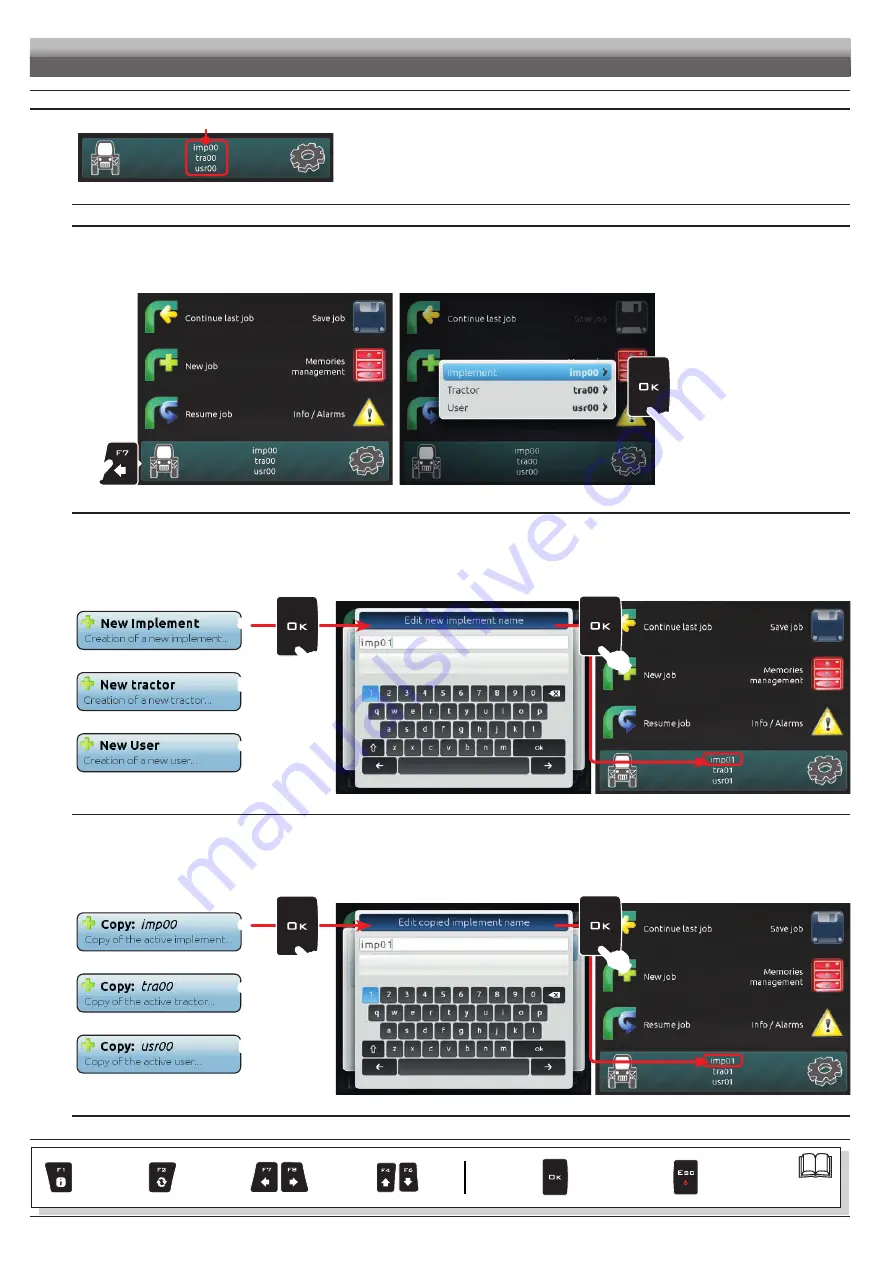
IMPLEMENT, TRACTOR AND USER TYPE SELECTION

1

 Press 

F7

 in the "Home" screen (Fig. 28).

2

 In the screen shown in Fig. 29 select the


Implement

 (

Tractor

 or 

User

) and press 

OK

.

Now it possible to create a new setup (

3a

 or 

3b

), or select an existing one (

3c

):

in all cases the setup will be enabled and the name will be displayed in the "Home" screen (Fig. 27).

1

Fig. 28 

2

Fig. 29 

3a NEW SETUP CREATION:

Select 

New implement

 (

a

 in Fig. 30) to create a new setup and press 

OK

.

Type the name (in the example of Fig. 31

imp01

) and press 

OK

.

The new setup is now active on the computer (Fig. 32). Before moving on to the advanced setup procedure repeat the basic setup (chap. 9).

You can follow the same procedure for 

Tractor


(

b

)

 and 

User


(

c

)

.

a

b

c

Fig. 30

Fig. 31

Fig. 32

3b NEW SETUP CREATION (BY COPYING DATA FROM AN EXISTING SETUP):

Select 

Copy

 (

d

 in Fig. 33) to copy the active setup and save the data on a new one; press 

OK

.

Type the name (in the example of Fig. 34

imp01

) and press 

OK

.

The saved setup is now active on the computer (Fig. 35). Proceed to advanced setup.

You can follow the same procedure for 

Tractor


(

e

)

 and 

User


(

f

)

.

d

e

f

Fig. 33

Fig. 34

Fig. 35 

ADVANCED SETUP

CONTINUES

Par.

7.4

Exit the function  
or data change

Confirm access
or data change

Scroll
(LEFT / 
RIGHT)

Delete 
selected 
character

Data
increase /
decrease

Scroll
(UP / 
DOWN)

Enter 
selected 
character

Содержание bravo series 400S

Страница 1: ...INSTALLATION USE AND MAINTENANCE 4674A0000 GPS GUIDANCE MONITOR Software rel 2 3X...

Страница 2: ...part of the equipment to which it refers and must accompany the equipment in case of sale or change of ownership Keep it for any future reference ARAG reserves the right to modify product specificatio...

Страница 3: ...priority alarms 26 10 3 3 Acoustic info 26 10 3 4 Steering warning 27 GUIDANCE 10 3 5 Offset tolerance 27 PREFERENCES 10 3 6 Selective job loading 27 10 4 General options 28 10 4 1 Language 28 10 4 2...

Страница 4: ...or will collect data on the job Navigator is not designed for use on public roads and should only be used on farmland This device is designed to work on agricultural machinery for spraying and crop sp...

Страница 5: ...nd that the monitor should not obstruct the operator s freedom of movement or block his view Consider all necessary connections of the computer Fig 3 the cable length and make sure there is enough spa...

Страница 6: ...12 VDC ALWAYS switch on the system through the computer and then remember to switch it off using the specific key on the control panel If the navigator remains on for a long time with machine off the...

Страница 7: ...y afterwards Fig 10 FIRST DEVICE SWITCHING ON Fig 11 Fig 12 Upon first switching on after the software version Navigator displays the Home screen Fig 11 press F8 and enter the device basic settings ch...

Страница 8: ...cess the selected item or to confirm modification 3 Press to exit screen without confirming modification ENTERING A NUMERICAL VALUE 2 2 1 1 4 3 C Fig 17 1 Press to move the cursor C across the digits...

Страница 9: ...vice basic settings chap 9 Afterwards it will be possible to select the preset settings by pressing F7 chap 13 Job menu Edit settings Implement Tractor User Select Create settings Implement DEF imp00...

Страница 10: ...o start guided setup procedure as shown in Fig 24 Fig 21 OK Next step ESC Previous step Fig 22 Fig 23 BASIC IMPLEMENT SETTINGS IMPLEMENT TYPE Sprayer Seletron system with Seletron valves Sprayer Elect...

Страница 11: ...receivers with NMEA183 protocol and with the following features 10 Hz GGA message latitude and longitude coordinates with at least 6 decimal digits 10 Hz VTG message 0 1 Hz ZDA message Serial port 576...

Страница 12: ...o create a new setup and press OK Type the name in the example of Fig 31 imp01 and press OK The new setup is now active on the computer Fig 32 Before moving on to the advanced setup procedure repeat t...

Страница 13: ...00 usr00 ADVANCED SETUP Fig 38 Fig 39 In the Home screen Fig 38 press F8 to enter the Settings menu Fig 39 Fig 40 Start advanced setup procedure for Navigator select the desired menu item with F4 or F...

Страница 14: ...ions configuration Fig 42 Sections number Indicate the number of boom sections Boom sprayer Boom sprayer Boom sprayer Boom sprayer Boom sprayer Fig 43 Fig 44 Boom width Fig 45 The boom width value dis...

Страница 15: ...d for overlapping of spraying with respect to field perimeter When this value is exceeded Navigator will notify the operator that the section valves spraying outside the field perimeter must be opened...

Страница 16: ...By setting this value an acoustic alarm will indicate the exact moment when the operator must steer in order to align the machine with the following track avoiding unsprayed or overlapping areas betw...

Страница 17: ...etween the reference tracks black lines decreases The spray lateral sides overlap Fig 57 0 5 m 0 5 m Fig 58 When the value is negative the distance between the reference tracks black lines increases U...

Страница 18: ...irm by pressing OK to enter setup Enter the value Select and enter one by one all values Offset between connection point and application point Application point Connection point 1 50 m NEGATIVE VALUES...

Страница 19: ...vered area diagram If you wish to see two different widths displayed on the guidance screen as in the example of Fig 67 set the Implement width to a different value than the boom width par 10 1 1 END...

Страница 20: ...ription of the selected value will appear on the display Confirm by pressing OK to enter setup Enter the value Select and enter one by one all values Offset between connection point and application po...

Страница 21: ...us to the covered area diagram If you wish to see two different widths displayed on the guidance screen as in the example of Fig 75 set the Implement width to a different value than the boom width par...

Страница 22: ...arge and available only in some areas of the world This signal allows to obtain a more accurate spraying WARNING this function may be used only in Europe EGNOS the United States WAAS and Japan MSAS 10...

Страница 23: ...s available worldwide for a fee and allows to obtain high working accuracy WARNING The differential correction service subscription is not managed by ARAG but directly by Omnistar For more information...

Страница 24: ...ess the arrow keys UP DOWN LEFT RIGHT to move across different tractor views Confirm by pressing OK to enter setup Fig 89 Fig 90 Tractor upper view Press the arrow keys UP DOWN LEFT RIGHT to move acro...

Страница 25: ...he display Confirm by pressing OK to enter setup Enter the value Select and enter one by one all values Fig 94 Fig 95 Steering angle Press OK to enter maximum steering angle setup Enter the value Par...

Страница 26: ...IC ALARMS 10 3 1 Acoustic critical alarms Fig 98 It allows to enable disable the acoustic signal when new Critical alarms are triggered Fig 97 Signal enabled Signal disabled 10 3 2 Acoustic low priori...

Страница 27: ...ance screen displays a LED bar according to the offset with respect to the reference line Each LED indicates an offset value corresponding to the one set in item Offset tolerance for ex 30 cm PREFEREN...

Страница 28: ...language Available languages Cesky Deutsch English Espa ol Fran ais Magyar Italiano Nederlands Polski Portugu s Rom n 10 4 2 Unit of measurement Fig 108 Set the computer units of measurement Metric km...

Страница 29: ...ed up by the GPS receiver Acquisition disabled Set date and time manually The display will show the Date and Time menu Fig 109 10 4 4 Date and Time Fig 110 To configure the items on this menu you must...

Страница 30: ...Fig 111 10 5 Device status Fig 111 Allows checking the correct operation of Navigator the description of the selected item will appear on the display Displayed items are READ ONLY EXTERNAL SIGNALS Fi...

Страница 31: ...31 ADVANCED SETUP DEVICE STATUS POWER SUPPLY DATA Fig 114 The device checks the status of the power supply FIRMWARE VERSIONS Fig 115 Navigator displays firmware versions...

Страница 32: ...ent F3 increases F5 decreases Displays job information alarms par 13 1 Enable disable the job function view Fig 117 F1 F8 Contextual function keys These keys control what is shown on the display displ...

Страница 33: ...ol OFF Sections ON Section ON Section OFF Zone to be sprayed OPEN SECTION Zone already sprayed CLOSE SECTION OPENING AND CLOSING SIGNALS When the overlapping exceeds the value set for the Sections ove...

Страница 34: ...cribed in par 14 6 F7 New AB This operation is fundamental for Navigator to guide you during spraying along tracks parallel to the reference track obtained by marking points A and B We recommend marki...

Страница 35: ...me job Activate procedure for resuming a job 10 F7 Select Create settings for User Tractor and Implement Par 12 2 F2 Save job Save current job 12 4 F4 Memories management Manage and copy data between...

Страница 36: ...m the point where it has been interrupted 2 Select and press OK to switch to guidance mode 3 Complete the job Fig 129 1 Fig 128 2 3 Fig 129 Par 7 4 Exit the function or data change Confirm access or d...

Страница 37: ...elected Save the entered text when the symbol is selected 4 Press to delete the character before the cursor 5 Press to exit screen without confirming modification Legend imp03 Typed Name Cursor Select...

Страница 38: ...start page without saving the job Press OK to switch to guidance Fig 135 12 3 F3 New job Start a new spraying 1 Press F3 to start a new spraying If the current job has not been saved yet Navigator wi...

Страница 39: ...jobs carried out or machine configurations The operations that can be carried out will be illustrated in the following paragraphs 1 Fig 136 A USB 1 pendrive inserted active menu B USB 2 pendrive not i...

Страница 40: ...nd press OK ERROR MESSAGES A file with the same name already exists on the SD card You can do the following Press OK to replace the file WARNING ALL data in the replaced file will be lost Press ESC to...

Страница 41: ...ion simultaneously on ALL implements of the list EXCEPT THE ACTIVE ONE 2 Fig 145 3 Fig 146 4 Fig 147 Delete Fig 148 Fig 149 Allows to delete data from the SD card Select Delete Fig 148 and press OK Th...

Страница 42: ...tion Select all allows performing the same operation simultaneously on ALL implements of the list EXCEPT THE ACTIVE ONE 2 Fig 153 3 Fig 154 4 Fig 155 Delete Fig 156 Fig 157 Allows to delete data from...

Страница 43: ...d press OK A confirmation message appears once the process is completed Press OK The map is saved on the USB pendrive inside a folder named kml Shape on SD Fig 162 It allows to export the current job...

Страница 44: ...ce mode 4 Complete the job Fig 165 1 2 Fig 163 Fig 164 2a In this screen it is possible to enable or disable the information memorized during the last saving Value enabled Value disabled Select one by...

Страница 45: ...ess F6 to view the Info Alarms menu Fig 167 A description of the selected notification is shown at the bottom of the display Par 7 4 Exit the function or data change Confirm access or data change Scro...

Страница 46: ...rresponding keys Par 13 1 F1 Info Alarms Displays job information alarms F3 NOT USED 13 4 F5 Camera Displays images from connected cameras 13 5 F7 Zoom all Overview of the field during spraying Par 13...

Страница 47: ...Menu 2 Press F1 to view the Info Alarms menu Fig 170 Fig 170 A description of the selected notification is shown at the bottom of the display Par 7 4 Exit the function or data change Confirm access o...

Страница 48: ...F6 to scroll data Displayed data and relevant units of measurement are indicated in par 16 1 3 3 Fig 172 A description of the selected data is shown at the bottom of the display Par 7 4 Exit the func...

Страница 49: ...ws the data sent to the GPS receiver Fig 174 Enabled for GPS receiver Smart Ag Tilt model only see General ARAG Cat A description of the selected data is shown at the bottom of the display Par 7 4 Exi...

Страница 50: ...at the same time view spraying data Enable camera view during advanced setup par 10 2 8 JOB DATA Fig 176 F2 Switch view between the two cameras F7 Select job data displayed on the LEFT side of the sc...

Страница 51: ...AUSE function par 14 2 1 In this screen it is NOT possible to mark or modify this point General points of interest Cursor Machine position Surface outside the field perimeter see SURFACE function Scal...

Страница 52: ...act point to be marked 3 Press OK Fig 180 4 Press F7 F8 to select the type of marker 5 Press OK to confirm Fig 181 4 3 4 Fig 180 5 Fig 181 REMOVING POINTS OF INTEREST 1 In field overview screen Fig 18...

Страница 53: ...ings menu Fig 185 Fig 185 In this screen it is possible to access several different menus which can be useful during spraying Device status par 10 5 Par 7 4 Exit the function or data change Confirm ac...

Страница 54: ...of more points F1 Pause Save job breaking point F3 F5 F7 General point of interest saving 14 4 F5 Resume from pause Guidance indications to return to job breaking point 14 6 F7 New AB Create a new AB...

Страница 55: ...y bends in the trajectory between A and B will be ignored The tracks appearing on the display which will act as a guidance reference include portions that are not straight but do not include sharp ben...

Страница 56: ...ition you wish to save A in Fig 195 the symbol will be placed exactly on that point Navigator can save ONLY ONE BREAKING POINT every time you save a point the previous one will be deleted 14 2 2 F3 F5...

Страница 57: ...Fig 199 5 4 Fig 200 4 Drive along the perimeter of the field or of the surface you wish to measure When you get close to the calculation starting point press Func again 5 Press F4 to complete the surf...

Страница 58: ...tance between your position and the breaking point C in Fig 203 3 Continue driving and make sure that the distance is decreasing you are reaching the breaking point When you are close to it you can se...

Страница 59: ...to align with the current position The closest reference track A in Fig 205 moves and becomes aligned with the center of the tractor all other reference tracks move accordingly After the alignment th...

Страница 60: ...followed during the job will appear on the display Fig 209 We recommend marking points A and B while the machine is moving at both ends of a straight line that is as long as possible the longer the li...

Страница 61: ...daytime night time display mode par 14 7 3 F8 switches between 2D 3D display mode par 14 7 4 par 14 7 1 par 14 7 2 par 14 7 3 par 14 7 4 Fig 211 14 7 1 F2 Tractor themes 1 2 1 In the guidance screen...

Страница 62: ...ew the available options 3 Press F6 in succession to switch between daytime and night time display mode 3 Fig 224 DAYTIME DISPLAY MODE DEFAULT NIGHT TIME DISPLAY MODE Fig 225 Fig 226 14 7 4 F8 2D 3D d...

Страница 63: ...ble DGPS correction par 10 2 1 DGPS connecting Wait for connection Job origin too far away The current position is too far away from the job origin Redefine the job origin 15 2 Troubleshooting FAULT C...

Страница 64: ...adius 0 0 20 0 m 0 0 m 0 00 65 00 ft 0 00 ft Reference line distance compensation 100 00 100 00 m 000 00 m 328 08 328 08 ft 000 00 ft Geometry settings Implement upper view Distance between connection...

Страница 65: ...0 20 00 m 2 50 m 0 50 64 00 ft 8 20 ft Vertical distance between front connection point and tractor s front axle 0 50 20 00 m 0 50 m 0 50 64 00 ft 1 64 ft Tractor rear view GPS antenna height from tra...

Страница 66: ...r to alterations resulting from environmental climatic or other conditions damage due to the use of unsuitable chemical products for spraying watering weedkilling or any other crop treatment that may...

Страница 67: ...or Navigator LT serie 4674Axxxx e 4674ACSTExx risponde ai requisiti di conformit contemplati nelle seguenti Direttive Europee 2004 108 CE Compatibilit Elettromagnetica Riferimenti alle Norme Applicate...

Страница 68: ...Via Palladio 5 A Tel 39 0522 622011 Fax 39 0522 628944 www aragnet com info aragnet com Only use genuine ARAG accessories or spare parts to make sure manufacturer guaranteed safety conditions are main...

Отзывы: