background image

5/14

XEN OWNER'S HANDBOOK

Upgrading the Apricot XEN

Chapter 5

If you are unfamiliar with Apricot’s recommended anti-
static precautions and/or the process of removing the
system unit cover refer to Appendix A.

  486

int l

e

DX2-66

 i 

TM

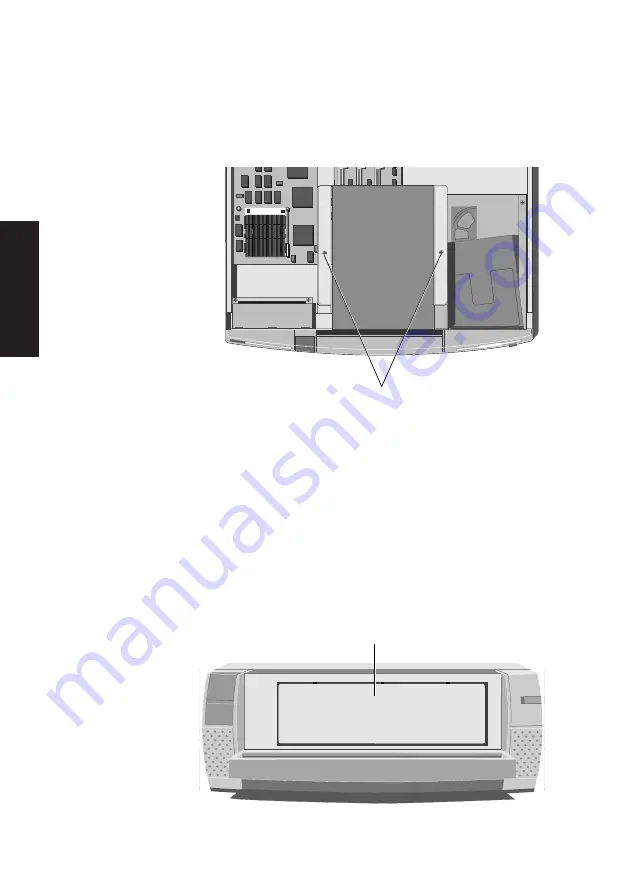
SECURING SCREWS

3.

Loosen the two screws that secure the drive bay and
slide the bay backwards.

4.

Lift the bay out of the system unit.

5.

The 5.25" drive aperture in the chassis at the front of
the drive bay is obscured by a blanking plate. The
blanking plate is attached to the top of the chassis and
must be removed in order to install a drive in the 5.25"
drive bay.

Open the drive bay door and identify the blanking plate.

BLANKING PLATE

Содержание XEN Pentium 60

Страница 1: ...apricot XEN Pentium 60 66 OWNER S HANDBOOK MITSUBISHI ELECTRIC ...

Страница 2: ...Chapter OWNER S HANDBOOK ...

Страница 3: ... a commitment on the part of Apricot Computers Limited Any software described in this manual is furnished under a license agreement The software may be used or copied only in accordance with the terms of this agreement It is against the law to copy any disk supplied for any purpose other than the purchaser s personal use All rights reserved no use or disclosure without written consent Copyright Ap...

Страница 4: ...p cover The CD ROM drive contains a laser system which is harmful to the eyes and is classified as a CLASS 1 LASER PRODUCT accordingtoIEC825RadiationSafetyofLaserProducts Equipment Classification Requirements User s Guide Do not attempt to disassemble the CD ROM drive if a fault occurs call an authorized Apricot maintainer Use the CD ROM drive only as described in this manual failure to do so may ...

Страница 5: ... that you use a power cord and plug which complies with the safety standards of that country Plug Standard Countries 250V E L N BS1363A United Kingdom Austria Belgium Finland E N L 250V SHUCO France Germany Holland Italy Norway Sweden 250V N L E SRAF 1962 Denmark DB16 87 E N L 125V NEMA 5 15P USA Canada 250V ASE 1011 Switzerland 250V AS 3112 1981 Australia The power cord fittings must bear the cer...

Страница 6: ...should be employed when adding the replacement plug The wires in the mains lead are coloured in accordance with the following code Green and Yellow Earth Blue Neutral Brown Live As the colours of the wires in the mains lead of this appliance may not correspond with the coloured markings identifying the terminals in your plug proceed as follows The wire which is coloured green and yellow must be co...

Страница 7: ...has been tested and found to comply with the RF emission limits for an FCC Class B computing device which is intended to provide reasonable protection against such interference in a residential installation However there is no guarantee that interference will not occur in a particular installation If this equipment does cause interference with radio or television reception which can be determined ...

Страница 8: ...Chapter CONTENTS ...

Страница 9: ... the SETUP utility 2 7 Using Apricot Help 2 8 3 Operating the Apricot XEN Using the front panel controls 3 2 Using the 3 5 diskette drive 3 3 Using the 5 25 floppy disk drive 3 4 Using the SLCD CD ROM drive 3 5 Using the Irwin FTD tape drive 3 7 Using the SCSI QIC tape drive 3 9 Using the SCSI DDS or DDS DC tape drive 3 12 Using the SCSI CD ROM drive 3 16 Using the Apricot XEN abroad 3 20 4 Caring...

Страница 10: ...4 Floppy drive A 6 4 Floppy drive B 6 4 Drive C D E F type 6 4 Drive C D E F timeout 6 5 Keyboard 6 5 Base Memory 6 5 Extended Memory 6 5 Advanced CMOS SETUP 6 5 Typematic Rate Programming 6 5 Hit F1 Message Display 6 5 System Boot up Num Lock 6 6 System Boot up Sequence 6 6 System Boot Up CPU Speed 6 6 Cache Memory 6 6 Network Password Checking 6 6 ISA Linear Frame Buffer 6 6 Set Linear Frame Add...

Страница 11: ...ss 6 9 IRQ active State 6 9 Parallel Port Mode 6 9 Configure with BIOS Defaults 6 9 Configure with Power on Defaults 6 9 Change Password 6 10 Write to CMOS and Exit 6 10 Do Not Write to CMOS and Exit 6 10 7 Troubleshooting Problems when starting 7 2 Troubleshooting charts 7 4 A Inside the Apricot XEN Anti static precautions A 2 Removing the top cover A 3 Configuring expansion cards A 4 Motherboard...

Страница 12: ...Chapter INTRODUCING THE APRICOT XEN Chapter1 ...

Страница 13: ...1 INTRODUCING THE APRICOT XEN TheApricotXENPentium60 66 isideallysuitedforuseashigh performance general purposepersonalcomputers networked business workstations and workgroup servers ReadtheseparatePowerConnectionGuidebeforeusing the Apricot XEN for the first time ...

Страница 14: ...memory modules SIMMs SETUPconfigurationutilityinread onlymemory ROM On board high performance PCI bus video based on an ATI 68800AX controller Equipped with at least 1 Mbyte of video RAM 256 Kbyte system memory cache PCIIntegratedDriveElectronics IDE diskdrivesystem Extendedkeyboard two buttonmouse parallelanddual serial ports 1 44 Mbyte 3 5 diskette drive 3 5 hard disk drive bay with room for two...

Страница 15: ... software or hardware options with accompanying installation diskettes and additional documentation Some of these options may have been factory configured or installed by your Apricot supplier Keep the cartons boxes and packaging materials you will need them again if you have to transport the computer elsewhere Makeanoteofthemanufacturer sdatarecordedonthevarious components product codes serial nu...

Страница 16: ...1 4 XEN OWNER S HANDBOOK Introducing the Apricot XEN Chapter 1 2 1 3 4 5 ...

Страница 17: ...ators from left to right lights when a diskette floppy disk or Irwin tape drive is accessed depending on the operating system lightswhenaharddiskdriveisaccessed depending on the operating system 3 door shown closed hinges down to reveal the removable media drive bay 4 3 5 diskettedrive fittedasstandardineveryApricot XEN system 5 system lock prevents unauthorized access to the inside of the system ...

Страница 18: ...1 6 XEN OWNER S HANDBOOK Introducing the Apricot XEN Chapter 1 11 12 10 1 3 9 10 2 4 5 6 7 8 13 ...

Страница 19: ... baud typically used for connecting an external modem or a serial printer signal cable 7 serial port 2 110 baud to 14 4k baud typically used for connecting an external modem or a serial printer signal cable 8 parallel port that supports EPP and ECP features typically used for a printer signal cable 9 monitor port connect the monitor signal cable to thisport ifyouareusingtheon boardvideocontroller ...

Страница 20: ...on the rear of the backplane thisisanApricotproprietaryconnectorwhich may be used in future developments of the XEN range 3 SIMM sockets every XEN has 8 Mbytes of motherboard memory which can be upgraded to 128 Mbytes by the use of single in line memory modules 4 processor socket insert an OverDrive processor here to upgrade the processing power of your Apricot XEN 5 5 25 removable mediadrivebay m...

Страница 21: ...Chapter Chapter2 GETTING STARTED WITH THE APRICOT XEN ...

Страница 22: ...e connect power and configure the Apricot XEN If you are familiar with the operation of personal computers this chapter will probably tell you all you need to know in order to start working with your XEN Chapter 3 Operating the Apricot XEN has more information about the use of the various disk and tape drives with which the XEN may be fitted ReadtheseparatePowerConnectionGuidebeforeusing the Apric...

Страница 23: ...and keyboard take into account any local or national regulations relating to ergonomic requirements For example youshouldensurethatlittleornoambientlight is reflected off the monitor screen as glare and that the keyboard is placed in a comfortable position for typing Give the XEN plenty of room so that air can circulate on all sides Air is drawn into the system unit through the vent on the left ha...

Страница 24: ... there If necessary the AC voltage setting of the Apricot XEN can be adjusted by the voltage selection switch on the rear of the systemunit seethesectionon UsingtheApricotXENabroad in Chapter 3 Operating the Apricot XEN Note that the monitor s voltage setting will probably also need adjusting consult the User s Guide that accompanies the monitor or ask your Apricot supplier for help The Safety and...

Страница 25: ...ard or mouse in with the system powered up 4 Connect the system unit and peripheral power cords to nearby grounded AC power outlets 5 If your AC power outlets have switches set them to their On positions Your Apricot XEN is now ready to use The rest of this chapter tellsyouhowtoturnyourXENonandoff andhowtoconfigure it using the built in SETUP utility Turning on and booting the computer Turning the...

Страница 26: ...nheldinthecomputer s system memory will be lost when you turn off the computer Always turn off any attached peripherals first particularly a printer attached to the parallel port If you are logged in to a network log out before turning off the computer Similarly close down or exit from any software which employs virtual memory or disk caching for example Microsoft Windows v3 1x with SMARTDrive Do ...

Страница 27: ... Caution When you run Fdisk it assumes you want to work with the first or master drive it says the Current fixed disk drive is 1 To switch attention to the slave drive choose Select next fixed disk drive option5 fromthemainmenu Of course you may also want to use Fdisk to repartition the master drive If you decide to do this be sure to make a back up copy of all the information on the drive first i...

Страница 28: ...It is recommended that you use the utility to create copies of the diskettes soon after setting up your system Using the SETUP utility What is SETUP is a configuration utility programmed into the SETUP XEN s read only memory ROM Because it is permanently kept in ROM SETUP does not need an operating system to function and can be invoked whenever you wish to reconfigure your computer SETUP s purpose...

Страница 29: ...setheenhancedfeatures of the system Apricot Help may be supplied in various forms according to the target operating system The two most common forms are ASCII text files and Microsoft Windows help files Viewing ASCII text files identified by their txt file extensions can be text files read by most text editors and wordprocessing programs Alternatively they can be displayed one screenful at a time ...

Страница 30: ...a program item for it using Program Manager The help file can then be viewed at any time simply by double clicking on its icon To do this 1 Insert the diskette into a suitable drive Copy the Windows help file and also the diskhelp ico icon file from the diskette to a hard disk or network drive 2 ChooseNewfromtheFilemenuinProgramManager SelecttheProgramItemoptionintheNewProgram Object dialog box th...

Страница 31: ...hapter 2 All the help files provided by Apricot have a version number so you can tell whether you re looking at the most up to date version You can discover the version number of a Windows help file by viewing it with Help and choosing About Help from the Help menu ...

Страница 32: ...Chapter Chapter3 OPERATING THE APRICOT XEN ...

Страница 33: ...er 3 3 OPERATING THE APRICOT XEN This chapter contains all you need to know for the day to day operation of an Apricot XEN system Note that the monitor has its own User s Guide ReadtheseparatePowerConnectionGuidebeforeusing the Apricot XEN for the first time ...

Страница 34: ...IVITY INDICATOR POWER BUTTON The POWER button is used to turn the computer on and off The greenindicatorinthebuttonlightswhenthesystemispowered This button also controls the power supply through the AC power outlet to the monitor There are two activity indicators on the front panel Inactive Active Meaning when active The XEN is using a 3 5 diskette drive a 5 25 floppy disk drive or an FTD floppy t...

Страница 35: ...sk surface The drive automatically moves the shutter aside to read the diskette Never touch the exposed surface under the shutter Keepdisketteswellawayfromdust moisture magneticobjects and equipment that generates magnetic fields Also avoid extremes of temperature and exposure to direct sunlight Otherwise data recorded on the diskette may become corrupted Inserting a Insert the diskette into the s...

Страница 36: ...ate rename or delete any files PROTECTED UNPROTECTED Using the 5 25 floppy disk drive Your Apricot XEN may be configured with a 5 25 floppy disk drive This drive can read and write double sided disks with a formatted capacity of either 1 2 Mbytes if marked HD or high density or 360 Kbytes if marked DD or double density Each floppy disk is sealed into a flexible plastic envelope with a long rounded...

Страница 37: ...sk envelope with a self adhesive tab a floppy disk such tabs are typically supplied with new floppy disks With the tab in this position you can read or print files from the disk but you cannot create rename or delete any files WRITE PROTECT NOTCH WRITE PROTECT TAB AFFIXED Using the SLCD CD ROM drive Your Apricot XEN may be configured with an SLCD CD ROM drive The SLCD drive requires an additional ...

Страница 38: ...n on the front of the drive to eject the compact disc platter halfway out of the drive note that the EJECT button will not work unless the computer is turned on Pull the platter out to its fullest extent Place the CD face up on the platter and push the platter in until it engages with the drive mechanism Wait for the CD to spin up to speed before attempting to read from it Removing a Beforeattempt...

Страница 39: ...Irwin FTD tape drive Your Apricot XEN may be configured with a 120 Mbyte Irwin FTD floppy tape drive The Irwin FTD is so called because it uses the on board diskette floppy disk interface and so does not require an additional drive controller card like most other tape drives The software required to control the tape drive depends on your operating environment ask your Apricot supplier for details ...

Страница 40: ...tivityindicator must be unlit 2 Press the eject button then pull the cartridge carefully out of the drive slot holding it between thumb and forefinger 3 Returnthecartridgetoitsplasticholder Thisprotects the cartridge and prevents dust from collecting on the surface of the tape Write Acartridgeisnormallywriteprotectedbutcanbewrite enabled enabling by sliding the tag labelled RECORD in the direction...

Страница 41: ...and write in QIC 150 and QIC 120 formats Both drives can also read from but not write to a QIC 24 formatted tape The drive automatically senses the cartridge type and uses the maximum density QIC format possible for that cartridge thereby giving its nominal capacity unless the cartridge has already been used in a lower density format Apricot does not supply support or recommend the use of 1000 ft ...

Страница 42: ...2 Remove the cartridge from its plastic holder 3 Insertthecartridgeasshownbelow Pushthecartridge gently into the drive as far as it will go 4 Push the control lever to the right to engage the mechanism Removing a 1 Do not attempt to remove the cartridge while it is cartridge being accessed by the computer that is while the green indicator is lit 2 Push the control lever to the left to release the ...

Страница 43: ... tape Write Acartridgecanbewrite protectedbyturningthecircularplastic protecting plug in the top left corner of the cartridge so that it points to a cartridge SAFE The plug can be turned with a screwdriver or the edge of a coin SAFE SAFE SAFE POSITION UNSAFE POSITION With the plug in this position data can be read from the tape but not written to it Keep your tape cartridges well away from magneti...

Страница 44: ...ent to the host software TheDDS DCdriveisillustratedbelow theDDSdriveissimilar except that the LED indicators and EJECT button are in different positions The way you use the drive and the meaning of the indicators is the same for both types CASSETTE IN PLACE GREEN DRIVE BUSY AMBER EJECT BUTTON CASSETTE INSERTION SLOT The DDS DC and DDS drives use standard 60 metre or 90 metre digital cassettes bea...

Страница 45: ... Gbytes on a 60 metre cassette or 8 0 Gbytes on a 90 metre cassette the sustainedtransferrateisincreasedbythesameratio However the actual compression ratio and transfer rate achievable in any particular case depend on the characteristics of the data being compressed and may be higher or lower than these nominal figures Interpreting There are two LED light emitting diode indicators on the the LED d...

Страница 46: ...ecome unreliable Remove the cassette and use another Hardware error or high humidity If the Drive Busy amber LED flashes rapidly this indicates either a hardware error or dew high humidity If this happens soon after powering up the computer the drive s diagnostic test may have failed in which case the drive will not operate Request help from your Apricot supplier or an authorized Apricot maintaine...

Страница 47: ...ritten to it Remember to allow time for the formatting process when you use a new tape Removing Before attempting to remove a cassette ensure that the drive a cassette is not currently in use the amber Drive Busy indicator must be unlit Press the EJECT button on the front of the drive depending on your operating environment the EJECT button may be disabled while the drive is in use If the tape is ...

Страница 48: ...rmine if the cassette needs to be copied and replaced Keep your cassettes well away from magnetic objects and equipment that generates magnetic fields Avoid extremes of temperature and exposure to direct sunlight otherwise the data recorded on the tape may become corrupted Using the SCSI CD ROM drive Your Apricot XEN may be configured with a SCSI CD ROM Compact Disc ROM drive The software required...

Страница 49: ...occurs call an authorized Apricot maintainer Inserting a The SCSI CD ROM drive uses a special removable disc caddy compact disc toholdaCDwithinthedrivemechanism Thecaddyhasametal shutter that guards the disc s surface the drive automatically moves the shutter aside to read the disc One disc caddy is provided free with the drive more can be obtained from your Apricot supplier Use only disc caddies ...

Страница 50: ...nting towards the drive that is shutter end foremost Push the caddy in until it is completely swallowed up by the drive Thedrivebeginsreadingthedisc stableofcontents Thedrive s activity indicator lights while the table of contents is being read When the activity indicator goes out the drive is ready for use If the activity indicator remains on this may indicate that the disc is not properly positi...

Страница 51: ...rive In this case pressing the EJECT button will have no effect To eject the drawer manually for example after a power failure you must first ensure that the computer is turned off Then insert a thin metal rod such as an unwound paper clip into the emergency eject hole and push hard see below The rod must be at least 35 mm long COMPACT CADDY LOADED Caring for Keep CDs and caddies well away from du...

Страница 52: ... the Apricot XEN is set to the correct voltage range before use If not the machine may be irreparably damaged The voltage setting of the monitor must always be the same as the voltage setting of the system unit See the User s Guide that accompanies the monitor or consult your Apricot supplier to find out how to change the voltage setting Make sure that the Apricot XEN and its monitor are returned ...

Страница 53: ...Chapter Chapter4 CARING FOR THE APRICOT XEN ...

Страница 54: ... THE APRICOT XEN This chapter provides information on how to care for your computer TheApricotXENrequireslittlephysicalmaintenance other than occasional cleaning But you must take care when transporting it to avoid damage to its delicate components particularly the hard disks ...

Страница 55: ...aning fluids or sprays near air vents ports or removable media drives Occasionally wipe the system unit with a soft slightly damp lint free cloth Occasionally wipe the air vents on the rear and sides of the system unit Dust and fluff can block the vents and limit the airflow Occasionally clean the diskette drive using a proprietary head cleaner The Occasionally wipe the monitor with a soft slightl...

Страница 56: ...ot probe between the keys as this may cause damage The mouse Dust and dirt may accumulate in the ball tracking mechanism of the mouse To clean the mouse 1 Unplugthemouse turnitupsidedownandlocatetheplastic cover that holds the ball in place Depending on the model theplasticcovercanberemovedeitherbyrotatingitcounter clockwise or by sliding it forward slightly 2 Remove the cover and set it aside 3 C...

Страница 57: ...ndcapstanthoroughly before concluding that the drive or your tapes are defective The read write head and the capstan are accessible through the flip up drive door as shown below Although it is possible to use special kits to clean the drive Apricot recommends the use of 90 isopropyl alcohol and several non abrasive lint free swabs as follows 1 Gently rub an alcohol dampened swab against the surfac...

Страница 58: ...thiskit It is also advisable to clean the tape drive after the first use of a new tape The SCSI DDS The read write heads in the tape drive are protected during or DDS DC normal operation by a built in cleaning roller In addition a tape drive specialcleaningcassetteisavailablefromyourApricotsupplier This cassette should be used Every 25 operating hours When a media warning status is indicated When ...

Страница 59: ...ter Don t try to move the computer while it is plugged into the AC powersupplyorwithanyothercables includingnetworkcables still attached Whenliftingandcarryingthecomputer gripthemetalunderside of the system unit Do not lift the unit by the plastic side trims or the front bezel Never attempt to use the door as a carrying handle Neverattemptto lift the system unit with a monitor on top If you need t...

Страница 60: ...Chapter Chapter5 UPGRADING THE APRICOT XEN ...

Страница 61: ...wishtohaveyoursupplier or service organisation install it for you Beforeyoustartinstallingtheupgradeyoushouldbethoroughly familiar with all the relevant instructions Warning Never carry out any work on the equipment with power applied Always switch off at the mains and remove the power lead from the equipment before starting work Appendix A at the rear of this manual provides a guide to recommende...

Страница 62: ...o examples A graphics card can provide more specialized video functions than those offered by the on board video sub system A modem or facsimile card can provide a connection to a telephone line TheApricotXENhasthreeexpansionslots onehalflengthand one full length 16 bit Industry Standard Architecture ISA and one full length slot which can be used by either an ISA or a PCI card An additional connec...

Страница 63: ...emove the system unit cover IfyouareunfamiliarwithApricot srecommendedanti static precautions and or the process of removing the system unit cover refer to the appendices at the rear of this manual 3 With the system unit cover removed the space for expansion cards will be visible It is on the left side of the system unit behind the activity indicators Use the illustration below to help you identif...

Страница 64: ...ling a drive controller card that you want to connect to a drive in the 5 25 drive bay it is easiest to install it in the top slot Toremovetheblankingplate firstunscrewthesecuring screw then slide the plate out of its slot Keep the screw you will use it later to secure the card 5 Yourarenowreadytoinstallthecard However before youdosoyoumustfirstensurethatthecardiscorrectly configured for your syst...

Страница 65: ...uide Note If the card uses the video feature connector on the motherboard you must plug the video feature cable into the motherboard socket before you install the card 7 Slide the card into the slot ensuring that the card edge connector engages correctly with the backplane 8 Carefully push the card fully home Do not apply excessive pressure 9 Secure the card by replacing the screw that you removed...

Страница 66: ... Mbyte 8Mx36 SIMMs giving upgrade capacities of 2 4 8 16 32and64Mbytes Anycombinationofthesecapacitiesispossible using any capacity in either of the two pairs Installation In order to install a memory upgrade you must 1 Power the system down 2 Take suitable anti static precautions and remove the system unit cover IfyouareunfamiliarwithApricot srecommendedanti static precautions and or the process ...

Страница 67: ...top edge of the SIMM and move it gently towards the vertical 3 When the SIMM has rotated through 20 taking care to avoid touching any of the components on the SIMM grip the top corners of the SIMM between thumb and firstfingerandcarefullypulltheSIMMoutofthesocket 4 Repeat steps 1 to 3 for the second SIMM Inserting SIMMs Make sure that the pair of SIMMs you intend to install in a bank are matching ...

Страница 68: ...il it clips into place Do not use excessive force If the SIMM will not rotate easily remove it and start again 5 If the SIMM is properly located it should remain in position held by the securing clips and with a small plastic lugs through the holes on either side of the SIMM 6 Repeat steps 1 to 5 for the second SIMM If you wish to install SIMMs in the other memory bank repeat the process above Onc...

Страница 69: ... jumper to select the voltage supplied to the processor J13H3 When shipped the clock speed is set to match that of the processor The processor voltage is set to 5V for a 60MHz system and 5 25V for a 66MHz system It is likely that future upgrade processors will require the jumper to be in the 5V position Refer to Appendix A for details of the jumpers Removing Before installing the upgrade processor...

Страница 70: ...ZIF socket A lever attached to the socket clamps the processor securely in the socket when it is parallel to the motherboard 4 Carefully rotate the lever from the secure position until it is perpendicular to the motherboard FREE LOCKED The first and last 15 of movement may require considerable effort Apply just enough pressure to overcome the resistance offered by the lever ...

Страница 71: ...Theprocessorhasapositioningguideinthe form of a small dot of paint 2 Carefully position the upgrade processor above the socket with the positioning guide on the processor over the keyed corner of the socket and the securing lever in the perpendicular position PROCESSOR IN CENTRE Warning If the processor is misaligned it will not go into the socket and any attempt to force it will damage the proces...

Страница 72: ...herboard is fitted with eight sockets which allow the video RAM to be expanded from 1 Mbyte to 2 Mbytes using eight 256k x 4 RAM chips 1 Power the system down 2 Take suitable anti static precautions and remove the system unit cover IfyouareunfamiliarwithApricot srecommendedanti static precautions and or the process of removing the system unit cover refer to Appendix A at the rear of this manual Th...

Страница 73: ...ive tray in the XEN system unit can contain any half height 5 25 device Apricot supplies a range of tape and CD ROM drives and a 5 25 floppy drive for this bay The following instructions describe the installation of a drive in thebay TheGenericinstructionsapplytoalldrives anddescribe the physical installation of a drive Instructionsspecifictoeachdrivetypearegivenafterthegeneric instructions Generi...

Страница 74: ...URING SCREWS 3 Loosen the two screws that secure the drive bay and slide the bay backwards 4 Lift the bay out of the system unit 5 The 5 25 drive aperture in the chassis at the front of the drive bay is obscured by a blanking plate The blanking plate is attached to the top of the chassis and must be removed in order to install a drive in the 5 25 drive bay Open the drive bay door and identify the ...

Страница 75: ...supplied by Apricot will be correctly configured for installation in a XEN For information on how Apricot supplied drives are configured see the drive specific information following these installation instructions 9 Identify the top and bottom of the drive 10 Restthedrive topdown onasuitableanti staticsurface 11 Withthedrivebayupside downplaceitoverthedrive The front of the drive must be at the en...

Страница 76: ...ews andtightenthem until they are finger tight COMP ACT SECURING SCREWS 14 Gently tighten the four screws 15 Turn the drive bay over and replace it in the system unit 16 Slide the bay forwards until the two holes in the bay line up with those in the hard drive assembly and the system unit brace ...

Страница 77: ... DX2 66 i TM 5 25 DRIVE POWER CABLE 19 The drive has now been installed and connected to a power cable You must now connect it to a signal cable Instructions on connecting each of the types of drive to a signal cable is given under the appropriate heading overleaf 5 25 floppy Cabling or Irwin FTD Thesignalcablemustbeconnectedbetweenthesignalconnector on the rear of the 5 25 floppy or Irwin FTD dri...

Страница 78: ...is kit includes a signal cable which is suitable for use with the drive supplied The cable should be connected between the SCSI card and the rear of the drive The following illustration shows the correct routing of the cable 486 int l e DX2 66 i TM SCSI CABLE Configuration Each SCSI drive is assigned an identity on the SCSI bus these are known as SCSI IDs All Apricot SCSI drives for XEN are suppli...

Страница 79: ...mmendedanti static precautions and or the process of removing the system unit cover refer to the appendices at the rear of this manual Inordertoremovethe3 5 drivebayyoumustfirstremovethe 5 25 drive bay 4 If there is a drive fitted in the 5 25 bay disconnect the power and signal cables from the rear of the drive 5 Remove the two screws that secure the 5 25 drive bay and slide the bay backwards 6 Li...

Страница 80: ... two 1 high hard disk drives configuration Inorderforthedriveordrivestooperatetheymustbecorrectly configured The IDE interface supports a maximum of two drives These drives are known as Master and Slave A single drive or the bootdeviceinadualdrivesystem mustbeconfiguredasMaster The second non bootable drive in a dual drive system must be configured as Slave IDE drives are normally configured using...

Страница 81: ...its connectors away from you Warning If there is a drive in the bay already be careful to ensure that the new drive does not touch it 3 Line up the screw holes on the drive with those in the bay insert the securing screws and tighten them until they are finger tight Note If you are installing a hard disk drive in a system that previously had only a floppy drive there will be two sets of holes avai...

Страница 82: ...ront bezel and the two screw holes in the bay line up with those in the base of the system unit 3 Replace the two securing screws 4 Connectthe3 5 harddisk s totheirsignalandpower cables 5 Reconnect the 3 5 floppy drive cable 6 Replace the 5 25 bay in the system unit 7 Slide the bay forwards until the two holes in the bay line up with those in the hard drive assembly and the system unit brace 8 Rep...

Страница 83: ...Chapter Chapter6 USING THE SETUP UTILITY ...

Страница 84: ...store information about the configuration of the computer The computer s configuration ismodifiedusingaSETUPutilityprovidedinReadOnlyMemory ROM on the motherboard AbatteryontheXENmotherboardmaintainstheconfiguration memory when the computer is switched off Invoking To enter SETUP press either the DEL or F1 key after the BIOS SETUP signs on but before the Please wait prompt appears ...

Страница 85: ...ingscreentheenterkeyinvokes the selected option F1 Callscontextsensitivehelpwhenavailable F2 F3 Thesetwokeysscrollthroughthepossible colour combinations F5 The F5 key restores the values to those that were present when SETUP was loaded F6 TheF6keyrestoresthevaluestotheBIOS defaults F7 The F7 key restores the values to the power on defaults F10 The F10 key saves the changes made to CMOS exits SETUP...

Страница 86: ...er modes ISA interrupts and ISA linear frame buffers Peripheral Sets up and modifies the peripherals Management SETUP integrated in the SMC37C665 super I Ocontroller Thisutilityspecifiesthe serial and parallel port addresses Configure with Reloads the CMOS RAM with default BIOS defaults values from the ROM table Configure with ReloadsCMOSwithsettingsatpower Power On defaults up Change Password Spe...

Страница 87: ...this option is not installed Drive C D There are three choices for configuring each IDE hard disk E F type drive InthisimplementationonlydrivesC andD aresupported The three choices are 1 Auto Configure the BIOS automatically interrogates the hard drive and configures it appropriately 2 User Type 1 allows you to explicitly configure the hard drive if the drive is not supported by Auto Configure 3 U...

Страница 88: ...eports the amount of base memory Extended Reports the amount of extended memory Memory Advanced CMOS SETUP Typematic Thisoptioniseitherenabledordisabled Thedefaultisdisabled Rate When enabled the following two typematic options are valid Programming 1 Typematic Rate Delay in milliseconds choose 250 500 750 or 1000 millisecond delays The default is 500 This determines how long it takes for the key ...

Страница 89: ... to boot from a diskette if necessary Drive C before A The system checks drive C first Check only C The system checks drive C and no other drives System The choices are either HIGH or LOW The default is high If Boot Up high is selected the system boots with the processor running CPU Speed at full speed If low is selected the system goes into deturbo mode whichresultsinsloweroperation equivalenttoa...

Страница 90: ...ase to be at C0000H or D0000H Selecting the other shadow memory base options causes the shadow memory size to be smaller Base Memory Select either 640 KB or 512 KB Default is 640 KB Size IDE DMA The choices are enabled or disabled The default is disabled If Transfer Mode you select enabled you can choose from three types of IDE DMAtransfers Standard compatible TypeB orTypeF Type F is the fastest D...

Страница 91: ...nterrupt The PCI auto configuration code will look here to see if this interrupt is free If this interrupt is specified as free then the PCI auto configuration code may attempt to use it ISA IRQ 11 Select free or used Select used if there is an ISA adapter in your system that uses this interrupt The PCI auto configuration code will look here to see if this interrupt is free If this interrupt is sp...

Страница 92: ...s address will display disabled Warning Donotselectthe2E8Hoption Thismayadverselyaffecttheoperation of the on board video Parallel Port Select Disabled or address 278H 378H or 3BCH If Address Programming Option has been set to auto this address will display disabled IRQ active High or low The default is high State Parallel Port Normal or extended The default is normal Extended enables Mode the Enh...

Страница 93: ...d to be a carriage return Onceyouspecifyapassword youcannotenterSETUPwithout entering the password If you forget the password you must movethepasswordjumperonthemotherboardtothe disable password position A second jumper on the motherboard allows you to disable SETUP Information about jumpers is given in Appendix A Write to CMOS and Exit After making any changes to SETUP select Write to CMOS and ex...

Страница 94: ...Chapter Chapter7 TROUBLESHOOTING ...

Страница 95: ... doubt turn off the computer and unplug all power cords before consulting your Apricot supplier or an authorized Apricot maintainer This chapter is concerned only with problems caused by the Apricot XEN itself remember that problems can also arise from other sources such as your network cabling operating system or application software ...

Страница 96: ...youpressF1 the XENattemptstobootdespitetheerrorindication forexample if a memory chip fails POST the computer can continue with less memory If the problem persists make a note of the error messagesandtheconditionsunderwhichtheyoccur andconsult your Apricot supplier or an approved Apricot maintainer Beep codes The XEN uses special audio beep codes to signal certain hardwarefaults Ifyouhearabeepcode...

Страница 97: ...y to continue The hard disk has no active bootable partition or is not formatted Insert a system diskette press F1 and format the hard disk as described in your operating system manuals Fixed disk read failure Press the F1 key to continue Theharddiskmaybedefective PressF1toretry Iftheproblem persists insert a system diskette press F1 back up the data held on the defective hard disk and try reforma...

Страница 98: ...by hardware component Problems with the system unit Problem Diagnosis The XEN will not start The AC power supply is not switched on when the POWER button is pressed The XEN power cord is loose The fuse in the AC plug has blown The power cord is broken inside The power on LED is The LED circuitry is faulty unlit although the XEN is working correctly Intermittent problems A cable or cord may be loos...

Страница 99: ... the cause of the fault Replace the blown fuse with one of the same rating and try again If the replacement fuse blows call an authorized Apricot maintainer If the replacement fuse does not blow switch off reconnect a peripheral and switch on Repeat this procedure for each peripheral in turn If power is lost when you deliberately flex the cable replace the cord with an identical one obtained from ...

Страница 100: ...ves or uses the card is configured incorrectly You may have inadvertently loosened other cards or cables inside the XEN The card is faulty A card that used to work You may have inadvertently loosened does not work now the card or its cables inside the XEN The card s configuration clashes with that of another card installed later The card is faulty Problems with expansion cards ...

Страница 101: ... XEN components If a diskette came with the card look for a readme file which might contain up to date installation instructions Sometimes the software that drives or uses an expansion card needs to know the card s configuration settings Check the documentation that came with the card or the software Isolate the XEN remove the top cover and check Contact your supplier Isolate the XEN remove the to...

Страница 102: ...ve become corrupted by strong magnetic fields or subjected to extremes of temperature and humidity There may be condensation on the surface of the disk The drive cannot write to a The disk may be write protected disk You are attempting to change a file with a read only attribute or for which you do not have the necessary access permissions The disk eject lever will There is no disk in the drive no...

Страница 103: ...y again If you are using a 51 4 floppy disk check that the write protect notch on the edge of the disk is uncovered Remove any write protect sticker and try again File attributes and access permissions may be set by your operating system Consult your operating system documentation The SETUP utility may also prevent access to the drive Do not force the lever when there is no disk in the drive as do...

Страница 104: ... drive does not seem The disk may not have been formatted able to read data correctly for your operating system The disk may have become corrupted by strong magnetic fields or subjected to extremes of temperature and humidity There may be condensation on the surface of the disk The drive cannot write to a You are attempting to change a file with disk a read only attribute or for which you do not h...

Страница 105: ...lity Ask your Apricot supplier or an authorized Apricot maintainer for advice A cold system unit brought into a humid room may collect condensation on its hard disks Wait until the system unit has adjusted to room temperature before using it File attributes and access permissions may be set by your operating system Consult your operating system documentation The SETUP utility may also prevent acce...

Страница 106: ...nal cable is loose The key functions have been remapped by software Some small object has fallen between the keys Liquid has seeped between the keys The keyboard was plugged in while the system was powered up The keyboard is faulty or the keyboard signal cable is broken inside The numeric keypad does The keypad has not been enabled not seem to work instead of numbers you get cursor controls ...

Страница 107: ... If the liquid is viscous unplug the keyboard and call an authorized Apricot maintainer If the liquid is thin and clear try unplugging the keyboard turning it upside down to let the liquid run out and drying it at room temperature for 24 hours If it still doesn t work call an authorized Apricot maintainer The keyboard controller is protected by a Polyswitch circuit This acts like a self healing fu...

Страница 108: ...y or the mouse signal cable is broken inside Problems with the monitor Problem Diagnosis There is no display or the The monitor is not switched on display is poor The brightness and or contrast controls need adjustment The monitor screen is dirty The monitor power cord is loose The signal cable between the monitor and the XEN system unit is loose The monitor signal cable or power cord is broken in...

Страница 109: ...ike a self healing fuse Turn the system off wait two minutes then turn it on again Call an authorized Apricot maintainer Remedy Switch on the monitor Adjust the controls until an acceptable display appears Consult the monitor s documentation if any Clean the monitor as described in Chapter 4 Caring for the Apricot XEN Push the plugs in firmly at the AC power outlet and at the monitor power inlet P...

Страница 110: ...Chapter AppendixA INSIDE THE APRICOT XEN ...

Страница 111: ...ing access to the inside of the Apricot XEN system unit Note that instructions for installing upgrade options are provided in Chapter 5 Upgrading the Apricot XEN Turn off the Apricot XEN and unplug all power cords before removing the top cover Also included here is information on configuring expansion cards and on motherboard jumper settings ...

Страница 112: ...sk from static discharge while the top cover is off This is because the electronic components of the motherboard are exposed Expansion cards SIMMs and OverDrive processors are other examples of electrostatic sensitive devices ESSDs All work that involves removing the XEN s top cover must be done in an area completely free of static electricity Apricot recommends using a Special Handling Area SHA a...

Страница 113: ...drink away from your work area and the open computer Removing the top cover 1 Turn off both the Apricot XEN system unit and the monitor 2 If your AC power outlets have switches set them to their Off positions 3 Unplug all power cords from rear of the system unit 4 If the system unit has a caselock on the right hand side turn the caselock key to the unlocked position 5 Loosen the two casing screws ...

Страница 114: ... in the BIOS The SETUP utility includes the facility to indicate to the PCI auto configurationutilitywhetherornoteachofthreeinterrupts IRQ9 10 and 11 are used by ISA cards If you use SETUP to indicate that one of these interrupts is used then the auto configuration utility will not attempt to configure a PCI card to use that interrupt For ISA cards how configuration options are selected varies fro...

Страница 115: ...at is executedinresponsetotheinterruptassignedtothatperipheral When an interrupt occurs the processor stops executing its currenttask executestheinterruptserviceroutine thenreturns to its original task The processor is literally interrupted A hardware interrupt may be referred to as an IRQ This is becausethemotherboardsignalsusedtogeneratetheinterrupts are labelled IRQx where x is a number between...

Страница 116: ...s with a card using IRQ7 If you are not using the parallel port it can be disabled using SETUP freeing IRQ7 to be used by an expansion card IRQ15 Secondary This interrupt is available for use by an hard disk expansion card unless an IDE device is controller connected to the secondary IDE interface IRQ3 Serial port 2 Each of the serial ports can be IRQ4 Serial port 1 individually disabled using SET...

Страница 117: ...hROM Typicallyexpansion card memory card ROM contains extensions to the motherboard BIOS providing additional functionality ExpansioncardROM sometimesknownasslotROM mustbe addressed somewhere in the processor s memory map An area of the memory map of an ISA compatible PC is allocated for expansion card ROM If you are unfamiliar with the concept of memory maps and the hexadecimal numbering system t...

Страница 118: ...the decimal system is said to be base 10 The hex numbering system uses a base of 16 Hex numbering works in exactly the same way as the decimal system except you must add 1 to a column that contains 15 before you add 1 to the column to the left As we have no single character to represent the numbers 10 to 15 we substitute the first six letters of the alphabet so that A represents 10 B represents 11...

Страница 119: ...is 65536x10 655360 If you have Microsoft Windows 3 x on your XEN you may find it helpful to use the Windows Calculator In Scientific View the calculator allows you to enter decimal numbers and convert them to hex and vice versa Another commonly used notation is to describe numbers asxK or xM Where 1K 1024 and 1M 1048576 1048576 1024x1024 Inthisnotation655360 thatisA0000h is 640K Memory maps All me...

Страница 120: ...s of 1048576 see Numbers and computers locations each containing one byte of data When installing expansion cards it is the first bottom Mbyte of address space that is of most interest The following diagram shows how the bottom 1M of address space is used in a XEN Diagrams like these are called memory maps and are a convenient way of representing processor address space BIOS RESERVED EXPANSION CAR...

Страница 121: ...eoadaptermemoryisaccessedbetween640k and 768k 1 A0000h to BFFFFh In the XEN the motherboard video BIOS is addressed between 768k and 800k 1 C0000h to C7FFFh Note This region is often used by video BIOS on expansion cards If an expansioncardwithvideoBIOSisinstalledinaXENthemotherboard video adapter must be disabled by removing jumper JP14 Theregionfrom800kto896k 1 C8000htoDFFFFh isavailable for exp...

Страница 122: ...address ranges as close together as possible without any overlapping This will leave the maximum amount of memory free for use as UMB space For information on UMB space refer to your DOS documentation andthehelpfilessuppliedwithyourcomputer I O ports I O ports are used by the processor to control the operation of peripherals Some expansion cards are controlled via an I O port or group of ports Whi...

Страница 123: ...ller 2 0C0 0DF DMA controller 2 0F0 Math coprocessor 1F0 1F7 Hard disk drive controller 278 27F Parallel port 3 2F8 2FF Serial port 2 378 37F Parallel port 2 3B8 3BF Parallel port 1 3E8 3EF Serial port 3 3F0 3F7 Diskette drive controller 3F8 3FF Serial port 1 0CF8 PCI configuration space enable 0CF9 Deturbo mode enable C000 C3FF Chipset configuration Note I O ports are always given in hex notation...

Страница 124: ...stration shows the position of the jumpers J12 G5 1 2 J12 G1 1 2 J12 G3 1 2 J7 A1 1 2 J13 H1 1 2 3 The illustration above shows the location of the jumpers on the motherboard Thetableoppositeliststhemotherboardjumpers by function tells what each jumper is for and indicates the settings shown by the dark blocks on the illustration above The jumper block numbers e g J7A1 J12H1 are printed on the mot...

Страница 125: ...sh recovery J12G3 1 Flash normal allows recovery of the default BIOS if the BIOS is corrupted during an upgrade Enable disable flash updates J12G3 2 Disable flash allows upgrading the BIOS stored updates in the flash EEPROM Monochrome colour video mode J12G5 1 Colour Enable disable entry into SETUP J12G5 2 Enable entry into program allows user to disable SETUP entry into the SETUP program at boot ...

Страница 126: ...Chapter AppendixB TECHNICAL INFORMATION ...

Страница 127: ... S HANDBOOK B 1 Technical Information Appendix B B TECHNICAL INFORMATION This appendix provides some technical information about the Apricot XEN More detailed information is available from your Apricot supplier ...

Страница 128: ...024 x 768 SVGA 800 x 600 VGA 640 x 480 I O ports Serial dual 9 way male D type RS 232 supporting baud rates from 110 baud to 14 4K baud Parallel 25 way female D type supporting ECP and EPP Keyboard 102 key AT compatible Mouse PS 2 compatible two button Diskette Capacity 1 44 Mb drive Access time 94 ms average Hard disk Interface IDE drive bay Form factor 3 5 Capacity One 1 6 drive or Two 1 drives ...

Страница 129: ...ed 150 Kbyte s normal Burst 300 Kbyte s double Access time Full stroke 0 65s typical normal 0 60s typical double Average random 0 40 typical normal 0 35 typical double Audio Line 0 7 V at 47 kOhm output Headphone 0 5 V at 32 Ohm Power Voltage 5 V dc 5 requirement 12 V dc 10 Ripple 5 V 0 05 Vp p at 250 mA 12 V 0 1 Vp p at 500 mA Current max 5 V 800 mA at Seek 12 V 1300 mA at Seek or Spin up Laser T...

Страница 130: ...cation 0 71 A 5 V dc SCSI Performancespecificationsapplywhenusingdatacompression DDS DC Power specifications are measured at the tape drive power tape drive connector and are nominal values Nominal 60 metre cassette 1 3 Gbyte 1 1 base capacity 2 6 Gbyte 2 1 typical 5 2 Gbyte 4 1 max1 90 metre cassette 2 0 Gbyte 1 1 base 4 0 Gbyte 2 1 typical 8 0 Gbyte 4 1 max1 Transfer rate Sustained 366 Kbyte s 1...

Страница 131: ... 12 cm 8 cm Transfer rate Sustained 150 Kbyte s normal from media 300 Kbyte s double Burst across 2 1 Mbyte s SCSI bus 4 0 Mbyte s synchronous Access time Full stroke 550 ms typical normal 520 ms typical double Average 350 ms typical normal 295 ms typical double Audio output Line 0 7 V at 47 kOhm Headphone 0 55 V at 32 Ohm Host interface SCSI 2 Power Voltage 5 V dc 5 specification 12 V dc 10 Rippl...

Страница 132: ...1 Keyboard 40 mm 205 mm 488 mm 1 4 kg 1 depending on configuration Temperature The Apricot XEN is designed to operate in a normal office and humidity environment butduringstorageandtransportationthesystem ranges is more tolerant of environmental factors Relative humidity Range Temperature with no condensation Storage Transport 0 to 55 o C 20 to 80 Operational 10 to 35o C 20 to 80 ...

Страница 133: ...ords The power cord supplied with the Apricot XEN complies with the safety standards applicable in the country in which it is first sold If you wish to use the computer in another country you must ensure that you use a power cord which complies with the safety standards of that country Current AC power inlet 4 5 A at 100 120 V ratings 3 0 A at 220 240 V AC power outlet 1 5 A at 100 120 V 1 0 A at ...

Страница 134: ...characteristics Serial ports 9 way male D type COM1 COM2 5 1 6 9 10101 Pin I O Function 1 I Data carrier detect 2 I Receive data 3 O Transmit data 4 O Data terminal ready 5 NA Signal ground 6 I Data set ready 7 O Request to send 8 I Clear to send 9 I Ring indicate ...

Страница 135: ... STROBE 2 I O Data bit 0 3 I O Data bit 1 4 I O Data bit 2 5 I O Data bit 3 6 I O Data bit 4 7 I O Data bit 5 8 I O Data bit 6 9 I O Data bit 7 10 I ACK 11 I BUSY 12 I PE 13 I SLCT 14 O AUTO FEED 15 I ERROR 16 O INIT 17 O SLCT IN 18 NA Ground 19 NA Ground 20 NA Ground 21 NA Ground 22 NA Ground 23 NA Ground 24 NA Ground 25 NA Ground ...

Страница 136: ...o pin 5 NA Digital G Self test Self test 6 NA Red Rtn Key pin Red Rtn 7 NA Green Rtn Mono Rtn Green Rtn 8 NA Blue Rtn No pin Blue Rtn 9 NA Plug No pin No pin 10 NA Digital G Digital G Digital G 11 NA Reserved No pin Digital G 12 NA Reserved Digital G No pin 13 O Hsync Hsync Hsync 14 O Vsync Vsync Vsync 15 NA Reserved No pin No pin Red Rtn Green Rtn Blue Rtn Analog grounds Digital G Digital ground ...

Страница 137: ...DINconnectors Thevoltagesandsignalsarethesameforboth connectors 6 4 2 1 3 5 5 3 1 2 4 6 Pin I O Function 1 I O Data 2 NA Reserved 3 NA Ground 4 NA 5 Vdc 5 I O Clock 6 NA Reserved Although the keyboard and mouse ports are physically and electrically compatible neither the keyboard nor the mouse will operate if plugged into the other s socket ...

Страница 138: ...may be used to connect the feature connector to an expansion card In case you have difficulty obtaining a cable the pinout of the motherboard connector is given in the following table Pin Function Pin Function 1 Ground 2 P0 3 Ground 4 P1 5 Ground 6 P2 7 EVIDEO 8 P3 9 ESYNC 10 P4 11 EDCLK 12 P5 13 No connect 14 P6 15 Ground 16 P7 17 Ground 18 DCLK 19 Ground 20 BLNK 21 Ground 22 HSYNC 23 Ground 24 V...

Страница 139: ...apricot MITSUBISHI ELECTRIC APRICOT COMPUTERS LIMITED 3500 PARKSIDE BIRMINGHAM BUSINESS PARK BIRMINGHAM B37 7YS Part No 15273131 Revision No 01 ...

Отзывы: