background image

Window and Toolbar Reference

5

TPDesign3 Touch Panel Program

Window and Toolbar Reference

TPDesign3 Windows

The first elements available in the Workspace are the Main Menu bar, Toolbar buttons, and Status 

bar. Double-clicking any area of the Status bar causes the feedback and page flip displays to change 

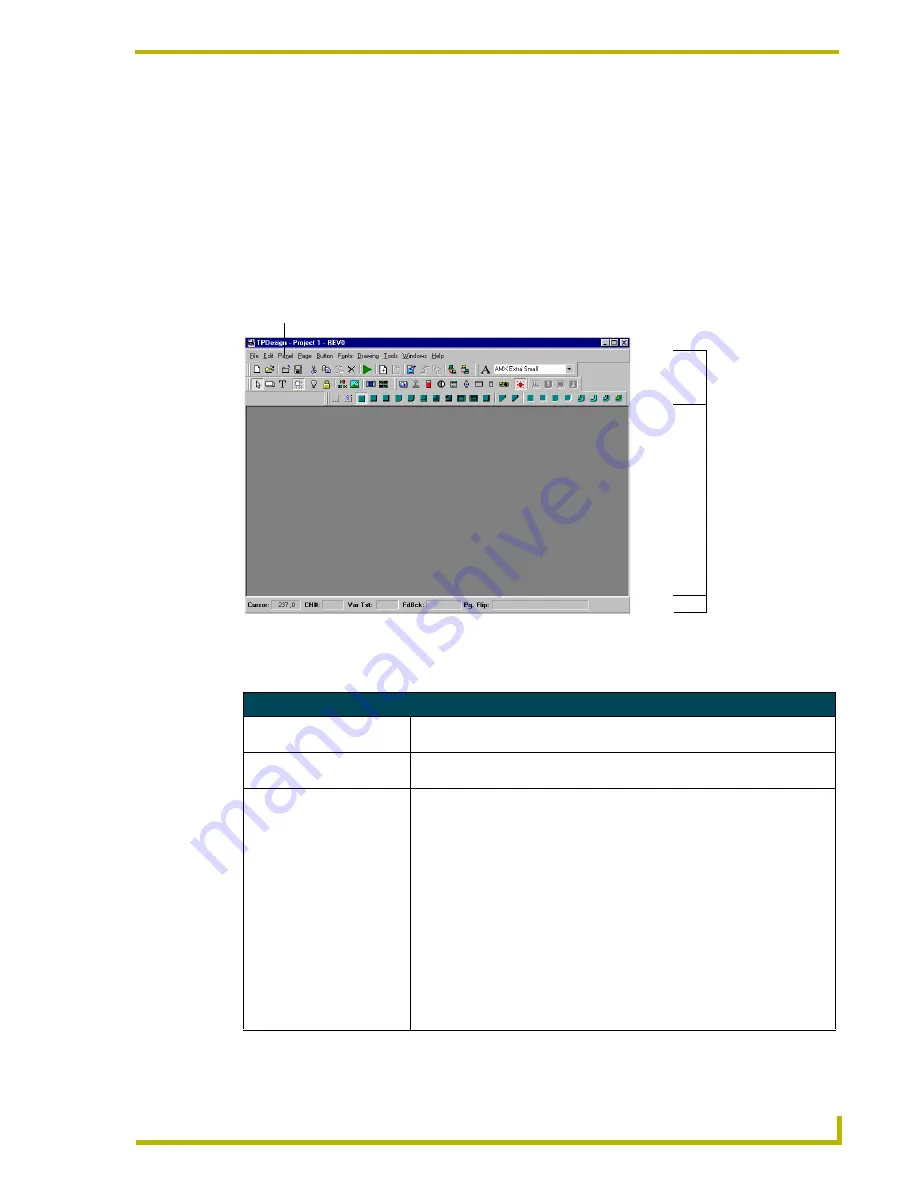
to location and size displays. FIG. 3 shows the Status bar elements and identifies the data shown by 

each.   

The main elements of the TPDesign3 Main Menu are described below:

FIG. 3  

TPDesign3 Main Menu and Status bar elements

TPD3 Main Elements

Main Menu bar

Provides access to all the functions needed to work with files, objects, and 
properties.

Toolbar buttons

Contain the buttons you can select (when a file is opened) to perform various 
TPDesign3 operations or functions.

Status bar

Contains the following default elements:

Cursor

 displays the X and Y mouse cursor coordiates on a page.

CH#

 shows the channel number assigned to the selected object.

Var Txt

 shows the variable text channel assigned to the selected object (if 

enabled).

FdBck

 shows the feedback (type) assigned to the selected object (if 

enabled).

Pg. Flip

 shows the object’s designated page flip (if enabled).

Double-clicking on the Status Bar opens a graphical elements row with these 
additional fileds:

Loc

 shows the location of the button on the page.

Size

 shows the pixel height and width of the selected object.

Rev

 shows the version of the active project file.

Main Menu bar 

Toolbar buttons

Workspace

Status bar
elements

Содержание TPDESIGN3 V3.16

Страница 1: ...instruction manual Software TPDesign3 Touch Panel Design Program Version 3 16 ...

Страница 2: ...l be repair or replacement of the AMX Software that does not meet AMX s Limited Warranty and which is returned to AMX This Limited Warranty is void if failure of the AMX Software has resulted from accident abuse or misapplication Any replacement AMX Software will be warranted for the remainder of the original warranty period or 30 days whichever is longer Outside the United States these remedies m...

Страница 3: ...orders Toolbar 10 Button Types Toolbar 11 Fonts Toolbar 12 Hotkey Shortcut Information 13 Designing Panel Pages 15 Defining your Preferences 15 Creating a New Project 16 Setting Panel Properties 17 Importing Bitmaps 18 Optimization of images 19 Importing Icons 19 Creating Editing an Icon 20 Managing Fonts 20 Creating a New Page 21 Setting Page Properties 21 Creating a Button 22 Assigning Button Co...

Страница 4: ...ard Button Properties 33 Setting Keypad Button Properties 33 Setting Panel Setup Button Properties 33 Setting Sensors Setup Button Properties on CP4 panels 33 Setting Video Setup Button Properties 34 Setting VGA Video Setup Button Properties 34 Setting Video Window Button Properties 34 Setting Video Joystick Button Properties 35 Defining External Buttons 36 Verifying Channel Assignments 37 Creatin...

Страница 5: ...utton also added to both the Edit and Button drop down menus Sensors Setup button on the Button Types toolbar is available for the adjustment of sensors on the four inch Color Passive panels Static and WebLinx HTML files now have the option to enable or disable the emulation of external buttons Size To Picture feature resizes a button to fit the dimensions of the inserted graphic Simulation mode a...

Страница 6: ...asic DHTML support Clients include Microsoft Internet Explorer 4 0 and higher running on all platforms for which they have been released Windows Unix and Mac Installing TPDesign3 To install the TPDesign3 program 1 Put the AMX Control Disc into the CD ROM drive 2 In File Manager or Explorer in Windows double click AMXSetup exe from the directory window for your CD ROM drive 3 Follow the instruction...

Страница 7: ...ONTROL is selected for the Destination Therefore in an actual operation of the program pressing the DVD button creates a page flip to the popup page called DVD CONTROL that contains buttons that control the DVD FIG 1 Example touch panel page FIG 2 Example touch panel page with assigned page flip Button selected for button properties assignments Button Properties box Button position on page Assigne...

Страница 8: ...Product Information 4 TPDesign3 Touch Panel Program ...

Страница 9: ...perties Toolbar buttons Contain the buttons you can select when a file is opened to perform various TPDesign3 operations or functions Status bar Contains the following default elements Cursor displays the X and Y mouse cursor coordiates on a page CH shows the channel number assigned to the selected object Var Txt shows the variable text channel assigned to the selected object if enabled FdBck show...

Страница 10: ...box and sets the printer paper size paper source and orientation options PRINT PREVIEW opens a graphical image of the touch panel pages contained in the project file Provides the option to select from three types of print information for a selected page PRINT prints the selected panel page using one of three types of print information Properties opens the Project Properties dialog box and displays...

Страница 11: ...page to the Windows clipboard or save it as a BMP format graphics file for use with an external application PROPERTIES allows you to name the page and to set the page color page properties TEXT sets text properties for all buttons On and Off States COLORS sets the selected button s text fill and border On Off state colors BORDER sets the button s border style ICON adds an icon to a button s Off or...

Страница 12: ...Standard from the Tools menu to toggle the Main toolbar buttons On or Off in the Main window ALIGN sets the alignment on multiple buttons MAKE SAME SIZE makes the Height Width or both features of selected buttons the same HORIZONTAL SPACING adjusts the horizontal spacing of selected buttons VERTICAL SPACING adjusts the vertical spacing of selected buttons Standard Toolbar Buttons New Creates a new...

Страница 13: ...eloped Manage Popup Page Displays selects and edits popup pages created within the currently displayed project file Download To Panel Downloads the current project file to the connected touch panel from a PC Upload From Panel Uploads a project file from the connected touch panel Main Toolbar Buttons Selection Tool Selects buttons Button Draw Tool Draws a button on the active page Text Tool Adds or...

Страница 14: ...ments Button Borders Toolbar Buttons No Border Changes the selected button to remove any border No Border Special Changes the selected button to a display no special border Single Line Changes the selected button border to a thin single line border Double Line Changes the selected button border to a double line Triple Line Changes the selected button border to three line widths wide Single Rounded...

Страница 15: ... 3 dimensional rectangle 3D Double Rectangle Changes the selected button border to a 3 dimensional double rectangle 3D Single Round Changes the selected button border to a 3 dimensional single round rectangle 3D Double Round Changes the selected button border to a 3 dimensional double border with rounded corners Neon 1 Changes the selected button border to single Neon Neon 2 Changes the selected b...

Страница 16: ...en the keyboard so you can enter a name or string Keypad Changes an active button into a keypad popup button on a page Sets the button to open the keypad so you can enter a password or value assignment Panel Setup Changes an active button into a panel setup button on a page Sets the button to open the Setup page Sensors Setup Changes an active button into a sensors setup button that takes the user...

Страница 17: ...the Main Toolbar On Off F3 Toggles the Button Borders Toolbar On Off F4 Toggles the Button Types Toolbar On Off F5 N A F6 Toggles the Fonts Toolbar On Off F7 Activates the Button Colors Scheme dialog box this dialog box changes the button properties for the active project ONLY F8 Activates the Power Assign dialog box F9 Activates the Paste Controls dialog box F10 N A F11 Toggles between a selected...

Страница 18: ...Window and Toolbar Reference 14 TPDesign3 Touch Panel Program ...

Страница 19: ... is stored with the project file Color changes in the Buttons Colors Scheme dialog box takes precedent over the color values in the Default Colors tab as long as the TPDesign3 session program is active When the session is closed any new buttons retain the properties of the Default Colors tab To set up application preferences 1 Select Preferences from the Edit drop down menu The Preferences dialog ...

Страница 20: ...accept the project preferences Creating a New Project To create a TPDesign3 project 1 Click the New icon from the Standard toolbar or File drop down menu The New Workfile dialog box FIG 5 appears 2 Select the touch panel type and click Create to open the Project Properties dialog box Be sure to select the appropriate touch panel type for which you will be creating the program In order to use graph...

Страница 21: ...Address field 4 Enter a Blink Rate value between 0 and 99 Default is 5 Blink rate value is in 1 10 of a second and applies to all buttons set with the blink feedback option The Blink Rate is the value that the panel will use if the feedback type is set to blink 5 Click the Page Tracking option if you want the AMX Central Controller to be notified when a page flip has occurred Notification will hav...

Страница 22: ...mage types 2 Click Import to open the Import Bitmap dialog box and search for bitmaps and other supported image types you want to import into the Bitmaps Library for the project Bitmaps are selected individually or in groups by using a combination of the Shift and left mouse key 3 Click Open when you re done selecting the bitmap files A warning message appears if the bitmap exceeds the panel scree...

Страница 23: ... is transparent The program then assigns the most used colors of the group to next 83 color slots The remaining color slots are occupied by a group of the closest colors matching the colors used in the selected images To optimize effectively Choose either pictures with similar color values or choose a single image to optimize Choosing images with similar colors allows the program to create a color...

Страница 24: ... box Creating Editing an Icon 1 Double click an existing icon or a blank cell from the Icon Manager dialog box to open the Icon Editor window Use this dialog to pixel edit the selected icon 2 Use the controls located on the left side of the dialog box to change the color properties of individual pixels create shapes color areas and rotate created images 3 Click OK to accept the changes made to the...

Страница 25: ...to the Add Page dialog box 3 Click OK The newly created page appears on the Workspace actively selected Enter the new Page Name and click OK The new page is created and displayed within the Workspace Now there are two pages in the project Main page and the new page You can set the page properties and create functional buttons These buttons allow page flips from one page to another Setting Page Pro...

Страница 26: ...ault Assigning Button Color Properties TPDesign3 gives the user different avenues to alter the color properties for different project elements The program also requires an order of precedence to the assignment of colors for buttons The three avenues for button color alteration from the Main menu are Edit Preferences Default Colors tab Button Colors Button Colors dialog box Tools Button Colors F7 B...

Страница 27: ... OK to accept your changes and return to the main menu Changing Button Borders 1 Select a button and using a mouse right click to open the button options menu 2 Click on Border from either the Button drop down or right click Button option menus The Select Border dialog box is displayed Another way to change a button border is by selecting the button and choosing the desired border from the Button ...

Страница 28: ...eckmark by the Use the same text for the On State of the button field only if you want different text to appear for the two states A button that changes from ON to OFF is an example of a button with different text for different states 6 Add the checkmark by the Use the same text for the On State of the button field only if you want the same text to appear for the two states A CD button that only c...

Страница 29: ...the Button Types toolbar In this example we ll use Time 3 Select a border from the Borders toolbar FIG 10 shows a time button using a Neon 2 border Selecting an Icon 1 Click a button to select it 2 Select Icon from either the Button drop down or right click Button option menus to open one of the Select Icon dialog boxes shown in FIG 11 To the left of the Icon Info section is the icon list This lis...

Страница 30: ... Use Graphical Dialog option from the Edit Preferences Application tab 3 Select a picture name from the listing of available pictures The first choice will assign the Off State Bitmap 4 Click in the On State Bitmap field title turns red choose a picture from the listing to assign as the On State of the button 5 You can clear the individual or both states by using either the Clear or Clear Both but...

Страница 31: ...button 6 Click OK to accept your changes and return to the main menu You can also resize the button by clicking on it and wait for the resize handles FIG 13 to appear Resize a button by selecting one of the button handles by placing the mouse cursor over the handle The cursor changes to a double arrow indicating the available direction for resizing While holding down the left mouse button drag the...

Страница 32: ...wn your left mouse button and drag the cursor to the opposite end of the page 2 Copy the page elements Click Edit Copy from the Main menu to copy selected elements on the active page Place the cursor on any of the selected buttons and right mouse click Click Copy from the button right click menu To paste buttons 1 Place the cursor over the area of pasting either an area on the same page or open an...

Страница 33: ...ntral Controller if required The following table lists strings and their features 11 Click OK to accept the changes FIG 14 Button Properties dialog box Window identifies button s location on the page Allows you to Hide or Show the button location window Axcess software uses the channel code number to identify the button and its operation Strings and their Features SL In the wireless panels enterin...

Страница 34: ...ave your selections to the button s properties Setting Joystick Button Properties You can create a joystick button on the panel page Joysticks are vertical and horizontal direction controllers you can use for camera operations such as pan and tilt 1 Draw a button on the working page by using the Button Draw tool from the Main toolbar and then select the border style and colors 2 Click the Joystick...

Страница 35: ...le Text address assign a Device Channel or click VarText Assign 6 Under Orientation select either Vertical or Horizontal as your bargraph orientation 7 Under Level Type select either Display Active or Center for a bargraph or slider Selection for Level Type is either bargraph displaying equipment responses states or slider adjustments to sound or lighting levels You may only have 8 levels per devi...

Страница 36: ... 1 Draw a button on the working page by using the Button Draw tool from the Main toolbar then select the border style and colors 2 Click the Date button from the Button Types toolbar The button is now a Date button 3 Double click the Date button the Button Properties dialog box appears 4 Under Channel Code enter the Device and Channel number or click Channel Assign 5 Under Variable Text address as...

Страница 37: ...ess assign a Device Channel or click VarText Assign 6 Click OK to accept any changes made and return to the main program Setting Panel Setup Button Properties 1 Draw a button on the working page by using the Button Draw tool from the Main toolbar then select the border style and colors 2 Click the Panel Setup button from the Button Types toolbar The button is now a Setup button 3 Double click the ...

Страница 38: ... then select the border style and colors 2 Click the VGA Video Setup button from the Button Types toolbar The button is now a VGA Video Setup button 3 Double click the Video Setup button the Button Properties dialog box appears Panels that do not support this feature such as the AXB TPI do not allow you to select this button type 4 Under Channel Code enter the Device and Channel number or click Ch...

Страница 39: ...ow a Video Joystick button 3 Double click the Video Joystick button to display the Button Properties dialog box FIG 20 4 Under Video Joystick Options select Centering or Non Centering and assign the Device Horizontal and Vertical values or select Level Assign Multiple video windows are available only if you are using an AXB TPI display driver box 5 Enter the Device and Channel numbers and any requ...

Страница 40: ...r the selected external button 3 Click on any of the displayed buttons to open either of the dialog boxes shown in FIG 22 The Button Programming Description dialog box is focused toward the panel programmer and allows you to provide property identifiers information relating to a specific button or to all buttons of a specific type This information is printed out with the Description option of File...

Страница 41: ...iled displays the different pages containing buttons with the same channel code value and using the same device number 4 Click Exit and Close to shut down the Channel Maps dialog box Creating a Popup Page Popup pages are partial pages used with full page screens When a popup page is created from a button the popup page takes on the attributes and properties assigned to the button selected to activ...

Страница 42: ...oject on your computer with limited functionality and get an idea of the project s operation on the touch panel It is recommended that before you download a project to a panel you test out the validity of the project components using this feature 1 Click the Run Simulation icon from either the Standard toolbar or from the File drop down menu 2 To end simulation mode click the X in the upper right ...

Страница 43: ...utton at any time that the project is open If by mistake you optimize the bitmaps in your project you must close the TPD project without saving any changes and re open 2 In the Download to Panel dialog Comm Settings tab verify that Optimize Bitmap Colors is not selected This dialog is accessible via the File menu Uploading a Project from a Touch Panel 1 Click the Upload From Panel icon from either...

Страница 44: ...ption allowing the user to set the WebLinx server host name to a value other than localhost 5 Select the Open panel in new window option if you would like the panel displayed in a separate browser window sized to fit the panel 6 Select the Show NetLinx Debug Status option if you are going to be using the HTML from within a NetLinx system and want to view the debug status This option is unavailable...

Страница 45: ...nter it exactly as it appears in the server 13 Select Overwrite Existing Files if these files currently exist in the directory 14 Click Begin to initiate the download of the files to the server Downloading to a NetLinx Master on a LAN To send the HTML pages to a NetLinx controller on a LAN the controller must be accessible via an Ethernet connection TCP IP To send the HTML pages 1 Enter the NetLin...

Страница 46: ... of AMX Corporation AMX reserves the right to alter specifications without notice at any time In Canada doing business as Panja Inc DALLAS TEXAS LOS ANGELES CALIFORNIA MEXICO CITY MEXICO ONTARIO CANADA PHILADELPHIA PENNSYLVANIA SHANGHAI CHINA SINGAPORE TAMPA FLORIDA WESTERLO BELGIUM YORK ENGLAND 3000 RESEARCH DRIVE RICHARDSON TX 75082 USA 800 222 0193 469 624 8000 469 624 7153 fax 800 932 6993 tec...

Отзывы: