Audio/Video Configuration
65
Enova DVX-315xHD & DVX-215xHD All-in-One Presentation Switchers - Instruction Manual
Audio In/Microphone
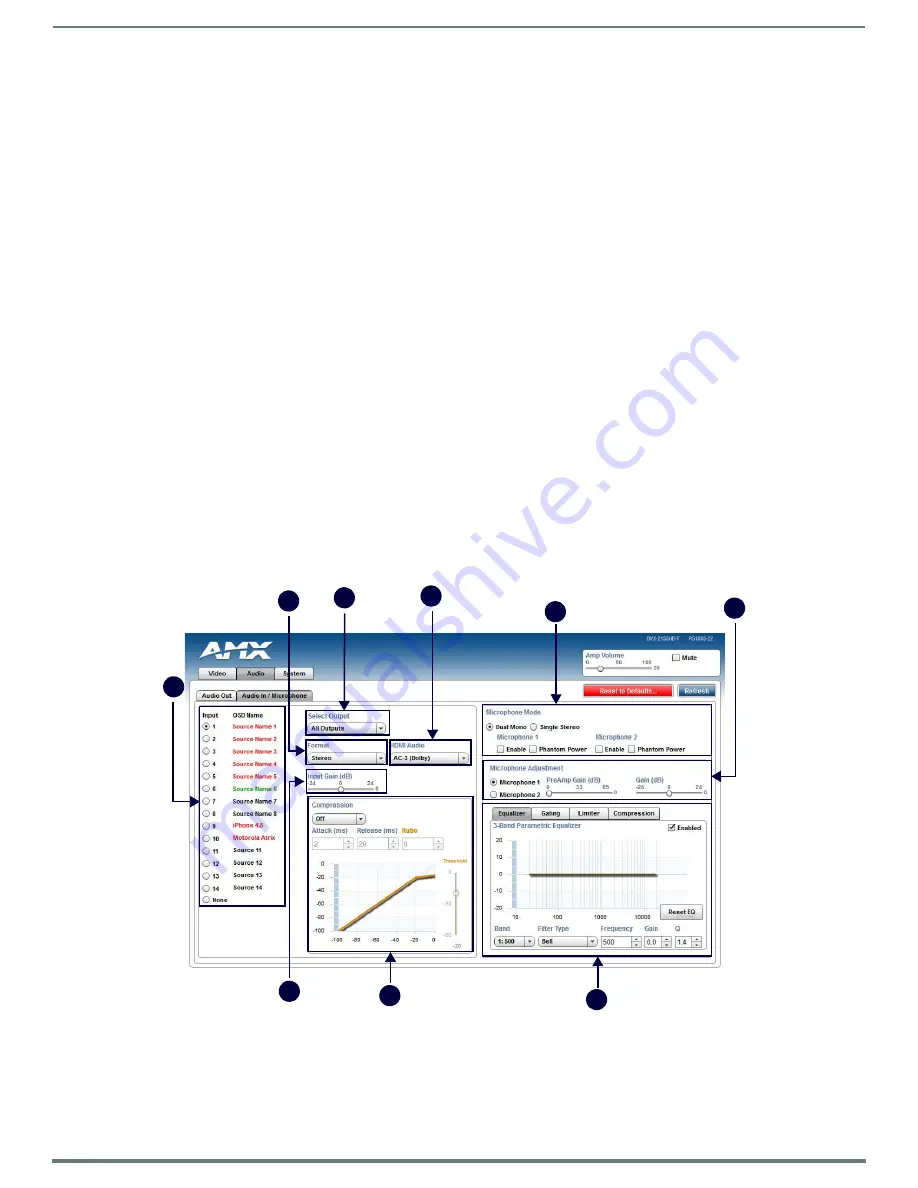
FIG. 69 displays the Audio In/Microphone page for the DVX.
FIG. 69
WebConsole Configuration Page - Audio In/Microphone Tab
8 -
Equalizer
: The equalizer is a 10 band parametric equalizer enabling you to set any of the 10 default frequencies (31Hz,
62Hz, 125Hz, 250Hz, 500Hz, 1000Hz, 2000Hz, 4000Hz, 8000Hz, 16000Hz) to any value from 20Hz to 20KHz. Each band is set
individually by selecting the band from the Band menu then adjusting the remaining settings.
A dynamic graph displays the resulting frequency response of the equalizer band. Changing the Gain, Frequency, or Q settings
can change the frequency response.
Use the following options to change the settings on the equalizer:
Band
: Use the menu to select which of the 10 equalizer bands you want to configure.
Filter Type
: Use the menu to set the filter type for the selected equalizer band. You can choose from Bell, Band Pass, Band
Stop, High Pass, Low Pass, Treble Shelf, and Bass Shelf.
Frequency
: Use the up and down arrows or direct text entry to set the center frequency for the selected equalizer band. You
can set the center frequency to any value between 20Hz and 20KHz.
Gain
: Use the up and down arrow buttons or direct text entry to adjust the gain/attention level of the selected band. You can
set the gain from -12 to +12dB in 1dB increments. The default setting is 0.
Q
: Q factor adjusts the filter from wider to narrower smoothing between inflection points on the frequency response. The
default setting is 1.4. The range is from 0.1 to 20.0 in 0.1 increment/decrement steps.
Tone Adjust
: Use the menu to select a fixed adjustment to the frequency response depending on the current use. You can
choose from Off, Movie, Voice, and Music.
Enabled
: Click to enable or disable the equalizer settings.
9 -
Ducking
: Use the menu to set the ducking level of the audio output. You can choose from Off, Low, Medium, High, and
Custom. Selecting Custom activates settings you can adjust for Threshold, Attack, Release, Attenuation, and Hold-time. The
default setting is Off.
Priority
: Use this menu to set the ducking priority for the microphones. You can choose from Off or Mic1.
Threshold
: Use the sliders to adjust the threshold levels for each microphone. You can set the threshold to any value
between 0 and -50.
10 -
Mix
: Use the sliders to set the mix levels for the audio input and the two microphones. Each device has its own mix level
slider. You can set each level from 0 to 100dB.
1 -
Audio Input
: Select the corresponding option button to switch that audio signal to the selected output. You can only select
one audio input at a time. Select None if you do not want any audio.
2 -
Format
: Use the menu to select the analog format for the audio input. You can choose from Stereo or Mono.
3 -
Select Output
: Use the menu to select an audio output.
1
2
3
4
6
8
7
9
4
5
8


