background image


31 

+31(0)78 - 615 20 33 
[email protected] 
www.altec.nl 


+32(0)2 - 270 34 88 
[email protected] 
www.altec.be 


NL 

BE 

5.3


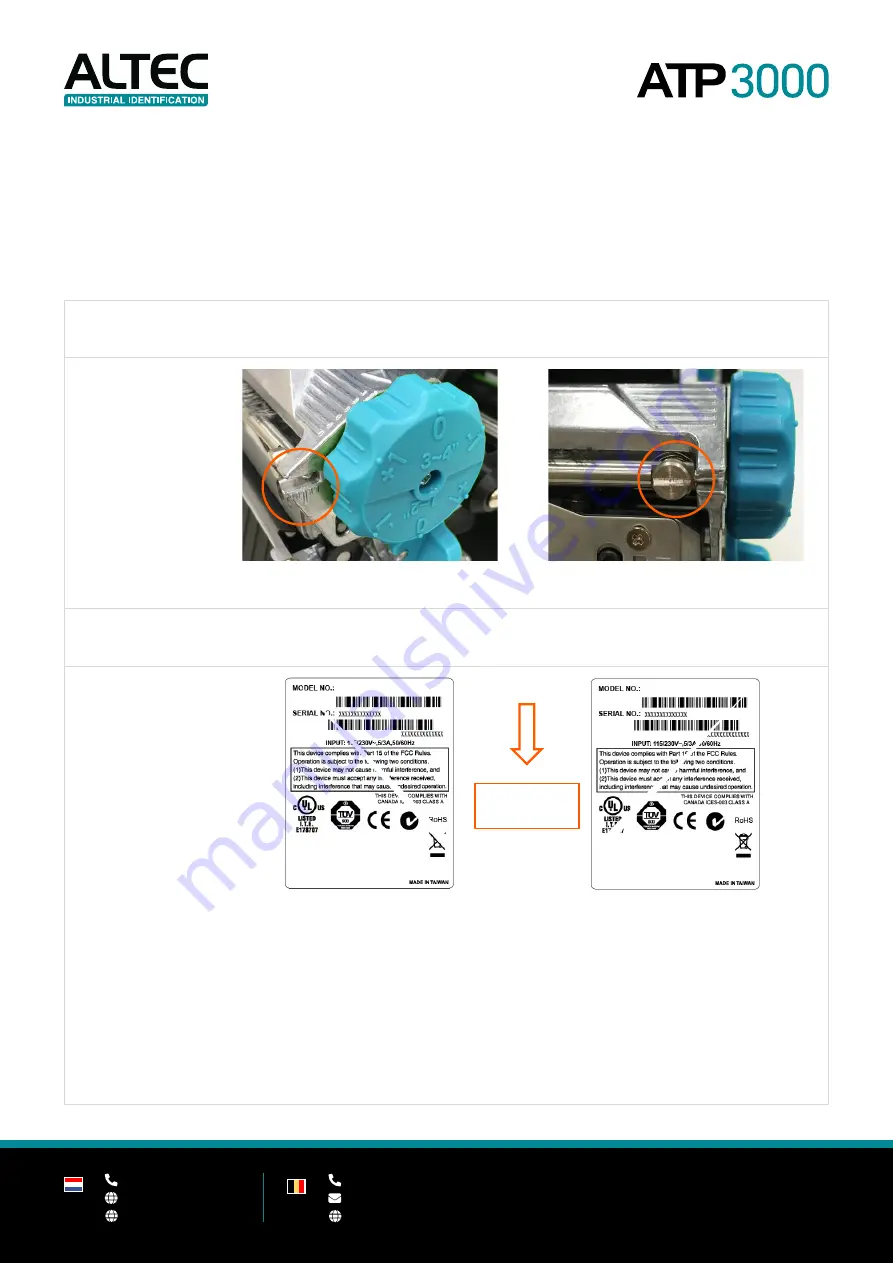
Mechanism fine adjustment to avoid ribbon wrinkles 

This printer has been fully tested before delivery. There should be no ribbon wrinkle presented on the media for 
general-purpose printing applications. Ribbon wrinkle is related to the media width, thickness, print head pressure 
balance, ribbon film characteristics, print darkness setting, etc. In case the ribbon wrinkle happens, please follow 
the instructions below to adjust the printer parts. 


Ribbon Tension Adjustment Knob has 5 positions for adjustment.  

Use flat blade driver to change the ribbon tension position. 

Adjustable printer 

parts 


Ribbon tension adjustment scales 


Ribbon tension adjustment knob 

Symptom 

1. Wrinkle happens from label  

lower right to upper left direction 

2. Wrinkle happens from label  

lower left to upper right direction 

Wrinkle example 


If the wrinkle on the label starts from the 

lower right side to upper left side, please 

do following adjustment. 


1.


Switch the ribbon tension 

adjustment knob clockwise per 1 

level and print the label again to 

check if the wrinkle is gone. 


If the wrinkle on the label starts from the 

lower left side to upper right side, please 

do following adjustment. 


1.


Switch the ribbon tension 

adjustment knob counter-

clockwise per 1 level and print the 

label again to check if the wrinkle 

is gone. 


Feed 

direction 

Содержание ATP3000

Страница 1: ...Version 1 0 User manual...

Страница 2: ...erior view 10 2 2 3 Rear view 11 3 Operator control 12 3 1 Touch screen 12 3 1 1 LED indication and keys 13 3 1 2 Main page icons 13 3 1 3 Power on utilities 15 4 Setup 16 4 1 Setting up the printer 1...

Страница 3: ...Wi Fi 41 6 5 4 Bluetooth 42 6 5 5 Advanced 42 6 6 File manager 44 6 7 Diagnostic 44 6 8 Favorites 46 7 Printer management tool TPM 47 7 1 TPM overview 47 7 2 Printer settings 48 7 2 1 Printer configu...

Страница 4: ...ts reserved Windows is a registered trademark of Microsoft Corporation All other trademarks are the property of their respective owners Information in this document is subject to change without notice...

Страница 5: ...rating and power type indicated on marking label provided by manufacture 8 Please refer to user manual for maximum operation ambient temperature Warning Do not throw the battery in fire Do not short c...

Страница 6: ...A 320 x 480 pixel 6 operation buttons menu feed pause up down left right 3 color LED Processor 32 bit RISC high performance processor Memory 128MB Flash memory 128MB DRAM Interface USB 2 0 High speed...

Страница 7: ...0 90 non condensing Environmental concern Comply with Energy Star 2 0 REACH RoHS and WEEE 1 3 Print specifications Print head resolution dots per inch mm 300 dots inch 12 dots mm Printing method Therm...

Страница 8: ...dia core diameter 76 2 mm 3 ID core Media type Continuous die cut black mark fan fold notch Wind direction Outside wound Media width 20 mm 120 mm cutter mode max 114 mm Media thickness 0 06 mm 0 28 mm...

Страница 9: ...en specially packaged to withstand damage during shipping Please carefully inspect the packaging and printer upon receiving the ATP 3000 printer Please retain the packaging materials in case you need...

Страница 10: ...c nl www altec nl 32 0 2 270 34 88 info altec be www altec be NL BE 2 2 Printer overview 2 2 1 Front view 1 LED indicator 2 LCD touch display 3 Front panel buttons 4 Media view window 5 Label exit 6 M...

Страница 11: ...spindle 2 Print head pressure adjustment knob 3 Print head release lever 4 Ribbon supply spindle 5 Label roll guard 6 Label supply spindle 7 External label entrance 8 Damper 9 Ribbon end sensor 10 Pr...

Страница 12: ...tec nl www altec nl 32 0 2 270 34 88 info altec be www altec be NL BE 2 2 3 Rear view 1 External label entrance 2 Power switch 3 USB interface 4 USB host 5 RS 232C interface 6 Ethernet interface 7 Pow...

Страница 13: ...5 20 33 info altec nl www altec nl 32 0 2 270 34 88 info altec be www altec be NL BE 3 Operator control 3 1 Touch screen Time Date Printer status Keys Icons Firmware version ETH 192 168 100 131 Ethern...

Страница 14: ...lash Printing error such as head open paper empty paper jam ribbon empty memory error etc Keys Function Select keys The labels on the footer of the UI will explain the function for left and right soft...

Страница 15: ...the menu Calibrate the media sensor Enter the Favorites option please refer to section 6 8 Enter cursor be marked in green located option Feed button advance one label Tap an item to open use it Note...

Страница 16: ...of the select key then turn on the power switch 3 Release the button when LCD monitor indicates with different functions 4 Printer will setup the functions showing on the LCD monitor accordingly Sequ...

Страница 17: ...secure surface 2 Make sure the power switch is off 3 Connect the printer to the computer with the provided USB cable 4 Plug the power cord into the AC power cord socket at the rear of the printer and...

Страница 18: ...ltec nl www altec nl 32 0 2 270 34 88 info altec be www altec be NL BE 4 2 Loading the ribbon 1 Open the printer right side cover 2 Install the ribbon onto ribbon supply spindle and install paper core...

Страница 19: ...e www altec be NL BE 3 Push the Print head release lever to open the print head mechanism 4 Thread ribbon below the ribbon guidebar through ribbon sensor slot as the loading path shown here 5 Stick th...

Страница 20: ...c be www altec be NL BE 6 Wind the ribbon rewind spindle counter clockwise roughly 3 5 circles until the ribbon is smooth properly stretched and wrinkle free 7 Close the print head mechanism by pushin...

Страница 21: ...www altec nl 32 0 2 270 34 88 info altec be www altec be NL BE 4 3 Remove used ribbon 1 Break the ribbon between ribbon guide plate and the ribbon rewind spindle 2 Slide the ribbon off to release the...

Страница 22: ...altec be NL BE 4 4 Loading media 4 4 1 Loading the media 1 Open the printer right side cover 2 Move the label roll guard horizontally to the end of label spindle then flip down the label roll guard 3...

Страница 23: ...ure the gap or black mark sensor is at the location where media gap black mark will pass through for sensing 6 Adjust the label guide to fix the media position Note Please install the media through th...

Страница 24: ...34 88 info altec be www altec be NL BE 7 Close the print head mechanism on both sides and make sure the latches are engaged securely 8 Set media sensor type and calibrate the selected sensor Note Plea...

Страница 25: ...Loading the Fanfold External media 1 Open the printer right side cover 2 Insert the fanfold media through the rear external label entrance chute 3 Please refer to section 4 4 1 step 4 8 for loading me...

Страница 26: ...g media 3 Use the front display panel to do the calibration first and set the printer mode to peeler mode Note 1 Please calibrate the gap black mark sensor before loading media in the peel off mode to...

Страница 27: ...f the liner through the peel off module slot as indicated 7 Pull out the media rewind spindle securing clip Wind the media on the spindle until the liner stretched properly 8 Insert the securing clip...

Страница 28: ...27 31 0 78 615 20 33 info altec nl www altec nl 32 0 2 270 34 88 info altec be www altec be NL BE 9 Close the print head release lever and press the FEED button to test...

Страница 29: ...rinter right side cover 2 Please refer to section 4 4 1 step 4 8 for loading media 3 Use the front display panel to do the calibration and set the printer mode to cutter mode 4 Push the Print head rel...

Страница 30: ...s 6 levels of adjustment for 1 2 and 3 4 media widths Because the printer s paper alignment is to the left side of mechanism different media widths require the different pressure to print the label co...

Страница 31: ...n adjustment knob has five positions for adjustment Because the printer s ribbon alignment is to the left side of mechanism different ribbon or media widths require different ribbon tension to print c...

Страница 32: ...ent Use flat blade driver to change the ribbon tension position Adjustable printer parts Ribbon tension adjustment scales Ribbon tension adjustment knob Symptom 1 Wrinkle happens from label lower righ...

Страница 33: ...ressure adjustment knob per 1 level and print the label again to check if the wrinkle is gone 3 If the wrinkle can t be avoided please contact Altec 2 If the ribbon tension adjustment knob has positio...

Страница 34: ...the media This Interface option is used to set the printer interface settings This Advanced option is used to set the printer LCD settings initialization cutter type media low warning setting etc Thi...

Страница 35: ...the printer settings for TSPL Item Description Default Speed Use this item to setup print speed Available setting range is 1 10 for 203dpi and 1 7 for 300dpi 3 Density Use this option to setup printin...

Страница 36: ...of the printing job Rewinder mode Enable the label rewinder mode Batch mode Offset This item is used to fine tune media stop location Available setting value range is from 999 dots to 999 dots 0 dot S...

Страница 37: ...Darkness Print speed Tear off Print mode Tear off Peeler off Cutter Rewind Print width List fonts List images List formats List setup Control prefix Format prefix Delimiter char Media power up Feed C...

Страница 38: ...rint width This item is used to set print width The available value range is 2 999 dots 812 List fonts This feature is used to print current printer available fonts list to the label The fonts stored...

Страница 39: ...gth Printer determine length and feed label No motion Printer will not move media No motion Label top This option is used to adjust print position vertically on the label The range is 120 to 120 dots...

Страница 40: ...N A Manual setup In case Automatic cannot apply to the media please use Manual function to set the paper length and gap bline size then scan the backing mark to calibrate the sensor sensitivity N A T...

Страница 41: ...escription Default Baud rate This item is used to set the RS 232 baud rate 9600 Parity This item is used to set the RS 232 parity None Data bits This item is used to set the RS 232 Data bits 8 Stop bi...

Страница 42: ...k protocol Static IP Use this menu to set the printer s IP address subnet mask and gateway DHCP 6 5 3 Wi Fi Item Description Default Status Use this menu to check the Wi Fi IP address MAC setting stat...

Страница 43: ...he local name for Bluetooth RF BHS Pin code This item is used to set the local pin code for Bluetooth 0000 6 5 5 Advanced Menu Interface Bluetooth Status Local name Ping code Menu Advanced Language Pr...

Страница 44: ...otine Ribbon Low Warning This item is used to set the warning for ribbon low For example if setting value is 30m when ribbon capacity was lower than 30m the will be shown in red 30M Printer head maint...

Страница 45: ...eature is used to print current printer configuration to the label On the configuration printout there is a print head test pattern which is useful for checking if there is any dot damage on the print...

Страница 46: ...on Printer head close motion RS 232 serial port configuration Number of download files Total available memory space Print head check pattern Dump mode Captures the data from the communications port an...

Страница 47: ...ading state 6 8 Favorites This feature is used to create your own favorites list You can organize the commonly used setting options in Favorites Get organized Favorites list Touch and hold a favorite...

Страница 48: ...the printer status Configure printer settings Manage multiple printers To download this tool on your PC use the following link 7 1 TPM overview 1 Select printer s 2 Printer status Printer is ready Er...

Страница 49: ...nt action Cut Piece Code Page Maximum Length Reference Direction Offset Shift X Y Print speed 1 6 inch s Printing temperature 0 15 Media width in millimeters Media height in millimeters Gap Black mark...

Страница 50: ...e Sleep Time Gap sensor intensity Black mark intensity Continuous intensity N A for ATP 3000 Keyboard country code Top cover open closed check Reprint last label after error Turn ribbon use on off Tur...

Страница 51: ...dule The optional Wi Fi module can be requested from Altec Ethernet Settings for Ethernet connection DHCP Set printer name and RAW port Static IP Set static IP address Subnet mask Default gateway MAC...

Страница 52: ...70 34 88 info altec be www altec be NL BE TPH Care These settings are not available for the ATP 3000 Information Overview of ATP 3000 printer information Cutting counter Mileage km can be reset here B...

Страница 53: ...ame of the loaded file Size of the loaded file in Bytes DRAM FLASH default or CARD Send file to the printer Get retrieve a list of the files on DRAM FLASH CARD Then you can select files and remove del...

Страница 54: ...hoose the required sensor and enter the label height and gap Paper Height Vertical label height from gap to gap Gap Height of the gap 2 Reset Printer Restart the printer Use this function when an erro...

Страница 55: ...To be used with ZPL 9 Wi Fi Default Reset Wi Fi settings back to default 10 Dump Text Sets the printer to dump mode Reset the printer to leave dump mode 7 2 6 Bitmap Font Manager Load bitmap fonts in...

Страница 56: ...l 32 0 2 270 34 88 info altec be www altec be NL BE 7 3 Program settings 7 3 1 Users Create users within the Printer Management tool 7 3 2 Alert Send notifications alerts to users when the status of c...

Страница 57: ...Here you can set up groups of printers This way you can change settings in the Printer Management Tool and apply them directly to all printers in the group 7 3 4 Setup Change general program settings...

Страница 58: ...n the Windows driver is not correct Re connect cable to interface or change a new cable Please reset the wireless device setting Select the correct printer port in the driver Clean the printhead Print...

Страница 59: ...nd media are incompatible The printhead pressure is not set properly Reload the supply Clean the print head Clean the platen roller Adjust the print density and print speed Run printer self test and c...

Страница 60: ...ble density to have good print quality Make sure the label guide touch the edge of the media guide RTC time is incorrect when reboot the printer The battery has run down Check if there is a battery on...

Страница 61: ...en changing a new label roll Platen roller Turn the power off Rotate the platen roller and wipe it thoroughly with a CleaningWipe Clean the platen roller when changing a new label roll Peel bar Use a...

Страница 62: ...32 0 2 270 34 88 info altec be www altec be NL BE 10 Support FAQ Do you need any help setting up your printer or do you experience a problem during printing The Netherlands T 31 0 78 615 20 33 info al...

Страница 63: ...62 31 0 78 615 20 33 info altec nl www altec nl 32 0 2 270 34 88 info altec be www altec be NL BE...

Отзывы: