background image

SOLO GA | User’s manual

9

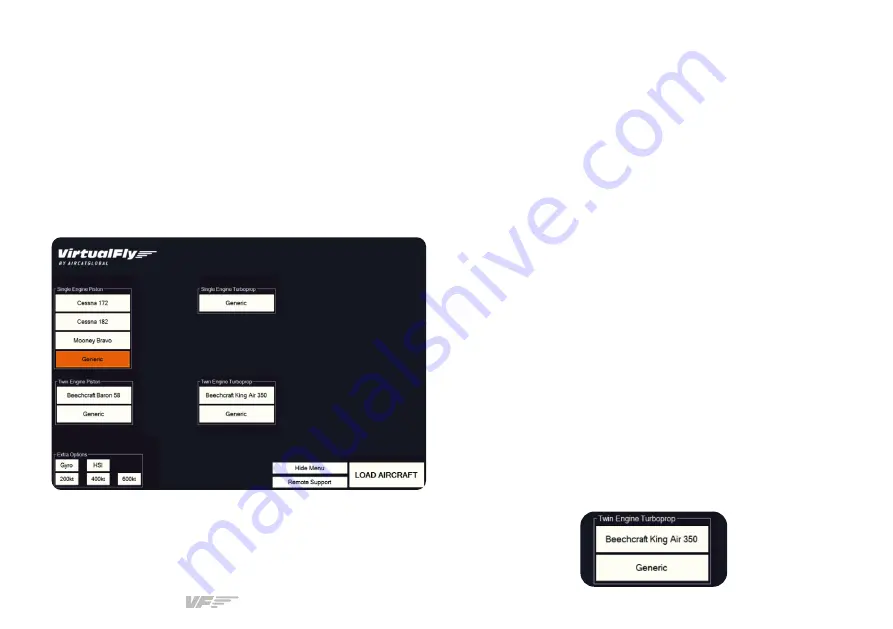
In the previous image you can see the SOLO GA has a 

"GENERIC" option for each aircraft type (4 in total). On 

each "GENERIC" option, you can select the full scale of the 

speedometer "Airspeed Range" and the type of instrument 

indication of direction "Directional Indicator".

To set up the SOLO GA with the aircraft you wish to fly, you 

must:

•  Select the corresponding Gauges Panel to desired 

aircraft

•  Place the corresponding magnetic labels

SELECTING GAUGES PANEL

The SOLO GA incorporates a 22" touchscreen, so you must 

manage it with your fingers. Follow these steps:

1.

 Select the label that corresponds to the aircraft you wish 

to fly in the simulation software. If there isn't a customized 

label for the desired aircraft, select the "GENERIC" option 

corresponding to the aircraft's engine type. For instance, if 

aircraft selected in simulation software is "Beechcraft B200", 

you must select the "GENERIC" button from the "Twin Engine 

Turboprop" menu.

5. PANEL SELECTION ACCORDING TO 

AIRCRAFT

The SOLO GA panel has been designed to operate and 

display instruments for single and twin engine planes of both 

piston and turboprop aircraft. The following picture shows 

that some aircraft have their own customised panel, such as 

the C-172, C-182, Mooney Bravo, Baron 58 and King Air 350. 

There are also customizable panels labelled as "GENERIC" to 

simulate other aircraft.

The aircraft best suited to be flown using the SOLO GA are 

those that MSFS, Prepar3D or X-Plane 11 incorporates by 

default. However, planes from Prepar3D CARENADO have 

been tested and have yielded good results.

Содержание Virtual Fly SOLO GA

Страница 1: ...registered trademarks of their respective owners All rights reserved C Maria Aur lia Capmany 21 P I La F brica 08297 Castellgal Spain Phone 34 938 333 301 https www virtual fly com For support contact...

Страница 2: ...ANEL TYPE ACCORDING TO AIRCRAFT 9 6 ENGINE STARTING PROCEDURES 11 6 1 START STOP FOR PISTON ENGINES 11 6 2 START STOP FOR TURBOPROP ENGINES 13 7 RADIOSTACK 15 7 1 AUDIO PANEL AND MARKERS 16 7 2 AUTOPI...

Страница 3: ...IN THE BOX A SOLO GA panel B Power strip C Network cable Ethernet D Magnetic labels E Quick Start Guide It is important to save all parts you are not going to use in case you need them in the future B...

Страница 4: ...Independently of the option you use you will need to plug one end of the provided Ethernet cable C to the LAN connector at the back of the SOLO GA The LAN connector socket of the SOLO GA is found in...

Страница 5: ...om magnetic labels shown below which allow you to change the designation of each switch and rotary switch to match the correct functionality The default designation of the switches and rotaries withou...

Страница 6: ...inks VFConnect https downloads virtual fly com software vfconnect latest vfconnect exe FSUIPC http www fsuipc com If you already have FSUIPC installed skip this step During the installation a registra...

Страница 7: ...llow PANEL SELECTION ACCORDING TO AIRCRAFT from section 5 to select the panel from the aircraft you wish to fly a The SOLO GA must not be disconnected while the programs are loading Doing so might cau...

Страница 8: ...SFS Prepar3D X Plane 11 and SOLO GA If you have issues establishing the connection between the SOLO GA and your computer please contact Virtual Fly s Technical support at support virtual fly com If us...

Страница 9: ...n t a customized label for the desired aircraft select the GENERIC option corresponding to the aircraft s engine type For instance if aircraft selected in simulation software is Beechcraft B200 you mu...

Страница 10: ...tomatically open and enable you to select your preferences regarding Airspeed Range and Directional Indicator as seen in the following image 3 Press the LOAD AIRCRAFT button shown below and the panel...

Страница 11: ...ches 7 Push the red START button on the left to start the engine 8 Once engine is running switch on the left L ALT switch to charge the battery 9 Switch on M AVIONICS switch These procedures have star...

Страница 12: ...h the step that corresponds to their application when stopping the piston engine 1 2 4 5 3 6 X Plane 11 STARTING STOPPING PISTON ENGINES To start and stop a piston engine aircraft in X Plane 11 please...

Страница 13: ...switch to charge the batteries 9 Switch on M AVIONICS switch These procedures have started the engine if the selected aircraft is a single engine or the left engine if it is a twin engine aircraft Bef...

Страница 14: ...esponds to their application when stopping the turboprop engine 2 5 4 3 1 X Plane 11 STARTING STOPPING TURBOPROP ENGINES To start and stop a turboprop engine aircraft in X Plane 11 please refer to the...

Страница 15: ...n increments of 1000 feet COM frequencies Rotate to change the decimal of the frequency in increments of 0 025 or rotate keeping the knob pressed to change the integers in increments of 1 00 NAV frequ...

Страница 16: ...is mandatory that the Ident knobs in respective COM NAV radios are pulled otherwise it won t be activated To make it easier the Options screen allows for a Linked option that will automatically press...

Страница 17: ...s heading bug 6 NAV Navigation Mode VOR1 or GPS Arms the NAV mode to intercept and follow the selected radial on NAV1 GPS track 7 APR Approach Mode LOC or ILS This arms the APR mode to intercept the L...

Страница 18: ...ill change to active when the desired altitude is reached 18 Yaw Damper Switch it ON or OFF if installed in aircraft being used Display 1 Roll Active Mode These can be ROL HDG NAV APR and REV ROL Wing...

Страница 19: ...show the next options AP Master AP switch is engaged YD Yaw Damper is On FD Flight Director is On Right column show AT Autothrottle is On TOGA TOGA is On 7 3 COMMUNICATIONS AND NAVIGATION COM NAV equ...

Страница 20: ...Hours and Minutes It always works in any mode while the device is On Change between ADF ANT mode In Use Frequency Stand By Frequency FRQ Mode Enables BFO modulation Enables FRQ mode and freqcy transfe...

Страница 21: ...NTDOWN MODE ET blinking A countdown of a maximum of 59 minutes 59 seconds is allowed To enter countdown mode the SET RST pushbutton must be pressed and mintained with the mouse for 2 seconds or longer...

Страница 22: ...rted waiting for a new entry if it is pressed several times it going back until arriving at the beginning VFR Puts automatically the VFR code predefined in the options screen Note The SBY mode is only...

Страница 23: ...ect3 Xplane exe on the MSF P3D X Plane computer VFConnect3 exe or VFConnect3 Xplane exe started incorrectly Only one of VFConnect or VFConnect Xplane can be execu ted at the same time be sure that you...

Страница 24: ...and SOLO directly without router at the beginning you will have to wait some time even more than a minute because Windows set IP addresses automatically Network Discovery disabled Check that in your c...

Страница 25: ...s a network cable to connect SOLO to the router and your PC to the router also or alternatively a direct cable between your PC and SOLO to enjoy completely of your SOLO Your MFS P3D X Plane PC is exe...

Страница 26: ...t simulation software https downloads virtual fly com software VirtualFly_Remote_Support_Tool exe 3 Take note of the code that appears in your PC screen as displayed below 4 Contact Virtual Fly s tech...

Страница 27: ...User s manual 27 10 TECHNICAL SPECIFICATIONS Power Supply 115 230 VAC mono 50 60 Hz Nominal intensity 0 75 A Weight 20 kg Height 43 7 cm Depth 21 8 cm Width 78 4 cm Compatibility MSFS Prepar3D and X P...

Страница 28: ...epar3D X Plane 11 Cessna 172 Skyhawk Cessna 172 Cessna 172SP Beechcraft Baron 58 Carenado Cessna 182 Beechcraft Baron 58 Beechcraft King Air 350 Mooney Bravo Beechcraft King Air C90 Many of the defaul...

Отзывы: