24
Chapter 1
General Information
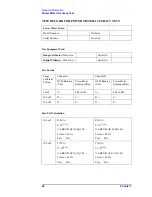
Power Meter Accuracy Test
•
POLARITY: NORMAL
•
RANGE: 1 mW
•
FUNCTION: CALIBRATE
Step 6.
Allow the equipment to warm up for approximately 30 minutes. Do not change any
connections or control setting during this time.
Step 7.
Zero and calibrate the power meter channel to which the range calibrator is connected:
a.
The range calibrator’s RANGE switch should be set to 1 mW.
b.
Set the range calibrator’s FUNCTION switch to STANDBY.
c.
Press
[Zero/Cal]
, then
Zero A
or
Zero B
(as appropriate). Wait for the operation to
complete.
d.
Set the range calibrator’s FUNCTION switch to CALIBRATE.
e.
Press
[Zero/Cal]
,
Cal
, then
Cal A
or
Cal B
(as appropriate). Wait for the operation to
complete.
Step 8.
Monitor the drift rate of the power meter reading: Five minutes following calibration, the
meter must read 0.001, 0.000, or -0.001 dBm. If the power meter reading is not one of these
values, allow additional warm up time, then check the drift rate again. The range calibrator
must remain connected to the power meter during this warm up time.
Step 9.
Zero and calibrate the power meter channel to which the range calibrator is connected:
NOTE
After a channel on the power meter is calibrated, do not allow more than 5 minutes to
elapse before completing the remaining measurement steps for that channel.
a.
The range calibrator’s RANGE switch should be set to 1 mW.
b.
Set the range calibrator’s FUNCTION switch to STANDBY.
c.
Press
[Zero/Cal]
, then
Zero A
or
Zero B
(as appropriate). Wait for the operation to be
completed.
d.
Set the range calibrator’s FUNCTION switch to CALIBRATE.
e.
Press
[Zero/Cal]
,
Cal
, then
Cal A
or
Cal B
(as appropriate). Wait for the operation to
complete.
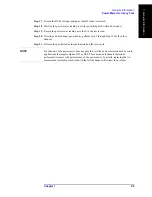
Step 10.
Record the DVM voltage reading as value A in the test record on page 26.
NOTE
All DVM readings in this procedure should be recorded showing five significant digits.
Step 11.
The reading on the power meter should be 0.000
±
0.001 dBm.
Step 12.
Switch the range calibrator RANGE to 300
μ
W.
Step 13.
Record the DVM voltage reading as value B in the test record.
Step 14.
Wait for the power meter reading to settle (no settling drift within 20 seconds).
Step 15.
Record the power meter reading as value C in the test record.
Step 16.
Switch the range calibrator RANGE to 100
μ
W.
Содержание E5071C
Страница 14: ...14 Contents ...
Страница 168: ...168 Chapter2 Performance Test E5071C Performance Test Record ...
Страница 212: ...212 Chapter4 Troubleshooting To configure the CPU Mother Board Assembly and BIOS ...
Страница 262: ...262 Chapter5 Replaceable Parts Power Cables and Plug Configurations ...
Страница 326: ...326 Chapter6 Replacement Procedure Probe Power and Power Switch Board Replacement ...
Страница 332: ...332 Chapter7 Post Repair Procedures Post Repair Procedures ...
Страница 360: ...360 AppendixB System Recovery Calibration of the Touch Screen ...
Страница 364: ...364 AppendixC Firmware Update Firmware Update ...
Страница 365: ...365 D Power Requirement D Power Requirement ...
Страница 367: ...Appendix D 367 Power Requirement Preparation for Power Supply D Power Requirement Figure D 1 Power cable options ...


