User Manual
| VISIX PTZ Network Camera
10225 Westmoor Drive, Suite 300, Westminster, CO 80021 | www.3xlogic.com | (877) 3XLOGIC
73
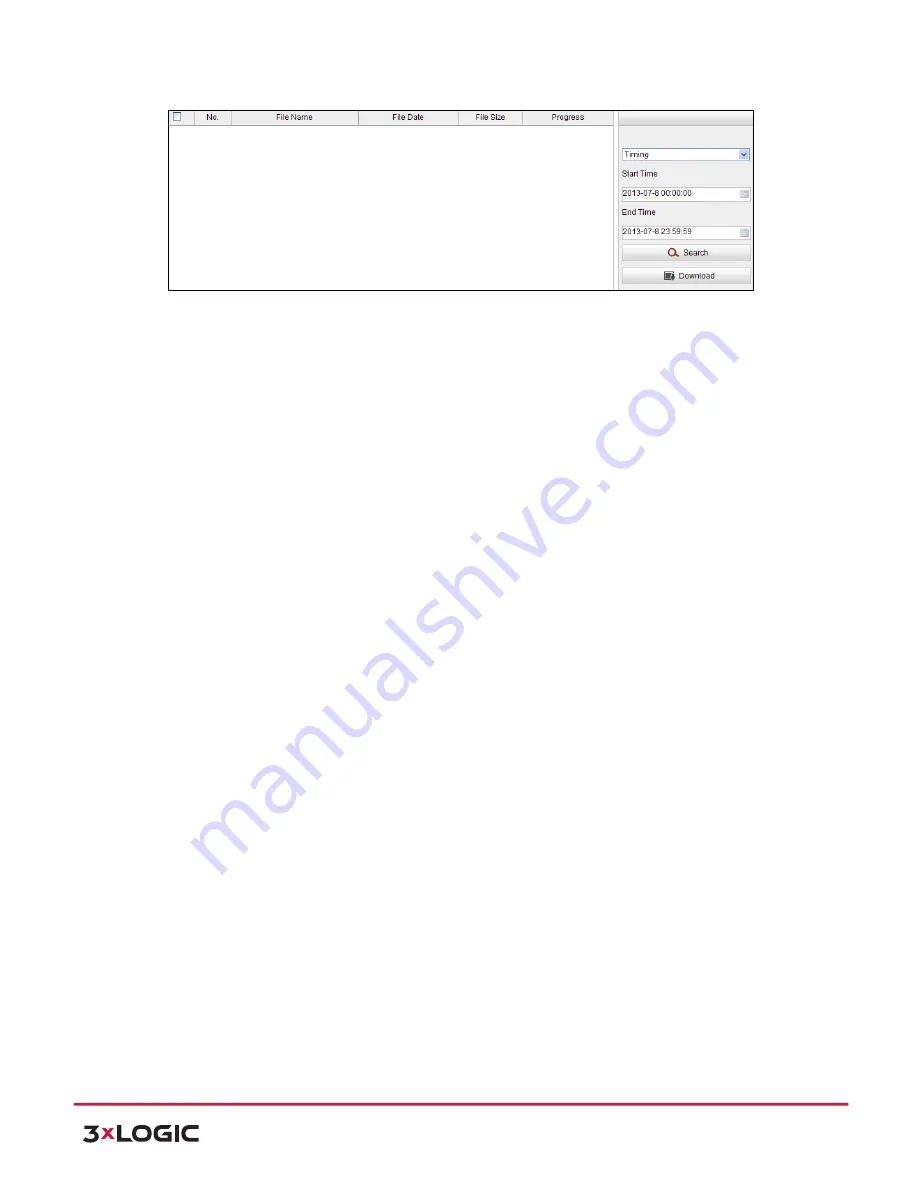
Figure 8-‐8
Picture Downloading interface
Страница 1: ...Z Network Camera 10225 Westmoor Drive Suite 300 Westminster CO 80021 www 3xlogic com 877 3XLOGIC 1 VISIX PTZ Network Camera VSX PTZ 2MP EXT20 VSX PTZ 2MP EXT VX 2M OP PTZ20X and VX 2M OP PTZ30X User M...
Страница 2: ...subject to change without notice The manual will be amended if there are any hardware updates or changes DISCLAIMER STATEMENT Underwriters Laboratories Inc UL has not tested the performance or reliabi...
Страница 3: ...e 2 This device must accept any interference received including interference that may cause undesired operation EU Conformity Statement This product and if applicable the supplied accessories too are...
Страница 4: ...ending on models according to the IEC60950 1 and Limited Power Source standard If the product does not work properly please contact your dealer or the nearest service center Never attempt to disassemb...
Страница 5: ...ment and do not expose it to high electromagnetic radiation To avoid heat accumulation good ventilation is required for a proper operating environment Keep the camera away from water and any liquid Wh...
Страница 6: ...IEW 10 4 1 POWER UP ACTION 10 4 2 LIVE VIEW PAGE 10 4 3 STARTING LIVE VIEW 11 4 4 RECORDING AND CAPTURING PICTURES MANUALLY 13 4 5 OPERATING PTZ CONTROL 13 PTZ Control Panel 13 Setting Calling a Prese...
Страница 7: ...on Settings 40 Configuring Email Settings 41 6 4 CONFIGURING VIDEO AND AUDIO SETTINGS 43 Configuring Video Settings 43 Configuring Audio Settings 44 Configuring ROI Settings 44 6 5 CONFIGURING IMAGE S...
Страница 8: ...OGIC 8 10 3 CONFIGURING ANONYMOUS VISIT 78 10 4 CONFIGURING IP ADDRESS FILTER 78 10 5 VIEWING DEVICE INFORMATION 79 10 6 MAINTENANCE 79 Rebooting the Speed Dome 79 Restoring Default Settings 80 Import...
Страница 9: ...The on screen label of the preset title azimuth elevation zoom time and dome name can be displayed on the monitor The displays of time and speed dome name can be programmed Auto Flips In manual track...
Страница 10: ...ove the unrealistic color casts White balance is the white rendition function of the camera to adjust the color temperature according to the environment automatically Patrol A patrol is a memorized se...
Страница 11: ...et with your computer and install the 3xLOGIC VISIX detection software This will allow you to search and change the IP address of the detected network cameras NOTE For the detailed introduction of the...
Страница 12: ...port number device serial number device version etc shown in Figure 2 3 2 Change the IP address and subnet mask to the same subnet as that of your computer 3 Enter the IP address of network camera in...
Страница 13: ...port mapping e g 80 8000 and 554 ports The steps for port mapping vary according to the different routers Please call the router manufacturer for assistance with port mapping Note Refer to Appendix 2...
Страница 14: ...via a modem Purpose This camera supports the PPPoE auto dial up function The camera gets a public IP address by ADSL dial up after the camera is connected to a modem You need to configure the PPPoE p...
Страница 15: ...RIVATE DOMAIN NAME RESOLUTION Figure 2 8 Private Domain Name Resolution Steps 1 Install and run the IP Server software in a computer with a static IP 2 Access the network camera through the LAN with a...
Страница 16: ...the Enter key to enter the login interface 3 Select English as the interface language on the top right of login interface 4 Input the user name and password and click NOTE The default user name is ad...
Страница 17: ...nster CO 80021 www 3xlogic com 877 3XLOGIC 9 Figure 3 3 Install Plug in 1 Figure 3 4 Install Plug in 2 Figure 3 5 Install Plug in 3 NOTE You may have to close the web browser to install the plug in Pl...
Страница 18: ...ess protocol version and other information The COMMUNICATION refers to the baud rate parity data bit and stop bit of the dome e g 2400 N 8 1 indicates the dome is configured with the baud rate of 2400...
Страница 19: ...ay audio etc PTZ Control Panning tilting focusing and zooming actions of the speed dome The lighter wiper one touch focus and lens initialization control Preset patrol pattern Set and call the preset...
Страница 20: ...Positioning Steps 1 Click on the tool bar of live view interface 2 Operate the 3D positioning function Left click a position of the live video The corresponding position will be moved to the center o...
Страница 21: ...o capture the live pictures or click to record the live video The local saving paths of the captured pictures and clips can be set in the Configuration Local Configuration interface To configure remot...
Страница 22: ...uttons to move the lens to the desired position Pan the speed dome to the right or left Tilt the speed dome up or down Zoom in or out Refocus the lens 3 Click to finish the setting of the current pres...
Страница 23: ...o initial position 94 Remote reboot 35 Call patrol 1 95 Call OSD menu 36 Call patrol 2 96 Stop a scan 37 Call patrol 3 97 Start random scan 38 Call patrol 4 98 Start frame scan 39 IR cut filter in 99...
Страница 24: ...nel click to enter the patrol settings interface 2 Select a patrol number from 3 Click to enter the adding interface of preset as shown in Figure 4 8 Figure 4 8 Adding Presets 4 Configure the preset n...
Страница 25: ...set Delete all the presets in one patrol SETTING CALLING A PATTERN Purpose A pattern is a memorized series of pan tilt zoom and preset functions It can be called on the pattern settings interface Ther...
Страница 26: ...eparately and with no priority level When configuring and calling the pattern proportional pan is valid the limit stops and auto flip will be invalid and the 3D positioning operation is not supported...
Страница 27: ...Z Configuration 2 Click the PTZ control buttons to find a position as the initial position of the dome you can also call a defined preset and set it as the initial position of the dome 3 Click Set to...
Страница 28: ...Speed You can set the speed of a defined preset from 1 to 8 Keyboard Control Speed Define the speed of PTZ control by a keyboard as Low Normal or High Auto Scan Speed The dome provides 5 scan modes au...
Страница 29: ...lance area Scan Stops When scan limit stops are set the random scan frame scan auto scan tilt scan panorama scan is performed only in the limited surveillance area NOTE Manual Stops of Limit Type is p...
Страница 30: ...cheduled Tasks 2 Check the checkbox of Enable Scheduled Task 3 Set the Park Time You can set the park time a period of inactivity before the dome starts the scheduled tasks 4 Set the schedule and task...
Страница 31: ...be overlapped Up to 10 tasks can be configured for each day 7 Click to save the settings 5 5 Configuring Park Actions Purpose This feature allows the dome to start a predefined park action scan preset...
Страница 32: ...rveillance area from being live viewed and recorded Steps 1 Enter the Privacy Mask Settings interface Configuration Advanced Configuration PTZ Privacy Mask Figure 5 9 Draw the Privacy Mask 2 Click the...
Страница 33: ...ble Privacy Mask to enable this function NOTE You are allowed to draw up to 24 areas on the same image 5 7 Configuring Smart Tracking Purpose The speed dome tracks the moving objects automatically aft...
Страница 34: ...d RS 485 signals You can set the control priority of these two signals The operation of Operator is prior to that of User When the Operator is controlling the speed dome the User cannot control it Whe...
Страница 35: ...Set the protocol type stream type image size and live view performance Protocol Type TCP UDP MULTICAST and HTTP are selectable TCP Ensures complete delivery of streaming data and better video quality...
Страница 36: ...wnloaded video files in interface Picture and Clip Settings Set the saving paths of the captured pictures and clipped video files Save snapshots in live view to Set the saving path of the manually cap...
Страница 37: ...NTP server NTP Port Port of NTP server Interval The time interval between the two synchronizing actions by NTP server It can be set from 1 to 10080 minutes Figure 6 3 Time Sync by NTP Server NOTE If...
Страница 38: ...time zone you can use the Time Zone function to adjust the time The time will be adjusted according to the original time and the time difference between the two time zones From the Time Zone drop down...
Страница 39: ...TTINGS Purpose TCP IP settings must be properly configured before you operate the speed dome over your network IPv4 and IPv6 are both supported Steps 1 Enter TCP IP Settings interface Configuration Ba...
Страница 40: ...the gateway of the network speed dome If the DNS server settings are required for some applications e g sending email you should properly configure the Preferred DNS Server and Alternate DNS server F...
Страница 41: ...oE Figure 6 10 PPPoE Settings 2 Check the Enable PPPoE checkbox to enable this feature 3 Enter User Name Password and Confirm password for PPPoE access NOTE The User Name and Password should be assign...
Страница 42: ...org 2 In the Domain text field enter the domain name obtained from the DynDNS website 3 Enter the Port of DynDNS server 4 Enter the User Name and Password registered on the DynDNS website 5 Click to s...
Страница 43: ...NO IP website 3 Enter the Port of NO IP server 4 Enter the User Name and Password registered on the NO IP website 5 Click to save the settings CONFIGURING SNMP SETTINGS Purpose You can use SNMP to get...
Страница 44: ...hould be the same as the settings you configure here 4 Click to save and finish the settings CONFIGURING 802 1X SETTINGS Purpose The speed dome supports IEEE 802 1X standard IEEE 802 1X is a port base...
Страница 45: ...entication server RADIUS server The switch forwards the certificate of authentication server to the network camera If all the information is validated the switch allows the network access to the prote...
Страница 46: ...n by configuring the priority of data sending Steps 1 Enter the QoS Settings interface Configuration Advanced Configuration Network QoS Figure 6 18 QoS Settings 2 Configure the QoS settings including...
Страница 47: ...saved in a folder in FTP server The name of folder can be defined as shown in following Figure 6 20 Figure 6 20 Parent Directory Child directory It is a sub folder which can be created in the parent d...
Страница 48: ...d the camera is connected to the Wide Area Network via the router Steps 1 Enter the UPnP settings interface Configuration Advanced Configuration Network UPnP 2 Check the checkbox to enable the UPnP fu...
Страница 49: ...ore using the Email function Steps 1 Enter the Email Settings interface Configuration Advanced Configuration Network Email Figure 6 23 Email Settings 2 Configure the following settings Sender The name...
Страница 50: ...es Authentication optional If your email server requires authentication check this checkbox to use authentication to log in to this server and enter the login user name and password Receiver Select th...
Страница 51: ...ive viewing 3 You can customize the following parameters for the selected main stream sub stream or third stream Video Type Select the stream type to video stream or video audio composite stream The a...
Страница 52: ...Configuration Advanced Configuration Video Audio Audio Figure 6 25 Audio Settings 2 Configure the following settings Audio Encoding G 711ulaw G 711alaw MP2L2 and G 726 selectable Audio Input When an i...
Страница 53: ...Click and draw a red frame in the live view image 4 Adjust the ROI level from 1 to 6 The higher the value the better image quality in the red frame 5 Enter a Region Name and click Save to save the se...
Страница 54: ...s from 0 to 100 Contrast This feature enhances the difference in color and light between parts of an image The value ranges from 0 to 100 Saturation This feature is used to adjust color saturation of...
Страница 55: ...to adjust gain of the image The value ranges from 0 to 100 Slow Shutter This function can be used in underexposure condition It lengthens the shutter time to ensure full exposure The slow shutter valu...
Страница 56: ...of infrared light manually IR Light Bright value ranges from 0 to 100 NOTE For detailed parameters configuration of IR light you can enter the OSD menu by calling the special preset 95 NOTE When the...
Страница 57: ...own demand as shown in Figure 6 35 Figure 6 35 Manual White Balance Outdoor You can select this mode when the speed dome is installed in outdoor environment Indoor You can select this mode when the sp...
Страница 58: ...of speed dome Video Standard You can set the Video Standard to 50hz PAL or 60hz NTSC according to the video system in your country NOTE This function varies depending on the models of speed dome Other...
Страница 59: ...select the display of speed dome name date or week if required 3 Edit the speed dome name in the text field of Camera Name 4 Select from the drop down list to set the time format date format and displ...
Страница 60: ...verlays configurable Figure 6 40 Text Overlay Settings 6 6 Configuring and Handling Alarms Purpose This section explains how to configure the network speed dome to respond to alarm events including mo...
Страница 61: ...ckbox of Enable Motion Detection Figure 6 41 Enable Motion Detection 3 Click Click and drag the mouse on the live video image to draw a motion detection area NOTE You can draw up to 8 motion detection...
Страница 62: ...ou want to set the arming schedule as shown in Figure 6 43 3 Click to set the time period for the arming schedule 4 After you set the arming schedule you can click to copy the schedule to other days O...
Страница 63: ...tion to a user or users when an event occurs NOTE To send the Email when an event occurs you need to refer to Section 6 3 10 Configuring Email Settings to set the Email parameters Upload to FTP Captur...
Страница 64: ...is the same as the setting of the arming schedule for motion detection Refer to Step 2 Set the Arming Schedule for Motion Detection in Section 6 6 1 4 Check the checkbox to select the linkage method t...
Страница 65: ...o Step 2 Set the Arming Schedule for Motion Detection in Section 6 6 1 Configuring Motion Detection 5 Check the checkbox to select the linkage method taken for the tampering Notify surveillance center...
Страница 66: ...in Section 6 6 1 Configuring Motion Detection 5 Check the checkbox to select the linkage method taken for the alarm input Refer to Step 3 Set the Alarm Actions for Motion Detection in Section 6 6 1 Co...
Страница 67: ...me in for the alarm output optional 4 The Delay time can be set to 5sec 10sec 30sec 1min 2min 5min 10min or Manual The delay time refers to the time duration that the alarm output remains in effect af...
Страница 68: ...e can be HDD full HDD error network disconnected IP address conflicted and illegal login to the speed domes Steps 1 Enter the Exception Settings interface Configuration Advanced Configuration Events E...
Страница 69: ...Configuration Events Audio Exception Detection Figure 6 51 Audio Exception Detection 2 Check Enable under Audio Input Exception checkbox to enable the audio input exception detection 3 Check Enable u...
Страница 70: ...schedule for motion detection Refer to Step 2 Set the Arming Schedule for Motion Detection in Section 6 6 1 Configuring Motion Detection 5 Check the checkbox to select the linkage method taken for aud...
Страница 71: ...AS Type 4 Enter the IP address of the network disk The default NFS storage format of file path is dvr test as shown in Figure 7 2 And the default SMB CIFS storage format of file path is test Figure 7...
Страница 72: ...ome please refer to the steps of NAS disk initialization 7 2 Configuring Recording Schedule Purpose There are two kinds of recording for the speed domes manual recording and scheduled recording For th...
Страница 73: ...55 The Pre record time can be configured as No Pre record 5 s 10 s 15 s 20 s 25 s 30 s or not limited NOTE The pre record time changes according to the video bitrate Post record The time you set to st...
Страница 74: ...n If you select Motion Detection the video will be recorded when the motion is detected Besides configuring the recording schedule you have to set the motion detection area and check the checkbox of T...
Страница 75: ...ng the recording schedule you have to configure the settings on the Motion Detection and Alarm Input Settings interfaces Please refer to Section 6 6 1 and Section 6 6 4 for detailed information Figure...
Страница 76: ...continuous snapshots to FTP Steps 1 Configure the FTP settings and check checkbox in FTP Settings interface Please refer to Section 6 3 8 Configuring FTP Settings for more details to configure FTP par...
Страница 77: ...User Manual VISIX PTZ Network Camera 10225 Westmoor Drive Suite 300 Westminster CO 80021 www 3xlogic com 877 3XLOGIC 69 Figure 7 7 Snapshot Settings...
Страница 78: ...e remotely recorded video files stored in the network disks or SD cards Task 1 To play back the video files Steps 1 Click on the menu bar to enter playback interface Figure 8 1 Playback Interface 2 Se...
Страница 79: ...back status Playback by frame NOTE You can choose the file paths locally for downloaded playback video files and pictures in Local Configuration interface Please refer to Section 6 1 Configuring Local...
Страница 80: ...s NOTE The progress ratio displays the downloading ratio of the video file You can click to stop the downloading The total number displays the amount of the video files The video files are not all lis...
Страница 81: ...User Manual VISIX PTZ Network Camera 10225 Westmoor Drive Suite 300 Westminster CO 80021 www 3xlogic com 877 3XLOGIC 73 Figure 8 8 Picture Downloading interface...
Страница 82: ...eed dome or insert a SD card in the speed dome Steps 1 Click on the menu bar to enter log searching interface Figure 9 1 Log Searching Interface 2 Set the log search conditions to specify the search i...
Страница 83: ...The admin user has access to create modify or delete other accounts Up to 32 user accounts can be created Figure 10 1 User Information Add a User Steps 1 Click to add a user 2 Input the new User Name...
Страница 84: ...om 877 3XLOGIC 76 Figure 10 2 Add a User Modify a User Steps 1 Left click to select the user from the list and click 2 Modify the User Name Level or Password 3 In the Basic Permission field and Camera...
Страница 85: ...877 3XLOGIC 77 Figure 10 3 Modify a User Delete a User Steps 1 Left click the user name you want to delete and click 2 Click on the pop up dialogue box to delete the user Figure 10 4 Delete a User 10...
Страница 86: ...10 3 Configuring Anonymous Visit When you enable this function you can log into the camera without a username and password In login interface check the Anonymous checkbox and click Login to enter the...
Страница 87: ...ion In the Device Information interface you can edit the Device Name Other information of the network speed dome such as Model Serial No Firmware Version Encoding Version Number of Channels Number of...
Страница 88: ...e the default settings NOTE Clicking restores all the parameters to default settings including the IP address and user information Please use this button with caution Figure 10 11 Restore Default Sett...
Страница 89: ...ates The device can find the firmware in the directory automatically 3 Click to select the local upgrade file and then click to start remote upgrade NOTE The upgrading process will take 1 to 10 minute...
Страница 90: ...the PTZ unit Steps 1 Enter RS 485 Port Setting interface Configuration Advanced Configuration System RS485 Figure 10 15 RS 485 Settings 2 Set the RS 485 parameters and click to save the settings By de...