background image

Copyright 1010music LLC 2023

Page 60 of 123

Blackbox 3.0 User Manual

To Delete, Save As or Rename a WAV File

1.

Touch a loaded pad on the Pads screen to display the Waveform Screen.

2.

Touch the name of the WAV file at the top of the screen to display the WAV Edit

screen.

3.

Use the control knobs to scroll to the WAV file or folder you want to delete. You

may need to load directories to navigate to the file you want to delete.

4.

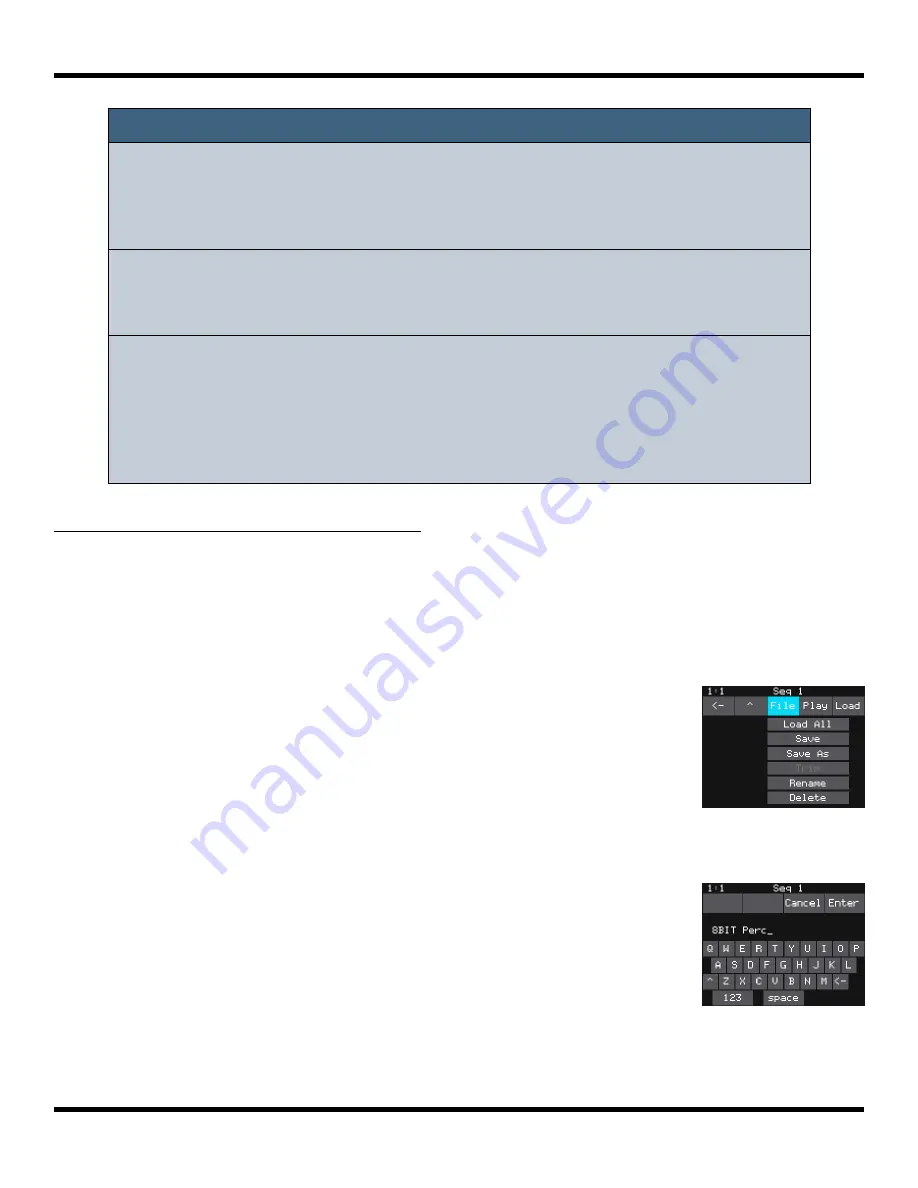
Touch File to display the WAV File Actions menu.

5.

Touch Delete to delete the selected WAV file or folder from

the microSD card. Touch Save As to save a copy of the WAV

file with a different name. Touch Rename to change the

name of the file on the microSD card.

6.

If you select Delete, blackbox will display a confirmation

prompt. Touch OK to confirm, or touch anywhere else to

cancel.

7.

If you select Rename or Save As, blackbox displays the file

naming keyboard. Use the touchscreen to enter letters

using the keyboard. Touch the <-- to delete the previous

letter. Turn a knob to position the cursor. Touch Enter to

save your changes.

8.

Touch the back arrow <-- in the top left to exit the WAV Edit

Screen.

WAV File Actions

Menu

Note:

If you delete, move or rename a WAV file, it will no longer be available

for use by presets that were previously using it. The name of the WAV

file will still appear in the Preset, but the Waveform screen will be blank

until you load a new WAV file into the pad.

Blackbox supports samples in the WAV file format. It supports 1 or 2

channel files with 16, 24 or 32 bit resolution at any sample rate. 48kHz is

the preferred sample rate.

WAV file names may use Alpha Numeric Characters (A-Z, 0-9) and

some special characters. The following characters are NOT allowed:

“ / \ ? * < > : |

File names must be less than 256 characters, including the path name.

Files that do not conform to these naming constraints will not be

recognized by blackbox.

File Naming

Keyboard

Содержание Blackbox 3.0

Страница 1: ...Blackbox 3 0 User Manual Apr 21 2023 This manual still needs another editing and technical review pass Please excuse the typos and small inconsistencies ...

Страница 2: ...ghlights 12 Display Highlights 13 QUICK START 14 Explore PADS 14 Explore KEYS 15 Explore Sequences 15 Explore Songs 16 Song Mode and REC STOP PLAY Buttons 17 Explore Presets 18 To Load a Preset 18 To Save a Preset 18 To Create and Name a Preset 19 SCREEN NAVIGATION MAP 20 WORK WITH PADS 21 Steps Common to All Pad Modes 21 To Load a WAV File into a Pad 22 To Set Pad Mode Loop and End Points on the ...

Страница 3: ... 41 Pos Pad Parameters Specific to Slicer Mode 42 To Manually Create or Remove Slices 43 To Use Auto Scan to Create Slices 44 To Use Slice to Grid 44 To Use Slices to Synchronize Playback of Clip Pads 44 Work with Granular Pads 45 Pad Parameters Specific to Granular Mode 45 Record New WAV Files 46 To record a single WAV file 46 Work with WAV Files Recorded on Blackbox 49 If you are recording WAVs ...

Страница 4: ...en with Sequences 65 To Record a Keys or MIDI Sequence Using the Keys Screen Mapped to a Sequence 65 To Record a Keys Sequence Using the Keys Screen Mapped to a Pad 65 WORK WITH SEQUENCES 66 Sequence Patterns 66 To Select the Active Pattern for a Sequence from the Sequences Grid 66 To Record a Sequence 67 Record and Play Sequences 67 To Toggle Song Mode On and Off 67 To Select the Active Pattern f...

Страница 5: ...MIX 86 To Adjust the Sound Level and Pan of a Pad 86 To Mute and Unmute Pads 86 MANAGE PRESETS 87 To Save Changes to a Preset 88 To Load a Preset 89 To Pack a Preset 89 To Clean Unused WAV Files Out of a Preset s Folder 90 To Delete a Preset 90 To Rename a Preset 91 To Save Current Changes as a New Preset 91 Work with Preset Files on the MicroSD Card 92 Legacy Presets 92 What will happen to my leg...

Страница 6: ...ith a MIDI Device 104 Summary of MIDI Global In Channel Note Mappings 105 To Disable MIDI Triggered Recording and Pad Clearing 106 Sharing of MIDI Input Channels 106 Use MIDI Program Change to Open a Preset 107 To Enable or Disable MIDI Program Changes 107 Work with MIDI Outputs 108 Use MIDI Out to Play an External MIDI Instrument Along with blackbox 109 To Send MIDI Notes from a Keys or Pads Sequ...

Страница 7: ...FILES AND PRESETS 119 Switch to a New MicroSD Card While Operating Blackbox 119 Backup Your Presets and WAV Files 119 Install New Firmware 119 To Install New Firmware 119 Reset a Blackbox Preset to Factory Settings 120 TECHNICAL SPECS 121 Onboard Memory 121 Maximum Sample Length 121 Samples Supported 121 Maximum Number of Voices Supported 121 Pin Mapping for Mini TRS Jack to MIDI 5 Pin DIN Connect...

Страница 8: ...r some tips to get the most out of your blackbox If you still have questions after reading this manual join our forum at forum 1010music com You can specifically get blackbox support at https forum 1010music com forum products blackbox support blackbox Our support team and other users are out there to help you and to exchange ideas about how to get the most out of blackbox Registered forum users c...

Страница 9: ...ded Push the card in to remove it when needed later Leave it in for now Power Blackbox needs to be connected to a 2 amp power source using a USB cable designed to carry power You can plug it into a standard power outlet or a USB power supply Either way you will insert the square end of the USB Power cord B into the POWER connection on the back panel The connection is snug to ensure that the device...

Страница 10: ...ed equal Make sure your power supply can provide 2 amps of power The USB power supply included with blackbox will do this Not all USB Type B cables are the same Some are made only for data while others are designed to carry power Blackbox comes with a USB Type B power cable If you want to replace it with a longer cable be sure it is rated to carry power You can take the microSD card out and reinse...

Страница 11: ...ut for Sampling Blackbox assumes Eurorack level audio is coming in to the AUDIO IN jack at 5V If you are using a line level signal of 1V you may need to adjust the input gain on the recording screen You could also use a mixer or preamp with your microphone or other input to adjust the level of the incoming signal See the section Record a New Wave File for more information about working with inputs...

Страница 12: ...en to edit more details Push it again to access more detailed information about the item The BACK button takes you to the previous screen Navigation Highlights To build your song with blackbox start by working through the navigation buttons from left to right You can certainly jump around and do things in any order but the general flow is to start on the left and move to the right PADS Play record...

Страница 13: ...of the scene that you are recording into When not in Song Mode this displays the number of the sequence that will be recorded You can toggle the state of Song Mode by pushing the SONG button then touching the on screen Song button Song Mode is active when the on screen button is blue In the top right hand corner a progress bar displays the current playback progress of the sequence or scene that ha...

Страница 14: ...way through each time you press it it might play only while you are touching the pad or it might play until you touch it again A blue progress bar appears at the bottom of the pad while it is playing If you toggle off a pad but it is still playing due to quantization settings the blue progress bar is replaced with a black bar You can trigger multiple sample pads at once The pink box indicates whic...

Страница 15: ...quences Now that we know how to trigger the pads let s play some sequences Before we do that let s take a minute to turn off Song Mode Push the white SONG button You will see a list of scenes that have been created for this song Touch the on screen Song button to toggle the state of Song Mode The on screen Song button is blue when Song Mode is active but for now let s make it gray for inactive so ...

Страница 16: ... the same cell for a total of 64 sequences Any one pattern in a cell can play back at a time Before we move on to song scenes go back to the SEQS screen and touch OFF on the right This will deactivate all sequences Explore Songs Push the SONG button to go to the Song Screens with its list of song scenes Touch the on screen Song button to enable Song Mode it turns blue When you do this the context ...

Страница 17: ...ord it On STOP Stop playing and recording all scenes and sequences Off PLAY Play all active sequences and armed clips You can start and stop sequences while playing The sequences will play in a loop until you press STOP or deactivate them Off REC Play Play any active sequences and record any PADS or KEYS entries into the currently selected sequence This is recorded as an overlay so you can add to ...

Страница 18: ... blackbox composition It holds the pad assignments sequences song scenes effects settings Mix settings and the detailed parameters for each of these To Load a Preset 1 Push the PSET button to access the Preset Management Screen It displays a list of the available presets on your microSD card with the currently selected preset highlighted in blue There is also a set of three buttons File Save and L...

Страница 19: ...will pop up with the name New Preset and a typewriter keyboard with familiar controls like numerics shift lock space and delete Use the Clear button to remove the default name 3 Type in a new name for your preset and finally touch the Enter button to complete the rename and load your new preset The File menu also has a Delete button you ll get an are you sure button to confirm If you change your m...

Страница 20: ...ols Presets Pad Parameters Load and Record Modulation Parameters Waveform Option B I Push Button Push INFO Push BACK Touch On Screen Key B B B I B I B B I B B B I I I I I Load B BACK INFO blackbox PADS KEYS SEQS SONG FX MIX PSET TOOLS REC STOP PLAY TOOLS PSET MIX FX FX FX KEYS KEYS Seq PADS Piano Roll Scene Parameters SONG Song Scenes Seq Params Pattern A Seq Parameters FX Modulation Parameters Lo...

Страница 21: ... at note C2 Steps Common to All Pad Modes From the Pads screen you will choose WAV files to assign to pads and assign a mode to each pad The main screen has a 4x4 grid of 16 light gray pads A WAV file can be assigned to each of these pads and each pad is assigned a Pad Mode The table below can help you choose the correct pad mode for your needs Icon Pad Mode Description Reverse Playback Beat Sync ...

Страница 22: ...ge of notes triggered via MIDI Each pad can have a different Pad Mode You can use the same WAV file in different pads in different Pad Modes To Load a WAV File into a Pad 1 Push the PADS button to bring up the Pads screen 2 Select a pad by touching it or using the control knobs to cycle through the pads The top control knobs move the selection horizontally The bottom left control knob moves the se...

Страница 23: ... you have a sequence or a MIDI input trigger playing for this pad blackbox will play the selected WAV file whenever a trigger is received for this pad Touch the Play button again to disable auto preview mode Touch Load to assign the selected WAV file to this pad When looking at the list of files list items that start with a slash are directories Load a directory to see its contents The file path i...

Страница 24: ...orm Keep a finger on the screen to keep it from scrolling away during playback Start and Length Numbers The sample number where playback will begin and the total length in samples that will be played Turn the top knobs to adjust Start and Length Bracket The pink bracket represents the Start and Length to show which part of the WAV will be played Loop Start and Loop End Numbers If Looping is enable...

Страница 25: ...on a page You can touch and drag a knob up and down or left and right to adjust the value Turn a hardware knob to adjust the value of the corresponding parameter in the focus frame the pink box Tap a knob to move the focus frame to include that control If a parameter supports modulation a 3 section bar to the right of the knob indicates which of the three modulation slots are in use Toggle the sta...

Страница 26: ...Source and Amount parameters for each of the three modulation slots 5 Turn a top knob or touch a row to select a parameter to edit and then turn a bottom knob to select a value 6 To set a MIDI CC value for a modulation source select the Source row for the desired modulation slot then touch the Learn button at the top of the screen The button is blue when Learn mode is enabled With Learn mode enabl...

Страница 27: ...time it takes for the sound to reach its loudest level 0 0 to 100 0 The attack percentage is a logarithmic scale between 0 and 9 seconds Yes Decay How long it takes for the sound to go from the initial peak to the sustain level 0 0 to 100 0 The decay percentage is a logarithmic scale between 0 and 38 seconds Yes Sustain The volume level that the sound maintains when you hold a note 0 0 to 100 0 No...

Страница 28: ... sent to selected output in stereo Out1L 1R 2L 2R 3L 3R The output of this pad is sent to the left or right stereo channel of the selected output No Pan For Pads routed to stereo outputs this controls the position of the output in the stereo channel 100 0 to 100 0 Yes Poly Mode Controls the maximum polyphony for this pad The note playback across all pads draws from a 16 pad pool Does not apply to ...

Страница 29: ...is case all assigned pads will be triggered Any MIDI channel that is mapped to a pad using this parameter no longer triggers any events for MIDI parameters set to OMNI Modulation sources PTCH pitch bend MODW Modulation Wheel MVOL Volume control and MPAN Pan control follow this channel assignment See the section Use MIDI Devices with Blackbox below for more information None Ch1 through Ch16 No Pad ...

Страница 30: ...Saw Reverse Saw Triangle Positive Triangle Sine Positive Sine Square Positive Square Random No Rate The frequency of the LFO from about 0 1Hz to 12 Hz When Beat Sync is On this specifies the rate in beats and measures Set to 0 0 to stop the LFO 0 0 to 100 0 When Beat is on 8 4 2 1 T T 1 8 1 8 T 1 16 1 16 T 1 32 1 32 T 1 64 bars Yes Depth The amplitude of the oscillating wave When Beat is off 0 0 t...

Страница 31: ...of the parameters screen to access the various parameter pages for this pad Use the control knob closest to the parameter name to change the value of a parameter Pos Parameters Specific to Sample Pads Parameter Description Range of Values Mod Target Loop Mode Controls whether the WAV file plays in a loop and the direction of the loop When looping is enabled Forward or Bidirect if you have the Laun...

Страница 32: ...n when playing forward or ends when playing in reverse Expressed as the number of the sample to be played first 0 to number of samples in the file Yes Length When Loop Mode is None how long the sample will play past the value of the Start parameter Expressed in number of samples 0 to number of samples in the file Yes Loop Start Point where the looping will begin when playing forward or looping wil...

Страница 33: ...her things Normal High Q Set to Normal mode unless you experience aliasing for the WAV file for this pad No Root Note The base sample will play for the note specified here The sample will be pitch shifted up or down one semi tone for each note away from the root note This will load from the WAV file if available when you add the WAV to the preset You can specify a different value here to be used f...

Страница 34: ... before the loop start point would be gradually faded in over the last 25 of the looped section So as section H starts section D fades in and section H is gradually faded out until on D is left as we reach the loop point When Loop Fade is 100 sections A B C and D are faded in on top of sections E F G and H Note In order for the Loop Fade to work to the full extent there must be enough audio signal...

Страница 35: ...is in the Symplesound folder included with the 1 3 firmware update If you are registered for our forum you can download this content at https forum 1010music com forum product downloads sampler content bundles 2 Push the PADS button to bring up the Pads screen 3 Select a pad by touching it or using the control knobs to cycle through the pads 4 Press the INFO button If the pad was empty the Load an...

Страница 36: ...es on blackbox and edit the Root Note on the Misc tab of the Parameters screen Save the WAV file with the root note information To save the WAV file push Info on this pad to display the WAV form screen Touch the WAV file name at the top of the screen then touch File and Save After you have done this for all of the files in the folder use File Load All to load them all into a pad Now when you play ...

Страница 37: ...t of 64 WAV files per pad If you change the pad mode of a multi sample pad to something other than sample it will load only the first sample in the folder and work with that You will need to reload the files to change back to multi sample mode Anytime you use File Load All to load a directory of samples into a pad the pad mode will automatically be changed to Sample Blackbox helps you automaticall...

Страница 38: ...re until you push Play After a clip pad has been toggled off but is still playing through to the quant break a black bar replaces the blue progress bar across the bottom of the pad on the Pads Home screen Work with a Clip Pad Use Clip Mode for WAV files where you want to use synchronized loops and quantized playback for the entire WAV file Clip Mode works well with drum loops between one and eight...

Страница 39: ...or example if the Quant Size is set to 1 bar and you press the pad the playback will begin at the start of the next bar None always start and stop immediately 1 16 1 8 1 4 1 2 1 bar 2 bars 4 bars 8 bars No Sync Sync is only enabled when quantizing is enabled the Quant Size parameter is not None The Sync feature prevents timing drift that can occur when the length and BPM of a clip does not align e...

Страница 40: ...ur clock tempo it will sound like the beats are running ahead of the rest of the music If your WAV file tempo is slower than your clock tempo it will sound like your drums are lagging If you want to fix that then choose the value for Sync that identifies how tightly you want to snap to the clock while the WAV file is playing in response to a single sustained note trigger While the note is playing ...

Страница 41: ...he beat count is a power of two 2 4 8 16 32 64 the clip tempo is close to the current clock tempo Work with Slicer Pads Slicer mode is useful when a single WAV file has multiple sections that you want to trigger independently For example if you have a drum riff you may want to trigger different drum hits within the drum riff independently Or if you have a recording of a vocal track you may get an ...

Страница 42: ...uant Size parameter When quantization is used the note trigger will cause playback to start and end on the next quant size boundary For example if the Quant Size is set to 1 bar and you press the pad the playback will begin at the start of the next bar None always start and stop immediately 1 64 1 32T 1 32 1 16T 1 16 1 8T 1 8 1 4T 1 4 1 2T 1 2 1 bar 2 bars Assumes 4 4 time No Sync The Sync feature...

Страница 43: ...vance the selection of the next slice to play The value of this parameter controls the order in which slice selection is advanced None This parameter will not be used to control the order of playback of slices Forward A trigger will cause the playback to move to the next slice Backwards A trigger will cause the playback to move to the previous slice Random A trigger will cause the playback to move...

Страница 44: ...o select the number of Slices to create Touch OK when you are ready to scan You can touch outside of the Slices field to cancel the scan Blackbox will automatically divide up the WAV file evenly into the number of slices you specified The slice points are shown as pink horizontal lines with a small pink square near the bottom You can adjust the results of the slice to grid or auto scan by manually...

Страница 45: ...ll get about 1 grain every few seconds At 50 you will get 3 grains with some overlap Above 50 there is constant overlap that becomes more pronounced 0 to 100 Keep in mind that more grains require more processor power No Scatter When density is less than 50 scatter controls how evenly the grains are distributed over time When density is above 50 scatter has no impact 0 to 100 No Speed How quickly t...

Страница 46: ...nd Record screen 4 In the top menu touch the button to the left of the Load button This will display the recording mode menu Touch 1x to record a single file 5 At the top of the WAV File Load and Record Screen you will see the level meters for the two channels followed by a list of recording parameters Turn one of the top two knobs to select a parameter and then turn one of the bottom two knobs to...

Страница 47: ...mediately 1 16 quantize to the next sixteenth note time 1 8 eighth note 1 4 quarter note 1 2 half note 1 bar a whole note assuming 4 4 time 2 bars 4 bars 8 bars Rec Mon Controls whether the input signal received through Audio IN is played out through Out1 and Out2 to enable you to monitor the recording Off Inputs are never played through the outputs Auto Inputs play through the outputs while recor...

Страница 48: ...ad and Record screen displays a running clock of measures and beats and time while recording There may be a delay between when you push Rec Play and when the recording starts as blackbox waits to quantize the recording to the selected Rec Quant time interval See Synchronize Playback with a Clock below for more information about clocks and quantization Note When the recording has stopped the PADS s...

Страница 49: ...use your computer to move the WAV files from the preset s folder on the microSD card into sound library folders on the card When you want to use these files in another preset point to the WAV files you moved to the library folders Then pack up those presets to preserve copies of the WAVs you used for each preset Note Blackbox won t stop you from loading a WAV file from a Preset B folder into Prese...

Страница 50: ...nce to trigger playback of a single pad Set up a sequence you want to record Set up a different pad for recording and set the recording input to RESAM then start recording 1 Configure a pad you want to resample by loading a WAV file applying effects and configuring other parameters as desired 2 To be able to trigger the pad while recording you will need to either set up an external controller to t...

Страница 51: ...o load each WAV into a pad individually in order to set the Root Note Be sure to save the WAV file after you set the Root Note so the setting will be saved into the file See Save and Load Parameters in WAV Files below to learn how to save the Root Note 4 Open the Preset where you want to use the multi sample pack Let s call it MySong 5 Create a new sample pad and use Load All to load the multi sam...

Страница 52: ...ified notes and records each note as a WAV file in a new folder on the microSD card When finished you will have a folder full of WAV files that you can use as a multi sample pack 1 First set up the external instrument you want to record Connect it s audio output to the stereo audio IN jack on the back of blackbox 2 Set up the connections for blackbox to trigger the external instrument You can use ...

Страница 53: ... individual file names Select this parameter and then push the INFO button to open the file naming screen Turn a knob to move the cursor position Touch the onscreen keyboard to enter a file name Touch Enter to save the filename and return to the parameters screen Rec Mon Controls when the incoming audio signal will be played out through the blackbox outputs On the audio input will always be played...

Страница 54: ...ion The WAV files will be named Filename MIDI Note Number MIDI Velocity For example if your preset name is Pet Sounds and your multi sample filename is Cat Meows an example file name would be Presets Pet Sounds Cat Meows Cat Meows 036 100 Each WAV file will have the Root Note and Vel Layer parameters set based on the MIDI Note used to trigger it Blackbox will use WAV tags to embed this information...

Страница 55: ... and Multi Granular LpStr Point where the looping will begin when playing forward or looping will end when playing in reverse Expressed in samples Must be before or equal to LpEnd LpStr is read from the WAV file when sample is loaded and saved to the WAV file when the WAV is saved Stored in the WAV smpl tag Sample Single LpEnd Point where the looping will end when playing forwards or looping will ...

Страница 56: ...specific pads When loading a WAV file blackbox makes an assumption about the pad mode based on the parameters that are available in the WAV file If there are slices in the WAV then it sets the pad mode to slicer If there are loop points in the WAV then it sets the pad mode to sample To save the values you have configured for a pad back to the WAV file 1 Open the WAV screen for the pad 2 Touch the ...

Страница 57: ...e where you want the desired end point for the WAV file 4 Touch the name of the WAV file at the top of the screen to display the WAV Selection screen 5 Touch File and then Trim Blackbox will ask if you want to Trim and Save Touch OK to overwrite the WAV file with the portions outside of the pink bracket trimmed off This is a destructive edit Touch anywhere else on the screen to cancel 6 Save your ...

Страница 58: ...o go back to the Velocity bar Pads Screen with Clipboard Side Panel Edit Menu Option Action Cut Copy all of the WAV file references and parameter settings for the selected pad and clear this pad The copied information is now in the clipboard for pasting into a different pad The current pad is now empty and all parameters are set back to their default values Copy Copy all of the WAV file references...

Страница 59: ...r copy them onto other microSD cards We recommend that you occasionally make backup copies of your WAV files especially before upgrading to new firmware Blackbox supports organizing WAV files into folders and sub folders You can create your own folder structure on the microSD card Blackbox 1 5 changed where new recordings are stored When you create a new recording it will be stored in the folder f...

Страница 60: ...e As blackbox displays the file naming keyboard Use the touchscreen to enter letters using the keyboard Touch the to delete the previous letter Turn a knob to position the cursor Touch Enter to save your changes 8 Touch the back arrow in the top left to exit the WAV Edit Screen WAV File Actions Menu Note If you delete move or rename a WAV file it will no longer be available for use by presets that...

Страница 61: ...ple banks will be copied to a sub folder Note If you continue to add WAV files to your preset after you pack it the preset will still point to these WAV files in their source folders Pack the preset again to copy these files over If the Pack option is disabled then the preset is fully packed already Note If you delete move or rename a WAV file it will no longer be available for use by presets that...

Страница 62: ...mber of semitones based on the note you play When you a use multi sample pad with Keys it will play the sample that has the root note closest to the played note and then pitch shift as needed When you select a slicer pad to play with Keys blackbox will map the slices in the pad to the notes on the keyboard To Play a Sample Granular or Clip Pad With the KEYS Screen 1 Push PADS to view the sample ba...

Страница 63: ...ered squares in the grid for each slice in the WAV file Use the arrows at the top of the screen to access additional octaves 7 Touch a numbered square on the grid to play that slice 8 Touch STOP at the top of the screen to stop playing all slices The SLICE button next to the STOP button does not do anything It is just a reminder that this is a slice pad Grid Keyboard for Slices Note On the traditi...

Страница 64: ...Mode options Turn any knob to scroll through the values Touch the screen or any button when the desired value is displayed Grid with Scale Mode Selector Note To find the right key to match some music tap a root note on the grid while turning a knob to scan through the root notes To Change Which Pad is Playing on the Keys Screen There are two ways to change which pad is playing with the keys screen...

Страница 65: ... Keys screen is now in SEQ mode Notes played and recorded here will now be sent to the selected sequence If that sequence is a MIDI sequence the notes will be sent through to the MIDI Out channel selected for that sequence If it s a Keys sequence the notes will be recorded into the sequence but will only be sent to the MIDI Out channel during sequence playback To Record a Keys Sequence Using the K...

Страница 66: ...ce while playing others you can select which sequence and pattern you are recording to Sequences Grid Note While you can create sequences with Step Count below 16 they won t cycle in a loop of fewer than 16 steps Sequence Patterns Each sequence in the Sequences Grid can have up to four patterns labeled A through D All patterns in the cell have the same Sequence mode Keys Pads MIDI the same target ...

Страница 67: ...tion set to ON blackbox will wait four beats then start to play any active sequences and start recording Record and Play Sequences Before we dive into the details of working with Sequences let s make sure Song Mode is disabled to keep things simple for now To Toggle Song Mode On and Off 1 Push the SONG button below the screen 2 The onscreen Song button at the top right of the Song Mode screen is b...

Страница 68: ...can then layer additional notes into the sequence if you continue to play Any active sequences will play while you are recording However the notes from other sequences will not record into the currently selected sequence Only the notes you trigger on the PADS screen the KEYS screens or via external MIDI devices will be added to the sequence You can push REC while another sequence is playing to sta...

Страница 69: ...quence quantization settings A blue progress bar shows the current playback state of the sequence A white progress bar indicates that the sequence will start at the next quantization break 7 Push STOP when you are finished If some WAV files remain playing you can push STOP again to turn them off Note Some sequences trigger long WAV files These WAV files may still be playing after the sequence stop...

Страница 70: ... numbers The piano roll displays the notes or pads recorded for each step over time moving from left to right You can touch the mode button at the top of the screen to switch the mode between Keys MIDI and Pads Note that if you do this any recorded events in all four patterns in that cell will be cleared 4 Each sequence can record keys input for only one pad This is selected using the selection gr...

Страница 71: ...re numbered to indicate which octave is currently displayed If you zoom out too far the numbers will not be displayed The numbers across the top of the piano roll indicate the step numbers If you zoom out too far the numbers will not be displayed To quickly switch the sequence you are editing touch the selection grid at the top left corner of the screen and then touch the square in the expanded se...

Страница 72: ... sequence All parameter settings remain untouched Double Doubles the Step Count for the currently selected pattern e g a 16 step pattern now has 32 steps and copies all note and pad trigger information from the first half into the second half This makes it easy to start with a short pattern of basic beats e g a kick and snare and quickly turn it into a longer framework for other instruments to be ...

Страница 73: ... 1 16 1 8T 1 8 1 4T 1 4 1 2T 1 2 1 bar 2 bars 4 bars 8 bars T Triplet Step Mode Step Mode controls whether the sequence notes are quantized to the grid while recording When Step Mode is OFF recorded notes will no longer be quantized to the grid Use Step Mode ON to force your notes to the quantization points for tight alignment to the tempo Use Step Mode OFF for more natural sounding and free flowi...

Страница 74: ...me more variety to your sound by adjusting the playback velocity By default Velocity is configured as a modulation for the Level parameter for all pads This means at lower velocities the pad playback level will be lower Additionally multi sample pads may have WAV files that are triggered at different velocities WAV files are mapped to different velocities either during automated multi sample recor...

Страница 75: ...an use a mid file to import the sequence into blackbox The sequence can be a Keys or MIDI sequence A Keys sequence will play with the pad selected in the top right selection grid at the time of importing A MIDI sequence will play out to the MIDI Channel configured for the sequence 1 Push SEQS to go to the Sequences screen 2 Select a sequence and push INFO to display the sequencer screen 3 Select e...

Страница 76: ... move it to a different pad if needed If the imported sequence is longer than the number of steps configured for the sequence only the steps in the sequence length will play back 7 Push INFO to see the Sequence Parameters screen Adjust the Step Length and Step Count to match the imported sequence if needed Note Blackbox has 16 note polyphony Importing a sequence with more than 16 simultaneous note...

Страница 77: ...g where you are in the scene as it plays Underneath that are displays for Tempo adjusted with the top left knob and Swing amount adjusted with the top right knob as well as buttons to bring up the Edit menu turn looping on and off and turn Song Mode on and off SONG Screen Two types of loops are available and are selected by touching the Loop button repeatedly When Song Mode is turned on blue black...

Страница 78: ...ing it off selecting the new pattern and turning it back on again To exit either of these screens press the BACK or SONG button On the right of each scene are two numbers e g 1 x 2 or 4 x 4 The first is the length of the longest selected sequence given in 16 step increments 1 for 16 steps 2 for 32 steps etc The second is the Play Count how often the pattern is repeated within the scene Press the I...

Страница 79: ...lays a virtual keyboard where you can rename the scene Touch enter at the bottom of the screen when you are ready to save the changes Delete Deletes the selected song scene Grab Adds any currently playing patterns to the current scene and removes patterns that have been deactivated This lets you experiment with building scenes from patterns on the fly You can use Loop1 to cycle through a scene con...

Страница 80: ... scene changes That one pattern can be set with Keep Using Keep is easy just press Keep so it s lit and then select the pad or cell you want to keep playing from the previous scene It will light with a down arrow To Record a Sequence during Song Playback You can experiment with new sequences during song playback by adding a sequence to a scene before recording it 1 Push SONG and select a scene 2 T...

Страница 81: ...cts processing You can also use the touch screen to slide the level selector next to the knob to the desired position When a pad is sending some of its signal to FX1 a blue triangle is displayed in the top left corner of the pad You can repeat this step for FX2 and a blue triangle will appear in the top right corner of the pad FX Screen To Modify Effect Parameters 1 Push the FX button to display t...

Страница 82: ... of the range of frequencies included when FILTER is on No BEAT Turns Beat Sync for the delay length on or off No FILTER Turns the Filter on or off No PING When Ping is on the echoes will alternate or ping pong from side to side When off the echoes are the same in the left and right channels No FX2 Reverb DECAY Determines the decay time for the reverb how long it will last Specified as a percentag...

Страница 83: ...7 Push BACK Notice the column of the three blue boxes beside each effect parameter knob When you set a modulation source other than none even if it s set to 0 that slot s box will light up blue Note The same effect parameter values are applied to all pads that are sending signals to that effect The Reverb effect is very processor intensive Blackbox does not limit what you can do based on anticipat...

Страница 84: ...tion that will be applied to the signal level at various frequencies You can touch the grid to move the filter point for each band The filter point will also move in the grid as you turn the knobs to adjust each of the parameters for that filter band Push the INFO button to select a different filter point to control The filter point for the selected node is pink Set the filter type to None for the...

Страница 85: ...ing filter H Shelf High shelving EQ H Cut High cut filter 4 Turn the other three knobs to adjust their values The numbers in the respective corners display the current value and the shape of the frequency response graph will change accordingly The four knobs control the following EQ Type see above Gain 24 dB to 24 dB Frequency 20 Hz to 20 4 kHz Q 0 1 to 18 4 5 Tap a spot in the grid to quickly mov...

Страница 86: ...he output is balanced equally between left and right A solid blue bar below the sound level indicates a pad is actively playing A red bar at the top of a cell indicates that pad is muted To Adjust the Sound Level and Pan of a Pad 1 Push MIX to display the Mixer screen 2 Touch the cell you want to adjust 3 Turn one of the top two knobs to adjust the level of the currently selected pad 4 Turn one of...

Страница 87: ...you to customize and create your own presets Presets are saved on the microSD card when you choose to save them If you load a different preset without first saving the current preset you will lose your work If you change to a different microSD card you will have a different set of presets When you switch to a different preset all previous settings will be replaced with the settings of the newly se...

Страница 88: ...ered under one Presets folder at the root Before you Pack a preset file the xml file lives in its own sub folder under Presets which is created as soon as you create a preset but the WAV files stay in their source folders until you pack them Blackbox will automatically move a legacy preset into the new folder location the first time you load that preset after upgrading to the 1 5 or newer firmware...

Страница 89: ...you make changes to that WAV file or re organize your sample library You may also want to gather up all of the files used in a preset so you can move it to another microSD card or archive it on your computer The Pack feature was created to address these needs 1 Load the preset you want to pack 2 Push PSET and then touch File Pack Blackbox will copy all of the WAV files used by this preset into thi...

Страница 90: ... this process WARNING this action cannot be undone You can touch anywhere besides OK to cancel this operation To Delete a Preset When you delete a preset you remove the preset from the list of presets on the Preset Management Screen and you delete the corresponding XML file from the microSD card You cannot undo this action To delete a preset 1 Push the PSET button to view the Preset Management scr...

Страница 91: ...o display the numeric keyboard if needed When the name is complete touch Enter to save the name and return to the Presets screen with the preset selected Note Renaming a preset does not load that preset Note If you enter a name that is already in use you will replace the old file with the current preset To Save Current Changes as a New Preset Sometimes while working on a preset you decide to save ...

Страница 92: ...ts in self named folders under the Presets folder Blackbox will not find them if you move the XML files outside of these folders or move these folders outside of the Presets folder Legacy Presets Blackbox Firmware version 1 5 changed the way presets and new sample recordings are managed In older versions the preset files were stored in the root folder but now the preset files are in individual fol...

Страница 93: ...e root folder We won t move them automatically We recommend that you pack up all of your presets one by one which will copy all of the files used by the presets into their respective folders When that is done you may choose to delete the files that are stored at the root or safely move them to a sub folder for future use ...

Страница 94: ... Out or the PHONES out HP If you choose any channel other than HP the signal will not be included in the headphone output Metro Gain Adjusts the volume level of the metronome from 96 dB to 20 dB ouch Compressor When set to ON blackbox will apply a compressor to the signals sent to Out 1 SD Mode This is a troubleshooting option If you get the message Please insert microSD when the microSD card is i...

Страница 95: ... from the TRS MIDI IN port USB Dvc Thru passes only MIDI messages from the USB DEVICE port USB Dev Out Enables or disables MIDI message output to the MIDI device plugged into the USB DEVICE port Clock Receive Selects a source for the clock signal when you have one or more MIDI devices connected to blackbox Your choices are USB Device the USB port MIDI In the MIDI IN TRS jack All both USB and TRS a...

Страница 96: ...t you use the MIDI adapter cables that came with your blackbox Blackbox offers several options for MIDI input leading to distinct workflows Most of these are dependent on MIDI Channel selections made in the TOOLS page MIDI tab Global In This MIDI Channel is used to activate a wide variety of functions in blackbox letting you turn an ordinary MIDI keyboard into a powerful control surface These func...

Страница 97: ...anging the value of the Global In parameter on the Tools screen 1 Push TOOLS to display the Tools screen and select the MIDI tab 2 Set the Global In parameter to the MIDI channel that you want to use to trigger pads and sequences Set this to Omni to respond to all MIDI input channels that have not been otherwise assigned 3 Connect your MIDI device to blackbox and configure it to use the selected G...

Страница 98: ...orkflows To Play Notes and Use Common MIDI Modulation Commands on a Pad Any pad that has its own MIDI In channel specified can use MIDI input on that channel to play a pad chromatically in the case of single Sample Multi sample Granular or Clip modes If the pad is set up as a Slicer MIDI notes will trigger specific slices just as they do when played from the KEYS screen Here s how to set it up 1 P...

Страница 99: ...d Effect Parameters You can use MIDI CC signals to control many pad and effect parameters in real time These changes are not recorded into sequences 1 Navigate to the parameter you want to control Any parameter that has four dots to the right of the dial or the parameter line can be modulated Touch the onscreen knob or the parameter list entry to select it 2 Push INFO The Modulation page will be c...

Страница 100: ...tarting point to the value of Starting Point the Modulation Amount parameter For example if the Filter parameter is set to 20 and you set the Modulation Amount to 15 then the lowest value of the MIDI control will map to 5 20 15 and the highest value of the MIDI control will map to 35 20 15 MIDI CC mappings are saved in the blackbox preset as a mapping to a specific MIDI CC number on a specific MID...

Страница 101: ...ay also want to use Pad Templates to set up your pads in advance of recording See CREATE PRESET TEMPLATES FOR RE USE to learn how to do this When using the Global In note map blackbox maps two MIDI notes to each pad one note starts and stops recording the other note clears the pad Recording including MIDI triggered recording will only work if the target pad is already empty loaded pads must be cle...

Страница 102: ...ers pads the bottom right quadrant triggers recording the top left quadrant triggers sequences and the top right quadrant clears pads When in the correct mode the Launchpad lights the buttons using the color pattern shown in the diagram pattern below If you have RecToPlay set to ON you ll find it in TOOLS Rec and have specified a recording length the pad will start playing as soon as recording is ...

Страница 103: ...ere assumes C4 is middle C If you want to configure lengths for each pad independently make sure you have RecConfig set to Per Pad on the Recording settings page in TOOLS mode If you re recording a sequence in Pads Mode notes on the MIDI In channel for that pad will play it in real time but won t be recorded only MIDI on the Global In channel or playing the pads on the screen will be recorded If t...

Страница 104: ...o all MIDI input channels that have not been otherwise assigned 3 Connect your MIDI device to blackbox and configure it to use the selected Global In MIDI channel 4 Push SONG and make sure that the Song tab is illuminated Song Mode ON 5 Scenes can be triggered using a specific range of notes on your MIDI device The range for the 32 possible scene triggers is Note 2 usually D 1 through Note 33 usua...

Страница 105: ...d then up 52 67 E3 G4 Select and trigger a sequence Sequences are mapped starting at the bottom left moving across and then up 68 83 G 4 B5 Trigger recording for a pad Pads are mapped starting at the bottom left moving across and then up 84 99 C6 D 7 Clear a pad Pads are mapped starting at the bottom left moving across and then up 100 E7 Select the previous pad 101 F7 Select the next pad 102 F 7 P...

Страница 106: ...coming notes are on a MIDI channel that has not been specifically assigned to anything else a pad s MIDI In or the MIDI Seq parameter then the notes will be applied as per the MIDI Global In Channel Note Mappings chart on the previous page If Global In is set to Omni and the incoming notes are on a MIDI channel that has been specifically assigned as a particular pad s MIDI In channel or the MIDI S...

Страница 107: ...alphabetical order just as they are listed on the Preset screen when you push the PSET button Keep in mind that a program change just like any other time when you change presets will cause the preset to change immediately without saving your edits So be sure to save your preset if needed before initiating a program change Because of the potential for data loss blackbox has a Tools parameter that a...

Страница 108: ... use the Global In MIDI Seq In or assigned to a particular pad MIDI output is always generated by a sequence even when it s played back as part of a scene in Song Mode As with MIDI input MIDI output can be set up in a variety of ways Two important global MIDI output settings are controlled from the MIDI tab of the TOOLS page MIDI Out This controls which MIDI signals are sent to the TRS MIDI OUT po...

Страница 109: ...e note events from the configured sequence to the MIDI instrument while also playing the internal pad or pads Use MIDI Sequences to Play an External MIDI Instrument MIDI sequences are a great way to add an external MIDI Instrument to your blackbox song These sequences do not trigger any sounds within the blackbox They only send MIDI Notes out A MIDI sequence can also be used to play MIDI notes thr...

Страница 110: ... gestures to zoom and move around the sequence 9 Follow the usual steps to use knobs to adjust note length move notes up and down and change the velocity and probability of individual notes 10 Push PLAY and the sequence will send the entered notes to the MIDI device via the MIDI Out channel selected above To Record a MIDI Sequence Using the Keys Screen 1 Select the MIDI sequence you want to record...

Страница 111: ... MIDI tab Set the value of the MIDI Seq parameter to MIDI channel A 4 Push SEQS and select which sequence you d like to record into It needs to be highlighted pink and selected for playback white border 5 Press the INFO button to access the sequence Select the pattern A D to record into then select MIDI Mode 6 Push INFO again to access the Sequence parameters then touch the Seq tab Set the MIDI Ou...

Страница 112: ...K OUT port Like the analog CLOCK IN the analog CLOCK OUT can be set to 1 2 4 8 12 or 24 pulses per quarter note PPQ Use the Analog Out parameter found under the Clock tab on the Tools screen to adjust this In addition blackbox can send MIDI Clock Start and Stop messages to the TRS MIDI OUT jack the USB DEVICE port or both at once The Send parameter under the Clock tab on the Tools screen allows yo...

Страница 113: ...RS MIDI In jack will be followed This setting is convenient for users who want to have both Clock sources set up at all times so they can switch back and forth without having to reconfigure the Clock input or for users who want to run both Clock sources at once and watch what happens To quote Dr Seuss These things are fun and fun is good Name Description Priority Clock In Blackbox gets a Clock sig...

Страница 114: ... signal Tap Tempo You can now adjust the internal tempo by turning a knob or by tapping to the beat To Use Tap Tempo or Manually Set the Internal BPM 1 Push the SONG button to open Song mode The current tempo is displayed as a number in the top left corner below the bar beat time display 2 Turn the top left knob to manually set the tempo or 3 Tap the tempo number display in time with the beat and ...

Страница 115: ...ug blackbox into a standard power outlet A power adapter that delivers at least 2 amps at 5 volts Newer iPad adapters will work The following power sources may not reliably provide sufficient power to support blackbox plus a MIDI device An iPhone adapter USB Power Adapter A laptop or computer USB connection Any adapter that supports under 2 amps at 5 volts If you need to use one of these lower pow...

Страница 116: ...this will display the WAV screen Touch the Pad Mode icon next to the pad selection grid at top left From the menu select New Rec to go to the Load Record screen when you exit this screen the WAV file mapping for that pad will have been cleared 3 Push INFO again to see the Parameters screen for this pad 4 Choose the Pad Mode on the Main page of the Parameters screen 5 Use the buttons across the bot...

Страница 117: ... the Normal mode algorithm You can configure sample and multi sample pads to use the High Quality algorithm when needed Here s how to configure this option To Use HighQ Mode to Reduce Aliasing 1 Open the parameter pages for the pad that is experiencing aliasing 2 Touch Conf to select that page 3 Scroll down to the Interp parameter which is set to Normal by default Turn a bottom knob to select the ...

Страница 118: ...on sounds you won t hear the difference and this is an easy win Disable the reverb by making sure no pads have FX2 applied on the Effects screen This is an expensive algorithm that can also be done off board Keep in mind that the reverb will continue to run for 60 seconds after you disable it so you won t get the benefit for a short while Use mono samples instead of stereo where appropriate Stereo...

Страница 119: ...nd insert into your computer You may need to use a microSD adapter for your computer not included 2 Copy the files from the microSD card onto your computer Install New Firmware We have a video that walks through the steps to download and install new firmware at https youtu be jiu5tJFYiVE or you can keep reading below for full written instructions To Install New Firmware Here are the steps required...

Страница 120: ... your computer You can find the available firmware images on the forum at https forum 1010music com You must be a registered user of the forum to access the download files Forum registration is free 2 Unpack the zip file Some browsers do this automatically for you 3 Find the xml file in the unpacked folder that has the same name as the preset you want to restore Copy the xml file onto the microSD ...

Страница 121: ...rs A Z 0 9 and some special characters The following characters are NOT allowed double quotes forward slash back slash question mark asterisk less than and greater than symbols the colon and the pipe symbol File names must be less than 256 characters including the path name Files that do not conform to these naming constraints will not be recognized by blackbox Maximum Number of Voices Supported B...

Страница 122: ...rument industry currently uses several different ways of mapping MIDI 5 Pin DIN signals to mini TRS jack connectors The diagram below to the right shows the numbering of the pins on a MIDI connector and the labels of the connection components of a mini TRS jack 1010music products are compatible with cables that use the following mapping of MIDI signals between female MIDI connectors and mini TRS j...

Страница 123: ...ems It just may have the answer you need Connect with Other Blackbox Users There is a very active community of users of 1010music products at forum 1010music com If you have a question about blackbox that isn t answered in this manual this is your best source for help We actively monitor the wish list sub forums for ideas for future versions of our products Forum registration is free We hope to se...

Отзывы: