background image

Prestige 2000W User’s Guide 

11-8                                                                                                                                                    User Access to the Prestige   

Table 11-6 SIP Proxy Configuration 

LABEL


DESCRIPTION


SAVE 

Click this button to save your changes without restarting the Prestige. Your 

wireless LAN, Internet and SIP settings changes do not take affect until you use 

RESTART. 

11.7 Phone Book 

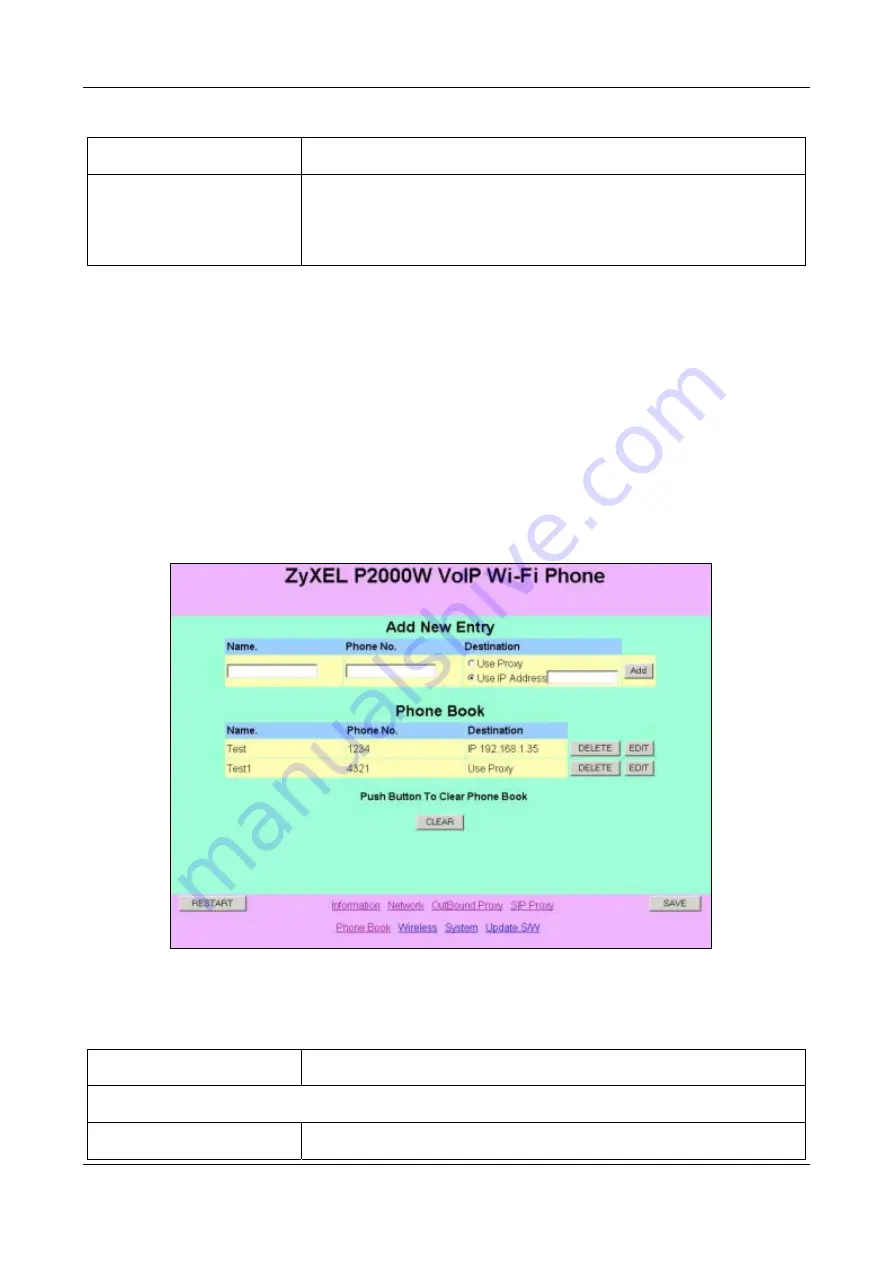
Use the phonebook feature to store and later retrieve names and corresponding telephone numbers.   

There are two ways the Prestige can dial a telephone number; either by using the SIP proxy server or the IP address.   

• 

Select 

Use Proxy 

to have the SIP-Server make the connection. The SIP proxy server assigns the telephone 

number or ITSP and therefore you can leave this field blank. 

• 

If you use the IP address to place a call without first going through the SIP proxy server; you need to know both 

the destinations IP address and the corresponding telephone number. 

If there is no SIP proxy server available, then it is still possible to make a connection. Providing the IP address and 

telephone number entered in your Phonebook exactly matches the recipients IP and number, the call can still be made.   


Figure 11-7 Phonebook


Table 11-7 Phonebook 

LABEL


DESCRIPTION


Add New Entry 

Name. 

Type a descriptive name to associate with the telephone number. 

Summary of Contents for Prestige 2000W

Page 1: ...Prestige 2000W VoIP Wi Fi Phone User s Guide Version 2 0 February 2004...

Page 2: ...f ZyXEL Communications Corporation Published by ZyXEL Communications Corporation All rights reserved Disclaimer ZyXEL does not assume any liability arising out of the application or use of any product...

Page 3: ...ompliance with the above conditions may not prevent degradation of service in some situations Repairs to certified equipment should be made by an authorized Canadian maintenance facility designated by...

Page 4: ...TE Repair or replacement as provided under this warranty is the exclusive remedy of the purchaser This warranty is in lieu of all other warranties express or implied including any implied warranty of...

Page 5: ...3 578 3942 www zyxel com www europe zyxel com WORLDWIDE sales zyxel com tw 886 3 578 2439 ftp europe zyxel com ZyXEL Communications Corp 6 Innovation Road II Science Based Industrial Park Hsinchu 300...

Page 6: ......

Page 7: ...ation 4 1 4 1 1 1 Wireless LAN Wireless menu 4 1 4 1 1 2 Internet Net menu 4 1 4 1 1 3 SIP Proxy Server Outbound Proxy and User Account menus 4 1 4 1 2 Menu Navigation Diagrams 4 1 Chapter 5 Keypad Me...

Page 8: ...he Prestige Web Configurator 10 2 Chapter 11 User Access to the Prestige 11 1 11 1 Device Information 11 1 11 2 Network Configuration STATIC 11 2 11 3 Network Configuration DHCP 11 3 11 4 Network Conf...

Page 9: ...re 3 4 Main Menu 3 2 Figure 4 1 Menu Diagrams 4 2 Figure 5 1 Scanning an ESSID 5 1 Figure 5 2 Setting up a Wireless LAN AP 5 2 Figure 5 3 Fixed IP Configuration 5 3 Figure 5 4 Dynamic IP Configuration...

Page 10: ...on 11 2 Figure 11 3 DHCP Network Configuration 11 3 Figure 11 4 PPPoE Network Configuration 11 5 Figure 11 5 Outbound Proxy Configuration 11 6 Figure 11 6 SIP Proxy Configuration 11 7 Figure 11 7 Phon...

Page 11: ...ing the embedded web configurator Packing List Card The Packing List Card lists all items that should have come in the package Certifications Refer to the product page at www zyxel com for information...

Page 12: ...restige Keypad Navigation Initial Configuration I Part I Prestige Keypad Navigation Initial Configuration This part introduces the Prestige the Keypad and details how to setup the initial configuratio...

Page 13: ......

Page 14: ...configure via the LCD display and keypad You can even manage your settings over the Internet using the Prestige s Web Configurator 1 1 Applications 1 1 1 Place a call via SIP Proxy Server SIP call ser...

Page 15: ...to Ad hoc mode with the same SSID and Channel Figure 1 3 Ad Hoc mode 1 2 Features 1 2 1 QoS Quality of Service Allows the Prestige to tag each communication that can be prioritized over the network fo...

Page 16: ...een given most of the following information INTERNET ACCOUNT CHECKLIST Wireless Settings ESSID ___________________ default Wireless Network Mode Ad Hoc Infrastructure default Channel _________________...

Page 17: ...URATOR ACCOUNT INFORMATION DEFAULTS Administrator Access Username zyxeladmin Password 1234 User level Access Username admin Password 1234 1 4 Installing and Removing the Battery Step 1 With Prestige s...

Page 18: ...astic tab on the battery base Figure 1 6 Removing the battery 1 5 Charging the Prestige Step 5 Connect the included power adaptor use only this adaptor to the charger Figure 1 7 Connecting the power c...

Page 19: ...registered Menu Names Figure 1 9 Battery Indicator Charge the battery for five hours before using your Prestige Figure 1 10 Charging the battery Step 4 The battery indicator bar stops blinking when t...

Page 20: ...to select menu options displayed Right Use this key to return to the previous menu You can also use this key as a shortcut to the Prestige s built in phonebook Arrow Keys Use these keys to navigate be...

Page 21: ...tige has returned to the default IP address see the Internet Account Checklist in Required Information for the default IP address Load Default IP Release Key Figure 2 2 Load Default IP 2 3 Switching t...

Page 22: ...t registered Menu Names Figure 3 2 Main Screen 3 1 Prestige s Keypad Menus This section introduces the Prestige s menu system and how to navigate through and configure them This is the Prestige s main...

Page 23: ...ction of the Left key for this screen Press the Left key while in the main screen to open the menus This displays the function of the Right key for this screen Press the Right key while in the main sc...

Page 24: ...g these menus 4 1 1 2 Internet Net menu Now configure your IP address to register with your account provider From here you can manually configure an IP address if you have one Otherwise choose an appr...

Page 25: ...enu S T 7 Wireless 8 SSL Setting 9 Restart Select Back Select S T 1 Scan 2 ESSID 3 Network Mode Select Back Press either the Left or Right key disposed underneath the option indicated inside the to pr...

Page 26: ...gs Prestige Usage II Part II Keypad Menus Phonebook Call History Misc Settings Prestige Usage This part explains the Prestige s keypad menus details how to manage your phone book and call settings and...

Page 27: ...ways and their associated wireless stations in the same set must have the same ESSID Follow these directions to scan for the ESSIDs of available wireless LAN APs Figure 5 1 Scanning an ESSID 5 1 2 Net...

Page 28: ...the same length of WEP keys as the AP 64 bit or 128 bit Enter the WEP keys manually Both the wireless clients and the access points must use the same WEP key for data encryption and decryption You can...

Page 29: ...Use the Information menu to check your IP address after completing one of the above three methods to connect 5 2 1 Fixed IP If you were assigned a specific IP address for your Prestige use the followi...

Page 30: ...ocol over Ethernet PPPoE functions as a dial up connection Therefore you ll also need a username PPPoE name and password from you ISP Use the following directions to set your Prestige to use PPPoE for...

Page 31: ...Proxy Server Settings Your Prestige is a SIP client and must connect to a SIP server The SIP proxy server receives your Prestige s SIP requests and forwards them to the next SIP server in the network...

Page 32: ...last screen again in this screen Enter the URL or IP address of your Outbound Proxy Server if your ITSP gave you one Use the following instructions to set up your Prestige to connect to the outbound p...

Page 33: ...Prestige 2000W User s Guide Keypad Menus 5 7 Figure 5 8 SIP User Account Settings The Prestige restarts after you return to the main menu...

Page 34: ......

Page 35: ...s Select Use Proxy to have the SIP Server make the connection The SIP proxy server assigns the telephone number or ITSP and therefore you can leave this field blank If you use the IP address to place...

Page 36: ...ient to make your call 6 3 Setting Up Speed Dial Keys1 Use the following instructions to set up a speed dial key for a name in your phonebook Figure 6 2 Speed Dial Settings 6 4 Editing Phonebook Entri...

Page 37: ...Prestige 2000W User s Guide Using the Prestige s Phonebook 6 3 Figure 6 3 Phonebook Edit Entry This message displays if there are no entries in the phonebook...

Page 38: ...k Erase Entry 6 6 Setting Up Groups 2 You can assign ring tones to groups of entries from your telephone book For example you may want to have a specific ring tone for work related calls Use the follo...

Page 39: ...ge s Phonebook 6 5 Figure 6 5 Phonebook Setting up Groups 6 7 Erasing One or More Phonebook Entries Use the following instructions to remove existing entries from your Prestige book This message displ...

Page 40: ...Prestige 2000W User s Guide 6 6 Using the Prestige s Phonebook Figure 6 6 Phonebook Erase One By One...

Page 41: ...Prestige 2000W User s Guide Using the Prestige s Phonebook 6 7 Figure 6 7 Phonebook Erase All...

Page 42: ......

Page 43: ...ll History The call history feature is useful for checking missed received and dialed calls 7 1 Missed Calls Follow these directions to use the missed calls list to check for missed calls and then edi...

Page 44: ...2000W User s Guide 7 2 Call History 7 2 Received Calls Follow these directions to use the received calls list to check for received calls and then edit and dial the Telephone numbers Figure 7 2 Receiv...

Page 45: ...ist of dialed calls to check for dialed calls and then edit and dial the Telephone numbers Figure 7 3 Dialed Calls 7 4 Erasing Calls Follow these directions to erase entries from the call history list...

Page 46: ...Prestige 2000W User s Guide 7 4 Call History Figure 7 4 Erasing Calls...

Page 47: ...Settings These sections detail how to change the Prestige s other settings 8 1 Adjusting the Ring Volume Follow these directions to adjust the Prestige s ring volume Figure 8 1 Ring Volume 8 2 Settin...

Page 48: ...8 2 Miscellaneous Settings Figure 8 2 Ring Melody 8 3 Setting the Vibration Mode You can have the Prestige vibrate when it rings Follow these directions to turn the Prestige s vibration mode on or of...

Page 49: ...s 8 3 8 4 Setting the Time Follow these directions to change the Prestige s time settings Figure 8 4 Time Setup 8 5 Setting the Banner Follow these directions to change the text that displays in the P...

Page 50: ...s 8 6 Restoring the Factory Default Settings Follow these directions to set the Prestige back to the factory default settings The Prestige will automatically restart when the factory default settings...

Page 51: ...make your call 9 2 Using the Phonebook to Dial a Telephone Number Use the following instructions to call one of existing entries in your Prestige book Step 1 Press the Right key to enter the Prestige...

Page 52: ...nfigurator Advanced Access Troubleshooting III Part III Introducing the Prestige s Web Configurator Advanced Access Troubleshooting This part explains the Web Configurator screens for Advanced access...

Page 53: ......

Page 54: ...ettings The second is an administrator s account that allows you to alter the way the Prestige makes and receives calls for example selecting a voice codec Do not attempt to change the Administrator s...

Page 55: ...and Administrator accounts the first time you login 10 3 Navigating the Prestige Web Configurator The following summarizes how to navigate the web configurator The following screen displays first Fig...

Page 56: ...n This is the software version that the Prestige is using Bootrom Version This is the boot ROM Read Only Memory software version that the Prestige is using Release Date This is the date that the Prest...

Page 57: ...server These settings are not configurable Click PPPoE if your network supports Point to Point Protocol over Ethernet to automatically configure your Prestige NetWork IP This is IP address your Prest...

Page 58: ...ate to your new settings CANCEL Click CANCEL to begin configuring this screen afresh RESTART Click RESTART to restart the Prestige and have your configuration changes take affect SAVE Click SAVE to sa...

Page 59: ...ctory and consists of six pairs of hexadecimal characters for example 00 A0 C5 00 00 02 This field is read only and cannot be configured DNS Server IP Type the DNS IP address for translating readable...

Page 60: ...your Prestige uses to connect to the wireless LAN NetWork Subnet Mask The subnet mask specifies the network number portion of an IP address NetWork Default Gateway This field displays the gateway IP a...

Page 61: ...screen displays the IP address and port number of an outbound proxy server the Prestige uses to connect to the outbound proxy server Figure 11 5 Outbound Proxy Configuration Table 11 5 OutBound Proxy...

Page 62: ...the IP address of your Prestige User Account Registrar Username This field displays the username as supplied by your VoIP provider to access the SIP Server Local Name This field displays the name used...

Page 63: ...ct Use Proxy to have the SIP Server make the connection The SIP proxy server assigns the telephone number or ITSP and therefore you can leave this field blank If you use the IP address to place a call...

Page 64: ...No This field displays the telephone number of each contact in your telephone book Destination This displays either Proxy or an IP address depending on your settings for this entry CLEAR Click CLEAR t...

Page 65: ...hannel A channel is a radio frequency used by IEEE 802 11b wireless devices Channels available depend on the AP you are connected to The channel is determined automatically using the site survey featu...

Page 66: ...ecimal characters 0 9 A F You must configure all four keys but only one key can be activated at any one time The default key is Key 1 Default Key Choose from the available WEP keys Unless advised to d...

Page 67: ...e the Prestige display the time in their corresponding formats Time Edit Type the new time for the Prestige to display SUBMIT Click SUBMIT to have the Prestige update to your new settings CANCEL Click...

Page 68: ...to find it Browse Click Browse to find the file you want to upload Remember that you must decompress compressed zip files before you can upload them UPDATE Click this button to begin the upload proce...

Page 69: ......

Page 70: ...ge uses to connect to a SIP server where there may be NAT routers that do not support the SIP protocol If your ISP gave you an outbound proxy server address and port then enter them here If they did n...

Page 71: ...ESTART Click this button to restart the Prestige and have your configuration changes take affect SAVE Click this button to save your changes without restarting the Prestige Your wireless LAN Internet...

Page 72: ...intain the connection Type a time in minutes to send a KeepAlive signal to the SIP Proxy Server The default is 0 which disables this feature Registrar Username Type in the username as supplied by your...

Page 73: ...In Volume 14 14 Select the speaker volume on the Prestige where 14 is the minium quietest and 14 is the maximum loudest Receive Buffer A larger receiving buffer allows the Prestige to rearrange data...

Page 74: ...lows you to set the DTMF payload type It is recommended to leave the default setting for this field SUBMIT Click SUBMIT to have the Prestige update to your new settings CANCEL Click this button to beg...

Page 75: ...Admin Login username The default setting for this is zyxeladmin Admin Login Password The default setting for this is 1234 Admin Confirm Password Type the new password again in this field Time Format...

Page 76: ...to as the IP Precedence bits and refer to a priority from 0 to 7 The next three bits are used in conjunction with the IP Precedence bits to define the Diffserv Code Point protocol DSCP bits The last...

Page 77: ...n SUBMIT Click SUBMIT to have the Prestige update to your new settings CANCEL Click this button to begin configuring this section afresh RESTART Click this button to restart the Prestige and have your...

Page 78: ...ings CANCEL Click this button to begin configuring this section afresh Update System Select File Type in the location of the file you want to upload in this field or click Browse to find it Browse Cli...

Page 79: ...inistrator specific Settings Table 12 6 Update S W LABEL DESCRIPTION SAVE Click this button to save your changes without restarting the Prestige Your wireless LAN Internet and SIP settings changes do...

Page 80: ...ing the same channel around your wireless network Relocate or reduce the radio interference 13 2 Error Messages The Prestige displays error messages to let you know that an error has occurred An error...

Page 81: ...The Prestige failed to obtain an IP address from the ISP Corrective Action Make sure your PPPoE settings are correct Restart the Prestige Error 4 Not Registered The Prestige failed to register with th...

Reviews: