background image


33 


To open the notification panel, swipe your finger down from 
the top of the screen. 


To close the notification panel, swipe your finger up from the 
bottom of the screen or touch the 

Back Key

Respond to or Remove a Notification 

In the notification panel, you can respond to a notification or 
remove the notifications.   


To respond to a notification, just touch it. 


To remove a notification, swipe it left or right. 


To remove all notifications, touch 


For some notifications, you can spread with two fingers to 
view more information. 

TIP: 

In the notification panel, touch 

  at the top of notifications 

list to get to the 

Settings

 menu quickly.   

Managing Shortcuts and Widgets 

Add Shortcuts and Widgets 

1.  Touch the 

Home Key > 

2.  Touch 

WIDGETS

 if you want to add a widget to the home 

screen. 

3.  Touch and hold a widget or an application icon and drag it to 

the Home Screen. 

Summary of Contents for Blade G LTE

Page 1: ...1 ZTE Blade G LTE User Manual ...

Page 2: ... Corporation reserves the right to make modifications on print errors or update specifications in this guide without prior notice This manual has been designed with the utmost care to ensure the accuracy of its content However all statements information and recommendations contained therein do not constitute a warranty of any kind either expressed or implied Please refer to chapter For Your Safety...

Page 3: ...er from the actual product or software Trademarks ZTE and the ZTE logos are trademarks of the ZTE Corporation Google and Android are trademarks of Google Inc The Bluetooth trademark and logos are owned by the Bluetooth SIG Inc and any use of such trademarks by ZTE Corporation is under license microSD logo is a trademark of SD 3C LLC Other trademarks and trade names are the property of their respec...

Page 4: ...0 Setting Up for the First Time 21 Locking Unlocking the Screen and Keys 21 Using the Touch Screen 22 Getting to Know the Home Screen 23 Personalizing 25 Changing the System Language 25 Setting the Date and Time 25 Changing Ringtone and Notification Sound 25 Turning On Off Touch Sounds 26 Adjusting Volumes 26 Switching to Silent Mode 26 Applying New Wallpapers 27 Changing Screen Brightness 28 Prot...

Page 5: ...tching apps 40 Connecting to Networks and Devices 41 Connecting to Mobile Networks 41 Connecting to Wi Fi 43 Using Wi Fi Direct 45 Connecting to Bluetooth Devices 47 Connecting to Your Computer via USB 49 Sharing Your Mobile Data Connection 51 Connecting to Virtual Private Networks 54 Phone Calls 56 Placing and Ending Calls 56 Answering or Rejecting Calls 56 Working With the Call Log 57 Calling Yo...

Page 6: ...te Contacts 69 Working With Groups 70 Searching for a Contact 72 Editing Contacts 72 Accounts 74 Adding or Removing Accounts 74 Configuring Account Sync 75 Email 77 Setting Up the First Email Account 77 Checking Your Emails 77 Responding to an Email 78 Writing and Sending an Email 79 Adding Signature to Your Emails 80 Adding and Editing Email Accounts 80 Changing General Email Settings 81 Gmail TM...

Page 7: ...ttings 87 Messaging 88 Opening the Messaging Screen 88 Sending a Text Message 88 Sending a Multimedia Message 89 Replying to a Message 90 Forwarding a Message 90 Viewing Details About a Message 90 Deleting Messages or Threads 91 Changing Message Settings 91 Agenda 92 Viewing Your Calendars and Events 92 Creating an Event 94 Editing or Deleting an Event 94 Changing Calendar Settings 95 Google 96 Or...

Page 8: ...103 Using Bookmarks 103 Viewing Your Browsing History 104 Changing Browser Settings 105 Maps 106 Activating Location Services 106 Getting Your Location 106 Searching for a Location 107 Getting Directions to Your Destination 107 Searching for Local Places 108 Google Now and Search 110 Enabling Google Now 110 Searching With Text 110 Searching by Speaking 111 Changing Search Settings 111 Camera 112 C...

Page 9: ...rking With Pictures 119 Working With Videos 121 Music 123 Copying Music Files to Your Phone 123 Viewing Your Music Library 124 Playing Music 125 Managing Playlists 127 Videos 129 Opening the Video Library 129 Playing and Controlling Videos 129 Managing Video Files 130 Sound Recorder 132 Recording a Voice Memo 132 Playing a Voice Memo 132 More Apps 134 Alarm 134 Calculator 135 ...

Page 10: ...Searching for Apps 138 Downloading and Installing Apps 138 Managing Your Downloads 139 Settings 141 General Settings 141 Wireless and Networks 144 Device 146 Personal 147 Accounts 149 System 149 Upgrading the Phone Software 151 Troubleshooting 152 For Your Safety 157 General Safety 157 RF Exposure Information SAR 158 FCC Compliance 160 ...

Page 11: ...11 Distraction 161 Product Handling 162 Electrical Safety 167 Radio Frequency Interference 168 Explosive Environments 170 ...

Page 12: ...12 Getting Started Getting to Know Your Phone Home Key Power Key Earpiece Touchscreen Back Key Menu Key LED Indicator Front Camera ...

Page 13: ...13 Headset Jack Flash Back Camera Speaker Back Cover ...

Page 14: ...14 Volume Key Charging USB Jack ...

Page 15: ...from any application or screen Touch and hold when the screen is not locked to open Google Search Menu Key Touch to get the options for the current screen Touch and hold to see recently used applications Back Key Touch to go to the previous screen Volume Key Press or hold to turn the volume up or down Installing the micro SIM Card and Battery Power off your phone and remove the battery before inst...

Page 16: ...16 removing or replacing the battery 1 Remove the back cover 2 Hold the micro SIM card with the cut corner oriented as shown and slip it into the card holder ...

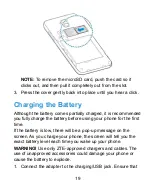
Page 17: ...tment Gently push down on the battery until it clicks into place 4 Press the cover gently back into place until you hear a click Installing the microSD Card Optional A microSD card can be installed or removed while the phone is turned on You need to unmount the microSD card before removing it 1 Remove the back cover ...

Page 18: ...card into the card slot until it clicks into position You may hear a click when the card clicks into the slot NOTE Some applications may require a microSD card to work normally or may store certain data on it Therefore it is recommended that you keep a microSD card installed and not remove or replace it randomly ...

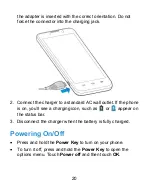
Page 19: ...ommended you fully charge the battery before using your phone for the first time If the battery is low there will be a pop up message on the screen As you charge your phone the screen will tell you the exact battery level each time you wake up your phone WARNING Use only ZTE approved chargers and cables The use of unapproved accessories could damage your phone or cause the battery to explode 1 Con...

Page 20: ...standard AC wall outlet If the phone is on you ll see a charging icon such as or appear on the status bar 3 Disconnect the charger when the battery is fully charged Powering On Off Press and hold the Power Key to turn on your phone To turn it off press and hold the Power Key to open the options menu Touch Power off and then touch OK ...

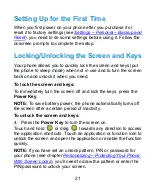
Page 21: ...and keys To immediately turn the screen off and lock the keys press the Power Key NOTE To save battery power the phone automatically turns off the screen after a certain period of inactivity To unlock the screen and keys 4 Press the Power Key to turn the screen on Touch and hold or drag towards any direction to access the application shortcuts Touch an application or function icon to unlock the sc...

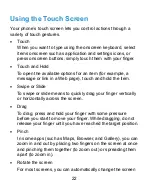
Page 22: ...age touch and hold the item Swipe or Slide To swipe or slide means to quickly drag your finger vertically or horizontally across the screen Drag To drag press and hold your finger with some pressure before you start to move your finger While dragging do not release your finger until you have reached the target position Pinch In some apps such as Maps Browser and Gallery you can zoom in and out by ...

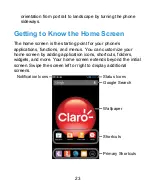
Page 23: ...or your phone s applications functions and menus You can customize your home screen by adding application icons shortcuts folders widgets and more Your home screen extends beyond the initial screen Swipe the screen left or right to display additional screens Status Icons Google Search Wallpaper Shortcuts s Primary Shortcuts Notification Icons ...

Page 24: ...24 Extended Home Screens Your home screen extends beyond the initial screen providing more space to add icons widgets and more Simply swipe left or right on the screen to see the extended Home Screens ...

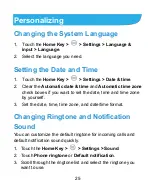
Page 25: ...utomatic time zone check boxes if you want to set the date time and time zone by yourself 3 Set the date time time zone and date time format Changing Ringtone and Notification Sound You can customize the default ringtone for incoming calls and default notification sound quickly 1 Touch the Home Key Settings Sound 2 Touch Phone ringtone or Default notification 3 Scroll through the ringtone list and...

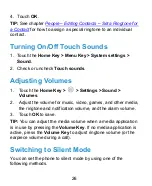
Page 26: ...he Home Key Settings Sound Volumes 2 Adjust the volume for music video games and other media the ringtone and notification volume and the alarm volume 3 Touch OK to save TIP You can adjust the media volume when a media application is in use by pressing the Volume Key If no media application is active press the Volume Key to adjust ringtone volume or the earpiece volume during a call Switching to S...

Page 27: ...ome Key Settings Sound Silent mode and touch Vibrate or Mute Applying New Wallpapers You can set the wallpaper for the Home Screen or Lock Screen 1 Touch and hold any empty area on the home screen or touch the Home Key Menu Key Wallpaper 2 Touch Home or Lock screen 3 Select a wallpaper source from Gallery Live wallpapers or Wallpapers and choose the image or animation you want to use as the wallpa...

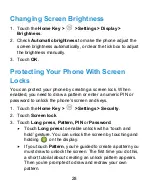
Page 28: ...to draw a pattern or enter a numeric PIN or password to unlock the phone s screen and keys 1 Touch the Home Key Settings Security 2 Touch Screen lock 3 Touch Long press Pattern PIN or Password Touch Long press to enable unlock with a touch and hold gesture You can unlock the screen by touching and holding on the display If you touch Pattern you re guided to create a pattern you must draw to unlock...

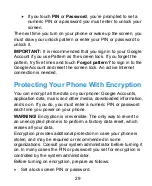
Page 29: ...Phone With Encryption You can encrypt all the data on your phone Google Accounts application data music and other media downloaded information and so on If you do you must enter a numeric PIN or password each time you power on your phone WARNING Encryption is irreversible The only way to revert to an unencrypted phone is to perform a factory data reset which erases all your data Encryption provide...

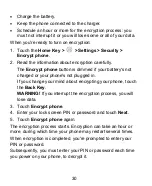
Page 30: ...not charged or your phone s not plugged in If you change your mind about encrypting your phone touch the Back Key WARNING If you interrupt the encryption process you will lose data 3 Touch Encrypt phone 4 Enter your lock screen PIN or password and touch Next 5 Touch Encrypt phone again The encryption process starts Encryption can take an hour or more during which time your phone may restart severa...

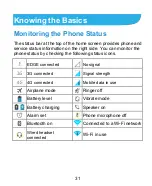
Page 31: ...t side You can monitor the phone status by checking the following status icons EDGE connected No signal 3G connected Signal strength 4G connected Mobile data in use Airplane mode Ringer off Battery level Vibrate mode Battery charging Speaker on Alarm set Phone microphone off Bluetooth on Connected to a Wi Fi network Wired headset connected Wi Fi in use ...

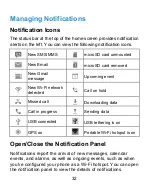
Page 32: ...sage Upcoming event New Wi Fi network detected Call on hold Missed call Downloading data Call in progress Sending data USB connected USB tethering is on GPS on Portable Wi Fi hotspot is on Open Close the Notification Panel Notifications report the arrival of new messages calendar events and alarms as well as ongoing events such as when you ve configured your phone as a Wi Fi hotspot You can open t...

Page 33: ...nd to a notification just touch it To remove a notification swipe it left or right To remove all notifications touch For some notifications you can spread with two fingers to view more information TIP In the notification panel touch at the top of notifications list to get to the Settings menu quickly Managing Shortcuts and Widgets Add Shortcuts and Widgets 1 Touch the Home Key 2 Touch WIDGETS if y...

Page 34: ...idget Size 1 Touch and hold a widget on the Home Screen and then release it 2 An outline appears around the widget Drag the outline to resize the widget NOTE Not all widgets can be resized Organizing With Folders You can create folders on the Home Screen and add several shortcuts in a folder Create a Folder 1 Touch and hold the shortcut on the Home Screen you want to add into a folder until appear...

Page 35: ... a Folder 1 Touch a folder to open it 2 Touch and hold the shortcut you want to remove and then drag it to the Home Screen 3 Release the shortcut and it will be removed from the folder Rearranging the Favorites Tray The Home Screen includes a customizable favorites tray at the bottom visible from all Home Screens You can drag apps shortcuts folders and other items in or out of the favorites tray f...

Page 36: ...omatically In others you open it by touching where you want to type You can touch the Back Key to hide the onscreen keyboard Change Input Methods Besides the default input method you can install other input methods on your phone Here is how to change the input method while entering text 1 When you use the onscreen keyboard to enter text the icon appears on the notification bar 2 Open the notificat...

Page 37: ...le to enter È touch and hold and the available accented letters and number 3 appear Then slide to choose È Touch to use uppercase Double tap to lock uppercase This key also changes to indicate the current case you are using for lowercase for uppercase and when locked in uppercase Touch to delete the text before the cursor Touch to select numbers and symbols You can then touch to find more Also oft...

Page 38: ...the following screen When the transcription appears you can touch DELETE to cancel the last dictated text Touch Input Settings Choose the touch input settings by touching Settings Language input from the Home Screen In the KEYBOARD INPUT METHODS section you can set the default input method and choose the settings for input methods Touch to start or pause voice typing Choose dictation language Retu...

Page 39: ...ch end of the selection Drag the tabs to change the selection Cut or copy Select the text you want to manipulate Then touch the Cut or Copy button to cut or copy the text to the clipboard Replace text with the clipboard text Select the text you want to replace Then touch PASTE Insert text from the clipboard Move cursor to the insertion point and then touch and hold the tab below the cursor Release...

Page 40: ...ch Between Recently Opened Apps 1 Touch and hold the Menu Key A list of the names and thumbnails of apps you ve used recently opens If you ve been using more apps recently than can fit on the screen you can scroll the list up and down 2 Touch a thumbnail to open that app You can swipe a thumbnail sideways to remove it from the list ...

Page 41: ...To enable always on data access 1 Touch the Home Key Settings Mobile networks 2 Tick the Always on mobile data box to allow applications to update data automatically IMPORTANT When you enable this option more data traffic will be generated for automatic updates of applications data And your phone will consume more power To get data services when roaming 1 Touch the Home Key Settings Mobile network...

Page 42: ...t from your service provider 4 Touch Save to complete TIP To set the APN to default settings touch the Menu Key Reset to default Select Network Mode 1 Touch the Home Key Settings Mobile networks Network Mode 2 Touch the type of network you prefer to connect Select Network Operator 1 Touch the Home Key Settings Mobile networks Network operators 2 Touch Search networks to search for all available ne...

Page 43: ...i 3 Touch a network name to connect to it 4 If the network is secured enter the password and touch Connect NOTE Your phone automatically connects to previously used Wi Fi networks when they are in range Get Notified of Open Networks 1 Touch the Home Key Settings Wi Fi 2 Slide the Wi Fi switch to the ON position 3 Touch the Menu Key Advanced 4 Check Network notification When Wi Fi is on you receive...

Page 44: ...D name If necessary enter security or other network configuration details 5 Touch Save Forget a Wi Fi Network You can make your phone forget about the details of a Wi Fi network that you added for example if you don t want the phone to connect to it automatically or if it is a network that you no longer use 1 Touch the Home Key Settings Wi Fi 2 Slide the Wi Fi switch to the ON position 3 Touch the...

Page 45: ... Key Settings Wi Fi 2 Touch the Menu Key Advanced to adjust the following settings Network notification Get notifications in the status bar when Wi Fi is on and an open network is available Keep Wi Fi on during sleep Set whether to keep Wi Fi on in sleep mode Avoid no Internet connections Only use Wi Fi networks that have Internet connection MAC address Check the MAC address IP address Check the p...

Page 46: ...ct with it The other device will receive a Wi Fi Direct connection prompt and need to accept the request for connection Both devices may need to enter a common PIN 5 Once connected the device is displayed as Connected Send Data via Wi Fi 1 Open the appropriate application and select the file or item you want to share 2 Select the option for sharing via Wi Fi The method may vary by application and ...

Page 47: ...wirelessly within a distance of about 10 meters The Bluetooth devices must be paired before the communication is performed Turn Bluetooth On Off 1 Touch the Home Key Settings Bluetooth 2 Slide the Bluetooth switch to the ON or OFF position When Bluetooth is on the icon will appear in the status bar Change the Device Name When your phone is visible to other Bluetooth devices it will be seen by its ...

Page 48: ...mon passcodes or consult the documents that came with the device Send Data via Bluetooth 1 Open the appropriate application and select the file or item you want to share 2 Select the option for sharing via Bluetooth The method may vary by application and data type 3 Touch a Bluetooth device the phone has paired with or wait for it to search for new devices and touch one of them Receive Data via Bl...

Page 49: ...ese files in an internal SD storage or on a removable microSD card If you are using USB tethering you must turn that off before you can use USB to transfer files between your phone and computer Connect Your Phone to a Computer via USB 1 Connect your phone to the PC with a USB cable 2 Open the Notification panel and touch 3 Choose one of the following options Charge only Charge your phone via USB U...

Page 50: ... your phone and the computer installed with Windows Media Player 1 Connect the phone with your computer via USB and choose Media device MTP 2 Open Windows Media Player and synchronize music files Disconnect Your Phone From the Computer To disconnect the phone from the computer simply unplug the USB cable when you re finished If the connection is USB mass storage flick down the notification panel a...

Page 51: ...ter which the files CANNOT be retrieved Sharing Your Mobile Data Connection You can share your phone s data capabilities through tethering or Bluetooth or by activating the mobile hotspot feature to create a portable Wi Fi hotspot Share Your Mobile Data Connection via USB You can access the Internet on your computer via the USB tethering feature of your phone The feature needs data connection on a...

Page 52: ... data charges NOTE When the portable Wi Fi hotspot feature is enabled you cannot use your phone s applications to access the Internet via its Wi Fi connection You still remain connected to the Internet via your mobile data network 1 Touch the Home Key Settings 2 Slide the Portable hotspot switch to the ON position to turn on Wi Fi hotspot After a moment the phone starts broadcasting its Wi Fi netw...

Page 53: ...ther users need to get your network SSID to find the Wi Fi hotspot Security Choose a security option Open not recommended WPA PSK or WPA2 PSK other users can access your mobile hotspot only if they enter the correct password When you select WPA PSK or WPA2 PSK touch the Password field to edit the security password 3 Touch Save to save your settings Share Your Mobile Data Connection via Bluetooth I...

Page 54: ...nside a secured local network VPNs are commonly deployed by corporations schools and other institutions to let people access local network resources when not on campus or when connected to a wireless network Depending on the type of VPN you are using you may be required to enter your login credentials or install security certificates before you can connect to your VPN You can get this information ...

Page 55: ...nect When you are connected the VPN connected icon appears in the status bar Modify a VPN 1 Touch the Home Key Settings More VPN 2 Touch and hold the VPN that you want to modify 3 Touch Edit profile and edit the VPN settings you want 4 Touch Save Delete a VPN 1 Touch the Home Key Settings More VPN 2 Touch and hold the VPN that you want to delete 3 Touch Delete profile ...

Page 56: ...to delete wrong digits 3 Touch the phone icon below the keypad to dial TIP To make an international call touch and hold the 0 key to enter the plus symbol Then enter the international prefix for the country followed by the area code and phone number End a Call During a call touch on the screen Answering or Rejecting Calls When you receive a phone call the Incoming Call screen opens displaying the ...

Page 57: ...he Call log is a list of all the calls you ve placed received or missed It provides a convenient way to redial a number return a call or add a number to your contacts To open the call log touch the tab in the Phone app Place a Call From the Call Log 1 Open the call log 2 Touch a number for more information about the call or touch beside it to call back Add a Call Log Number as a Contact 1 Open the...

Page 58: ...it Touch the Menu Key Edit number before call to edit the number in the dialer before calling it Touch to send a message If the number belongs to a contact you have touch to view contact details Delete the Call Log 1 Open the call log 2 Touch the number you d like to delete 3 Touch the Menu Key Remove from call log NOTE You can also touch the Menu Key Clear call log in the call log screen to delet...

Page 59: ... they left 1 Touch the Home Key 2 Touch and hold the 1 key in the dialer If prompted enter your voicemail password 3 Follow the voice prompts to listen to and manage your voicemail messages NOTE To set your voicemail service touch the Menu Key Settings Voicemail in the dialer and touch the voicemail settings you want to change For detailed information please contact the service provider Using Opti...

Page 60: ... can record phone conversation or switch to another call in progress Touch to end the current call WARNING Because of higher volume levels do not place the phone near your ear during speakerphone use Managing Multi party Calls When the call waiting and three way call features are available you can switch between two calls or set up a conference call NOTE The call waiting and three way call feature...

Page 61: ... dialer screen enter a number and touch the phone icon below the keypad 2 Once you have established the connection touch and dial the second number This puts the first caller on hold and dials the second number 3 When you re connected to the second party touch If one of the people you called hangs up during your call you and the remaining caller stay connected If you initiated the call and are the...

Page 62: ...ervice provider for assistance Set Voicemail Touch the Home Key Menu Key Settings Voicemail Touch Service to select voicemail service provider Your carrier is the default Touch Setup Voicemail number to edit the voicemail number Touch Ringtone to set the notification sound for new voicemails Touch Vibrate to set the condition for vibration Set Hearing Aids Your phone supports HAC Hearing Aid Compa...

Page 63: ...s 2 Touch Normal or Long Set Speed Dials You can touch and hold the 1 9 key from the dialer to call the corresponding speed dial number The number key 1 is reserved to speed dial your voicemail To assign a speed dial key 1 Touch the Home Key Menu Key Settings Speed dial 2 Touch a speed dial key 3 Enter a phone number or select one from the contact list 4 Touch OK Bar Certain Calls Call barring fea...

Page 64: ...ward when unanswered or Forward when unreachable to enable it Internet Call Settings To add an Internet calling account 1 Touch the Home Key Menu Key Settings Accounts 2 Touch Add account 3 Follow the instructions from your Internet calling service provider to configure the settings for your account 4 Touch the Menu Key Save To configure which calls use Internet calling You can configure your phon...

Page 65: ...rnet calling account you added to your phone 1 Touch the Home Key Menu Key Settings Accounts 2 Check Receive incoming calls Checking this setting will reduce your battery life between charges Other Options 1 Touch the Home Key Menu Key Settings Additional settings 2 Touch Caller ID to choose whether your number is displayed when someone receives your outgoing call Or check Call waiting to get noti...

Page 66: ...rite contacts Checking Contact Details 1 Touch the Home Key Contacts and touch the all contacts tab to access your contact list 2 Scroll through the list to view all your contacts 3 Touch a contact to view its details TIP Contact names are displayed in alphabetical order If you have a lot of contacts stored drag the slider on the right side of the screen to go directly to the initial you want Addi...

Page 67: ... Profile You can create your own name card in your phone 1 Touch the Home Key Contacts and touch the all contacts tab 2 Touch Set up my profile or your name whichever is at the top of the contact list 3 Edit your profile information and touch DONE Importing and Exporting Contacts You can import export contacts from to your micro SIM or microSD card This is especially useful when you need to transf...

Page 68: ...1 Touch the Home Key Contacts 2 Touch the Menu Key Import Export Import from SD card 3 Select an account in which to save the contacts 4 Select the vCard file s in the microSD card and touch OK NOTE If the microSD card is not installed in the phone you can import vCard file s in the phone storage Export Contacts to the micro SIM Card 1 Touch the Home Key Contacts 2 Touch the Menu Key Import Export...

Page 69: ...led in the phone you can export vCard file s into the phone storage Share contacts 1 Touch the Home Key Contacts and touch the all contacts tab 2 Touch the Menu Key Select item s 3 Touch the contacts you want to share to select them and then touch 4 Choose how to share the contacts Options depend on the applications and services installed Working With Favorite Contacts In the favorite contacts tab...

Page 70: ...ext to the contact name Remove a Contact From Favorites 1 Touch the Home Key Contacts and touch the favorite contacts tab 2 Touch a favorite contact and then touch next to the contact name Working With Groups View Your Contact Groups 1 Touch the Home Key Contacts and touch the contact groups tab 2 Scroll through the list to view the preset groups and the groups you create 3 Touch a group to view i...

Page 71: ...embers 6 Touch Delete a Group 1 Touch the Home Key Contacts and touch the contact groups tab 2 Touch a group and then touch the Menu Key Disband group 3 Touch OK to disband the group The contacts in the group will not be deleted Edit a Group 1 Touch the Home Key Contacts and touch the contact groups tab 2 Touch a group and then touch the Menu Key 3 Touch Rename group to edit the group name Or touc...

Page 72: ...etails 1 Touch the Home Key Contacts 2 Touch a contact you need to edit and then touch the Menu Key Edit 3 Edit the contact and touch DONE Set a Ringtone for a Contact Assign a special ringtone to a contact so you know who is calling when you hear the ringtone 1 Touch the Home Key Contacts 2 Touch a contact you want to set a ringtone for and then touch the Menu Key Set ringtone 3 Select a ringtone...

Page 73: ...contact you want to delete and touch the Menu Key Delete 3 Touch OK to confirm To delete several contacts you can 1 Touch the Menu Key Select item s in the all contacts screen 2 Touch to select the contacts you want to remove and then touch 3 Touch OK to confirm ...

Page 74: ...ollow the onscreen steps to enter the information about the account Most accounts require a username and password but the details may vary You may also need to obtain some information from IT support or system administrator Types of the accounts successfully added are displayed above Add account in Settings Remove an Account Removing an account will delete it and all information associated with it...

Page 75: ...tion on your phone or on the web are automatically synced with each other When auto sync is turned off you need to sync manually to collect emails updates or other recent information Sync Manually 1 Touch the Home Key Menu Key System settings 2 Touch the type and then the account you want to sync in the ACCOUNTS section 3 Touch the Menu Key Sync now Or touch the types of information you want to sy...

Page 76: ...in the ACCOUNTS section The Sync screen appears showing a list of information the account can sync 3 When auto sync is turned on check or uncheck items as you need Checked types of information on the phone and the web will be kept in auto sync ...

Page 77: ...nter these details manually by touching Manual setup or when automatic setup fails 3 Follow the on screen instructions to finish the setup Your phone will show the inbox of the email account and start to download email messages Checking Your Emails Your phone can automatically check for new emails at the interval you set when setting up the account You can also check new emails manually by touchin...

Page 78: ...he Inbox 2 Do the following as you need To do Reply to the sender touch Reply to the sender and all recipients of the original message touch Forward the message Touch 3 Edit your message and touch Mark an Email as Unread You can return a read email to the unread state for example to remind yourself to read it again later You can also mark a batch of emails as unread While reading a message touch t...

Page 79: ...Sending an Email 1 Open your email Inbox and touch NOTE If you have more than one email account added on the phone touch the sender line to select the account you want to use for sending the message 2 Enter a contact name or email address in the To field Separate each recipient with a comma You can also touch to select recipients from your contacts NOTE Touch the Menu Key Add Cc Bcc to send a carb...

Page 80: ...app 2 Touch the Menu Key Settings and select the account you want to add signature to 3 Touch Signature and enter the text 4 Touch OK Adding and Editing Email Accounts Add an Email Account After setting up your first email account see Email Setting Up the First Email Account you can add more email accounts and manage them separately 1 Open Email to get the Inbox screen 2 Touch the Menu Key Setting...

Page 81: ... and touch the account whose settings you want to change 3 Make the changes you want and touch the Back Key when you re finished Remove an Email Account 1 Open Email to get the Inbox screen 2 Touch the Menu Key Settings and touch the account you want to remove 3 Touch Remove account at the bottom of the screen and then touch OK Changing General Email Settings General settings apply to all email ac...

Page 82: ...ned in you will be prompted to do so or create a new account Swipe down on the screen to refresh your Inbox and download new messages Switching Accounts Gmail displays conversations messages and settings from one Google account at a time If you have signed in to more than one Google account on your phone you can switch accounts and view information in each account 1 From your Inbox touch the curre...

Page 83: ...image or a video touch the Menu Key Attach picture Attach video 6 Touch at the top right of the screen to send the message Adding Signature to Your Gmail Messages You can set a few lines of plain text as signature for every outgoing Gmail message The signature you set on the phone is independent of the signature you use for Gmail on the web 1 Open the Gmail app 2 Touch the Menu Key Settings and se...

Page 84: ...ch in the message header Reply all Forward the message touch in the message header Forward 3 Edit your message and touch the send icon Working With Received Attachments When a message has an attachment Gmail displays information about that attachment at the bottom of the message Depending on the attachment type the applications installed on your phone as well as your settings you may preview view ...

Page 85: ...ay appear below the search field You can touch a suggestion to search for it right away 3 In the search results touch the message you need and work with it just as you would with any Gmail message Working With Labels Message labels include both labels you create and default labels such as Sent Starred and Outbox You can organize your emails by labeling them or adding stars to them Labels also help...

Page 86: ...he Gmail app and touch in the message list the sender images in front of the messages you want to star 2 At the top of the screen touch Add star To view messages by label 1 Open the Gmail app and touch the current account at the top of the screen without checking any message 2 Touch a label below ALL LABELS to view messages with that label ...

Page 87: ...87 Changing Gmail Settings Touch the Menu Key Settings in any Gmail screen to change General settings which apply to all Gmail accounts or other settings that only apply to specific accounts ...

Page 88: ...to write a new text or multimedia message Touch to search for a message with keywords Touch an existing message thread to open the conversation you ve had with a certain number Sending a Text Message 1 On the Messaging screen touch at the bottom 2 Add recipients by one of the following ways Touch the To field and manually enter the recipient s number or the contact name If the phone presents a few...

Page 89: ...nd the text of the message as you do when sending a text message You can also include email addresses as recipients 3 Touch the Menu Key Add subject to add a message subject 4 Touch the paper clip icon to attach a file to the message 5 Touch or Send NOTE When you enter an email address as a recipient add a subject or attach a file the message is automatically converted to a multimedia message When...

Page 90: ...n the text box at the bottom You can touch the icon if you want to reply with an MMS 3 Touch Forwarding a Message 1 On the Messaging screen touch the thread that has the message you want to forward 2 Touch and hold the message 3 Touch Forward in the menu that opens 4 Enter a recipient for the message and edit the content if you want 5 Touch Viewing Details About a Message 1 Touch and hold a messag...

Page 91: ...d a message and select Delete 3 Touch Delete To delete message threads 1 On the Messaging screen touch and hold one thread you want to delete 2 If there are more threads you want to delete touch them one by one 3 Touch at the bottom 4 Touch Delete Changing Message Settings Touch the Menu Key Settings in the Messaging screen to change the Messaging settings ...

Page 92: ...me Screen and select Agenda Viewing Your Calendars and Events Select Visible Calendars 1 Open the Agenda app 2 Touch the Menu Key Calendars to display 3 Touch the calendars to check the ones you want to see or uncheck the ones you d like to hide Events from hidden calendars are not shown in the Agenda app Change Calendar Views You can view your calendars in different forms The app offers four view...

Page 93: ...In Week or Day view swipe horizontally to see earlier weeks days and later weeks days When you are viewing earlier or later days weeks or months touch Today at the top to quickly switch to today View Event Details In Agenda Day or Week view touch an event to view its details ...

Page 94: ... about the event NOTE If you have more than one calendar account you can choose a calendar account to which to add the event by touching the current calendar above the Event name box 3 Touch DONE at the top of the screen to save the new event Editing or Deleting an Event 1 Find the event you want to edit or delete 2 Open its details screen see Viewing Your Calendars and Events View Event Details i...

Page 95: ...oose how to share Changing Calendar Settings To change the calendar settings open a calendar view Day Week Month or Agenda Then touch the Menu Key Settings You can change General settings which apply to all accounts or other settings that only apply to specific accounts ...

Page 96: ...lect the photo video backup and contact sync options Organizing Your Contacts 1 Open the Google app 2 Touch People 3 Touch and enter the person you want to search for or select a suggested person and then touch Add or Follow 4 If you touched Add select the circle the person should be added to and touch OK or touch Create a new circle to set up new circles Getting Updates 1 Open the Google app 2 To...

Page 97: ...t messaging and video call 1 Touch Hangouts in the Google app or touch from the home screen Hangouts 2 Touch at the top right to create a new Hangout 3 Type the person s name email address phone number or choose a circle You can also select one of your contacts from the list below the search box 4 At the bottom of the screen touch either Message or Video call For chatting with messages enter the t...

Page 98: ...cussion of a common topic Touch Communities in the Google app to search and join all kinds of online communities on the Google network Events Touch Events in the Google app to manage your social calendar You can add events invite people and then share photos in real time from the event Locations Touch Locations in the Google app to see your friends locations on the map and configure your location ...

Page 99: ...Search the Web 1 Open the Browser app 2 Touch the address box at the top of the web page If the address box isn t visible scroll to the top of the web page to show it 3 Enter the address URL of a web page Or enter terms you want to search for You can also touch to search by voice 4 Touch a URL or search suggestion or touch Go on the keyboard to open the web page or search results TIP Touch the X a...

Page 100: ...ult This can make new Browser tabs open more quickly Default page Set the factory default URL as the homepage Most visited sites Every new browser tab displays a list of your frequently visited sites for you to choose from Site Navigation Every new browser window displays a site navigation screen with several shortcuts to specific websites Other Type a URL as the homepage Get Information About the...

Page 101: ...the page Touch to the right of the address box Find text on the page Touch the Menu Key Find on page and type the terms you want to search for Send the page URL to friends Touch the Menu Key Share page and select how you want to send the URL Save the page for offline reading Touch the Menu Key Save for offline reading You can touch the Menu Key Bookmarks SAVED PAGES to read them TIP Besides links ...

Page 102: ... number of currently active browser windows 2 Swipe vertically to scroll through the list of opened tabs 3 Touch the thumbnail of the tab you want to open TIP Swipe a thumbnail horizontally or touch its X to close the tab Touch X on the top right of the screen to close all tabs To use incognito tab for privacy browsing Pages you view in incognito tabs won t appear in your browsing history or searc...

Page 103: ...ads when in the Browser app Using Bookmarks Save web URLs as bookmarks to open them easily in the future To open a bookmark touch the Menu Key Bookmarks in a browser window and then touch the bookmark Bookmark a Web Page 1 Open the web page 2 Touch the Menu Key Save to bookmarks 3 Edit the bookmark label and address if necessary or choose a different account Touch the name beside Add to to change ...

Page 104: ... Delete a Bookmark 1 Touch the Menu Key Bookmarks in the web page screen 2 Touch and hold the bookmark to delete 3 Touch Delete bookmark 4 Touch OK Viewing Your Browsing History 1 Open the Browser app and touch the Menu Key Bookmarks 2 Touch the HISTORY tab 3 Touch a time span to view the web pages you browsed during then or touch Most visited to view your frequently visited web pages You can touc...

Page 105: ...You can configure a number of Browser settings to customize the way you browse the web including several that you can use to control your privacy To open the Browser settings screen touch the Menu Key Settings in the web page screen ...

Page 106: ...use Wi Fi and mobile networks to determine your approximate location Check GPS satellites to use GPS satellites to determine your location Check Location Google search to let Google access your location data for some services and improved search results NOTE To let Google apps such as Maps and Google access your location Location Google search should be checked Getting Your Location 1 Touch the Ho...

Page 107: ...rches appear in a list below the search box You can touch a suggestion to search for it TIP You can also touch beside the search box to use voice search 3 Touch the search key on the keyboard Red points indicating search results appear on the map 4 Touch a red point to open a card at the bottom with summary information about the location Slide the card up to find more information about the locatio...

Page 108: ...ps helps you find all kinds of businesses and establishments around you You can rate these places and get recommendations 1 Touch the Home Key Maps 2 Navigate the map view to the area you d like to explore You can explore nearby locations or pan the map to another location 3 Touch the search box at the top 4 Touch the Explore card and choose one option in the new screen Results will appear on card...

Page 109: ...109 share it with others NOTE The Explore feature is not available for all areas ...

Page 110: ...start your day how much traffic to expect before you leave for work and more You can turn Google Now on or off from within the Google app The first time you open the Google app see a brief explanation of how Google Now works and touch Next When you see Yes I m in choose it to begin 1 Touch the Home Key Google 2 Touch the Menu Key Settings 3 Slide the ON OFF switch next to Google Now Searching With...

Page 111: ...gle You can also the Home Key Voice Search 3 Speak the terms you want to search for or the question you want to ask When you re finished speaking your speech is analyzed and the search is initiated Changing Search Settings Open the Google app and touch the Menu Key Settings to set Google Now notifications my stuff your addresses and interests for Google Now in order to deliver relevant information...

Page 112: ...nd videos are stored to the phone s memory card or the phone s internal storage You can copy them to your computer or access them in the Gallery app Capturing a Photo 1 Touch the Home Key Camera 2 Aim the camera at the subject and make any necessary adjustment Number Function ...

Page 113: ...lide to zoom in or out 7 View photos and videos you have taken 8 Capture a photo 9 Switch between the camera and camcorder 3 You can either let the camera autofocus on the center of the screen or you can touch another area on the screen that you want to focus on 4 Touch the shutter icon to take the photo WARNING Keep a safe distance when using the flash Do not point the flash toward people or anim...

Page 114: ... Auto ISO Select ISO level or leave it at Auto Review time Set the auto review time for the taken picture You can turn off the feature Geo tag Select whether to store the GPS location in your captured photos Restore defaults Restore default camera settings NOTE Some options are not available for the front camera Taking a Panoramic Photo 1 Touch the Home Key Camera 2 Touch and then touch Panorama 3...

Page 115: ... 5 When you reach the end of your shot touch The panorama appears immediately and the phone displays a progress indicator while it saves the image 6 To view the image touch the thumbnail in the corner of the screen NOTE Touch the Back Key to exit the panorama mode Recording a Video 1 Touch the Home Key Camera 2 Slide the switch to open the camcorder 3 Aim the camera at the subject and make any nec...

Page 116: ... Turn on or off the flash only available for the back camera 3 Change the camcorder settings 4 Slide to zoom in or out 5 View photos and videos you have taken 6 Record a video 7 Switch between the camera and camcorder 4 Touch to start recording 5 Touch to stop recording ...

Page 117: ...h to open the following camcorder setting options Video quality Set the quality for your video Time lapse Set the time interval between each frame when you shot time lapse videos White balance Change white balance scenario or leave it at Auto Geo tag Select whether to store the GPS location in your recorded videos Restore defaults Restore default camera settings ...

Page 118: ...umber of albums To view album contents Touch an album to view the pictures and videos it contains To share albums 1 Touch and hold an album until it is selected 2 Touch more albums that you want to share 3 Touch at the top of the screen and select how you want to share the albums To delete albums 1 Touch and hold an album until it is selected 2 Touch more albums that you want to delete 3 Touch OK ...

Page 119: ...um to view the picture in full screen When viewing a picture in full screen the following options are available Swipe horizontally to see more pictures or videos Double tap the picture or pinch two fingers together or spread them apart to zoom out or in ...

Page 120: ...r view its details Touch to return to the album NOTE Some options may not be available for certain albums or pictures Retouch Your Pictures You can edit any photos you took and some other pictures in Gallery The changed picture is saved in the Edited album while the original image is never affected 1 Touch while viewing a picture in full screen to open the Edit interface If the icon is invisible t...

Page 121: ... the picture touch or at the top of the screen 4 Touch Save to save the new picture to the Edited album Share Your Pictures 1 Touch an album in the gallery and then touch a picture 2 Touch If the icon is invisible touch the screen first 3 Select how you want to share the picture Working With Videos Play Videos 1 Touch an album in the gallery 2 Touch the thumbnail of a video to start playing Touch ...

Page 122: ...122 Share Videos 1 Touch an album in the gallery and then touch and hold the thumbnail of a video 2 Touch at the top of the screen 3 Select how you want to share the video ...

Page 123: ... a Computer 4 Connect your phone and the computer with a USB cable 5 Open the Notification panel and touch 6 Touch Media device MTP if supported on the PC or USB mass storage to browse the files on the phone storage or the microSD card See Connect Your Phone to a Computer via USB 7 Copy the music files from the PC and paste them to the phone storage or microSD card Download From the Internet You c...

Page 124: ...aloged according to the information stored in the files Touch the tabs at the top of the screen to view your music library organized by Albums Artists Songs Playlists Folders or GenreList NOTE If an audio file is being played its summary information is displayed at the bottom of the music library screen Touch to open the playback screen Set a Song as the Default Ringtone The song will be used as t...

Page 125: ...e TIP If the song is being played you can touch the Menu Key Set as ringtone in the playback screen Delete a Song 1 Touch the Home Key Music to see the music library NOTE If you are in the playback screen touch to return to the music library 2 Touch next to a song in any list 3 In the menu that opens touch Delete OK Playing Music Touch a song in the music library to listen to it The following play...

Page 126: ...e current playlist 2 Playback control Skip songs or pause and resume playback Drag the slider to jump to any part of the song 3 Touch to return to the music library 4 Touch to add the song to or remove it from favorites Your favorite songs can be found in the Favorite playlist in the Playlists tab ...

Page 127: ...gs so that you can play the songs you like in the order you prefer Create a Playlist 1 Touch next to the song in the music library 2 In the menu that opens touch Add to playlist 3 Touch New 4 Type the playlist name and touch Save The playlist is created and the song you selected is added to the playlist Add a Song to a Playlist 1 Touch next to the song in the music library 2 In the menu that opens...

Page 128: ... 3 Touch Remove from playlist Delete or Rename a Playlist 1 Touch the Playlists tab in the music library to see all the playlists 2 Touch next to a playlist and touch Rename Playlist or Delete Playlist in the menu that opens NOTE These options may not be available for certain automatically created playlists such as Recently added ...

Page 129: ...o library Touch the tabs at the top of the screen to view the available videos ALL VIDEOS all videos on your phone LAST ADDED recently added videos on your phone CAMERA VIDEOS videos you have recorded with the phone s camera Playing and Controlling Videos Touch a video in the video library to play it The following video play screen appears ...

Page 130: ...o pause or resume the video play drag the slider to jump to any part of the video 3 Touch to share or delete the video 4 Touch to hide the onscreen controls Touch to display them 5 Adjust the video play volume Managing Video Files To delete videos 1 Touch and hold a video in the video library The video is ...

Page 131: ...y The video is highlighted 2 To share more videos touch them 3 Touch and select how you want to share them To rename a video 1 Touch next to the video you want to rename 2 Touch Rename 3 Type the new video name and touch OK To view details of a video 1 Touch next to the video you want to view the details of 2 Touch Details ...

Page 132: ...ing you can do the following Touch to pause or continue the recording Touch to cancel the recording 3 Touch to stop recording The memo is automatically saved If you don t want to save the memo after recording it touch OK to delete it Playing a Voice Memo To play a memo you just recorded Touch at the bottom of the screen To play any saved memo 1 Touch at the top right of the screen to see all recor...

Page 133: ...133 2 Touch the title of a memo to play it NOTE You can also touch next to a memo to delete rename share it check its file information add a tag or set it as your phone ringtone ...

Page 134: ...h as time repeat and alarm sound 4 Touch SAVE to save enable the alarm TIP You can touch in front of an existing alarm to enable or disable it Use Bed Clock Bed clock displays all alarms you have set 1 Touch the Home Key Alarm 2 If necessary touch the Menu Key Bed Clock Preferences in the Alarm screen to set up the following bed clock options Then touch the Back Key to return to the Alarm screen E...

Page 135: ...side to see all calculator buttons Cell Broadcasts Touch the Home Key Cell Broadcasts to view broadcast alert messages Touch the Menu Key Settings to change alert settings Chrome Touch the Home Key Chrome Google Chrome is a web browser on your phone When you sign in to Chrome with your Google Account you can enable sync to access your Chrome bookmarks browsing history and open tabs from other devi...

Page 136: ...er Quickly access all of your images videos audio clips and other types of files on your phone and the memory card Touch the Home Key File Manager Touch the folder name at the top of the screen to switch between the external microSD card storage and the internal phone storage NotePad Touch the Home Key NotePad to save and view your text notes Touch New at the bottom to create a new note Then enter...

Page 137: ...Updates Touch the Home Key System updates You can check your system s software status check for updates or change update settings YouTube Touch the Home Key YouTube You can watch YouTube videos or upload your own ...

Page 138: ...ng an app s name or description or the developer s name Just touch and enter the search terms Downloading and Installing Apps When you find the app you are interested in through browsing or searching touch it to open its details screen where more information about the app is displayed 1 Touch INSTALL free apps or the price paid apps If the app is not free you need to sign in to your Google Wallet ...

Page 139: ...Home Key Managing Your Downloads After you ve downloaded and installed an app you can rate it view it in a list with your other downloaded apps configure it to update itself automatically and so on View Your Downloaded Apps 1 On the Apps screen of Play Store touch the Menu Key My apps 2 Your list of installed apps opens you can touch one to rate it uninstall it request a refund and so on Uninstall...

Page 140: ...140 3 Touch Uninstall OK ...

Page 141: ...i on or off and configure your Wi Fi connections See Connecting to Networks and Devices Connecting to Wi Fi When Wi Fi is on touch the Menu Key Wi Fi Direct in the Wi Fi menu to share data between two devices via Wi Fi directly See Connecting to Networks and Devices Using Wi Fi Direct Bluetooth Turn Bluetooth on or off and configure your Bluetooth connections See Connecting to Networks and Devices...

Page 142: ...gtone and Notification Sound and select system sounds refer to Turning On Off Touch Sounds Display Brightness Set the brightness of the display Wallpaper Select a background image for the home screen Auto rotate screen Allow the screen to rotate the contents it displays when you rotate the phone Sleep Set the length of time of inactivity before the screen turns off automatically Font size Set the ...

Page 143: ...or spelling check and word suggestion KEYBOARD INPUT METHODS Configure text input settings See Knowing the Basics Entering Text Touch Input Settings Voice Search Language Select the language you use when entering text by speaking or searching by speaking Speech output Control when the phone should output speeches Block offensive words Replace offensive words with an asterisk when you use Google vo...

Page 144: ...o an example Play a brief sample of the speech synthesizer using your current settings Pointer speed Select how fast the pointer mouse should scroll when you connect the phone to a trackpad or mouse accessory Wireless and Networks Data Usage Touch the ON OFF switch to turn on or off mobile data You can check how much data has been used during the time circle you set set mobile data limit and warni...

Page 145: ... Connecting to Networks and Devices Connecting to Virtual Private Networks USB Tethering Share your phone s mobile data connection with PCs or other devices via a USB cable See Connecting to Networks and Devices Sharing Your Mobile Data Connection Share Your Mobile Data Connection via USB Bluetooth Tethering Share your phone s mobile data connection with PCs or other devices via Bluetooth connecti...

Page 146: ...ur phone Battery Check how much power remains for the battery and what has been using the battery Apps See apps installed on your phone and manage them Touch an app in the DOWNLOADED ON SD CARD RUNNING or ALL tab to see its information You can stop the app uninstall or disable the app clear data and cache or move the app between the internal storage and the memory card NOTE Not all applications ca...

Page 147: ... other services Security Screen lock Lock the screen with long press pattern PIN or password See Personalizing Protecting Your Phone With Screen Locks Make pattern visible Show the pattern as you draw it Automatically lock Set the time needed for the lock protection to be activated after the screen turns off Power button instantly locks Lock protection is activated immediately when you press the P...

Page 148: ...s you enter them Device administrators View or deactivate apps you have authorized to be device administrators Unknown sources Check this option to permit installation of apps from sources other than the Play Store Trusted credentials Display trusted CA certificates Install from SD card Install certificates from the memory card Clear credentials Delete all certificates Backup and Reset Back up my ...

Page 149: ...rd during the process Accounts Manage your accounts and synchronization Touch Add account to sign in to or create accounts on your phone Touch an account type to see that type of accounts you have added and adjust the accounts settings System Accessibility Configure the system accessibility options and accessibility plug ins on your phone such as using TalkBack for low vision users Developer Optio...

Page 150: ...150 About Phone View phone status legal information and other information You can also upgrade your phone system from update packages copied to the storage card ...

Page 151: ...ucts 2 Use the one press upgrade package offered by your mobile service provider 3 Use the upgrade package on your microSD card NOTE Visit ZTE official handset service support website http www ztedevice com support and click your country or region to learn more about the above upgrade methods as well as which phones and methods are supported ...

Page 152: ...ak at your current location for example in a basement or near a tall building because wireless transmissions can not effectively reach it Move to a location where the network signal can be properly received The network is busy at the current time for example during peak times there may be too much network traffic to handle additional calls Avoid using the phone at such times or try again after wai...

Page 153: ...trunk or phone line Unable to select certain features Your service provider does not support these features or you have not applied for services that provide these features Contact your service provider Battery not charge The battery or battery charger is damaged Contact the dealer The phone s temperature is below 0 C or higher than 45 C Adjust the battery charging environment to avoid extremes of...

Page 154: ...ated in an area where signaling is weak temporarily power off the phone The battery is depleted In high temperature environments battery life will be shortened Use a new battery If you are not able to connect to the network the phone will continue to send out signals as it attempts to locate a base station Doing so consumes battery power and will consequently shorten standby time Change your locat...

Page 155: ...ly Debris on the micro SIM card contacts Use a soft dry cloth to clean the micro SIM card contacts Unable to connect to the network micro SIM card invalid Contact your service provider You are not within the network s service area Check the service area with your service provider Poor signal Move to an open space or if you are inside a building move closer to a window Cannot answer incoming calls ...

Page 156: ...ings and then select Deactive All You have activated the Fixed dial numbers feature Go to Settings Call settings Fixed Dialling Numbers and disable it PIN Code blocked You have entered an incorrect PIN code three consecutive times Contact your service provider If the service provider provides the micro SIM card s PUK code use the PUK code to unlock the micro SIM card ...

Page 157: ...ile making calls Your phone may produce a bright or flashing light Small parts may cause a choking Don t dispose of your phone in fire Your phone can produce a loud sound Avoid contact with anything magnetic Keep away from pacemakers and other electronic medical devices Avoid extreme temperatures Switch off when asked to in hospitals and medical facilities Avoid contact with liquids Keep your phon...

Page 158: ...y set by the Federal Communications Commission of the United States During SAR testing this device was set to transmit at its highest certified power level in all tested frequency bands and placed in positions that simulate RF exposure in usage against the head with no separation and near the body with the separation of 10 mm Although the SAR is determined at the highest certified power level the ...

Page 159: ...RF exposure guidelines when tested with the device directly contacted to the body The FCC has granted an Equipment Authorization for this model phone with all reported SAR levels evaluated as in compliance with the FCC RF exposure guidelines SAR information on this model phone is on file with the FCC and can be found under the Display Grant section of www fcc gov oet ea fccid after searching on FC...

Page 160: ...d use such body worn accessory should be avoided FCC Compliance This device complies with part 15 of the FCC Rules Operation is subject to the following two conditions 1 This device may not cause harmful interference and 2 this device must accept any interference received including interference that may cause undesired operation CAUTION Changes or modifications not expressly approved by the manufa...

Page 161: ... correct the interference by one or more of the following measures Reorient or relocate the receiving antenna Increase the separation between the equipment and receiver Connect the equipment into an outlet on a circuit different from that to which the receiver is connected Consult the dealer or an experienced radio TV technician for help Distraction Driving Full attention must be given to driving ...

Page 162: ...protect users and their environment Always treat your phone and its accessories with care and keep it in a clean and dust free place Keep the screen and camera lens clean Unclean screen or camera lens may slow down the phone s reaction to your operations or lower image quality Clean the device and its accessories with a soft material such as cleaning cloth for eyeglass lenses Do not use alcohol or...

Page 163: ...or near heating equipments or high pressure containers such as water heaters microwave ovens or hot cooking utensils Otherwise your phone may be damaged Please check local regulations for disposal of electronic products Do not carry your phone in your back pocket as it could break when you sit down Small Children Do not leave your phone and its accessories within the reach of small children or all...

Page 164: ...etic media close to your phone for a long time Electrostatic Discharge ESD Do not touch the micro SIM card s metal connectors Antenna Do not touch the antenna unnecessarily Normal Use Position When placing or receiving a phone call hold your phone to your Main antenna GPS antenna Bluetooth Wi Fi antenna ...

Page 165: ...165 ear with the bottom toward your mouth Antenna Antenna ...

Page 166: ...ad one before when exposed to flashing lights or light patterns such as when playing games or watching video If you have experienced seizures or blackouts or have a family history of such occurrences please consult a physician Repetitive Strain Injuries To minimize the risk of Repetitive Strain Injury RSI when texting or playing games with your phone Do not grip the phone too tightly Press the but...

Page 167: ...amage your hearing Turn down the volume before using headphones Bluetooth stereo headsets or other audio devices Phone Heating Your phone may become warm during charging and during normal use Electrical Safety Accessories Use only approved accessories Do not connect with incompatible products or accessories Take care not to touch or allow metal objects such as coins or key rings to contact or shor...

Page 168: ...re fall do not use it until you have taken it to be checked at an authorized service centre Radio Frequency Interference General Statement on Interference Care must be taken when using the phone in close proximity to personal medical devices such as pacemakers and hearing aids Pacemakers Pacemaker manufacturers recommend that a minimum separation of 15 cm be maintained between a mobile phone and a...

Page 169: ...s Medical Devices Please consult your doctor and the device manufacturer to determine if operation of your phone may interfere with the operation of your medical device Hospitals Switch off your wireless device when requested to do so in hospitals clinics or health care facilities These requests are designed to prevent possible interference with sensitive medical equipment Aircraft Switch off your...

Page 170: ...tions with potentially explosive atmospheres obey all posted signs to turn off wireless devices such as your phone or other radio equipment Areas with potentially explosive atmospheres include fuelling areas below decks on boats fuel or chemical transfer or storage facilities areas where the air contains chemicals or particles such as grain dust or metal powders Blasting Caps and Areas Power off y...

Reviews: