background image

7. Interface of Parameter Setting Mode                                       

7-6 Parameter Setting 

7-6-1 Method for Setting Parameters 


Have Access to Parameter Setting Interface 

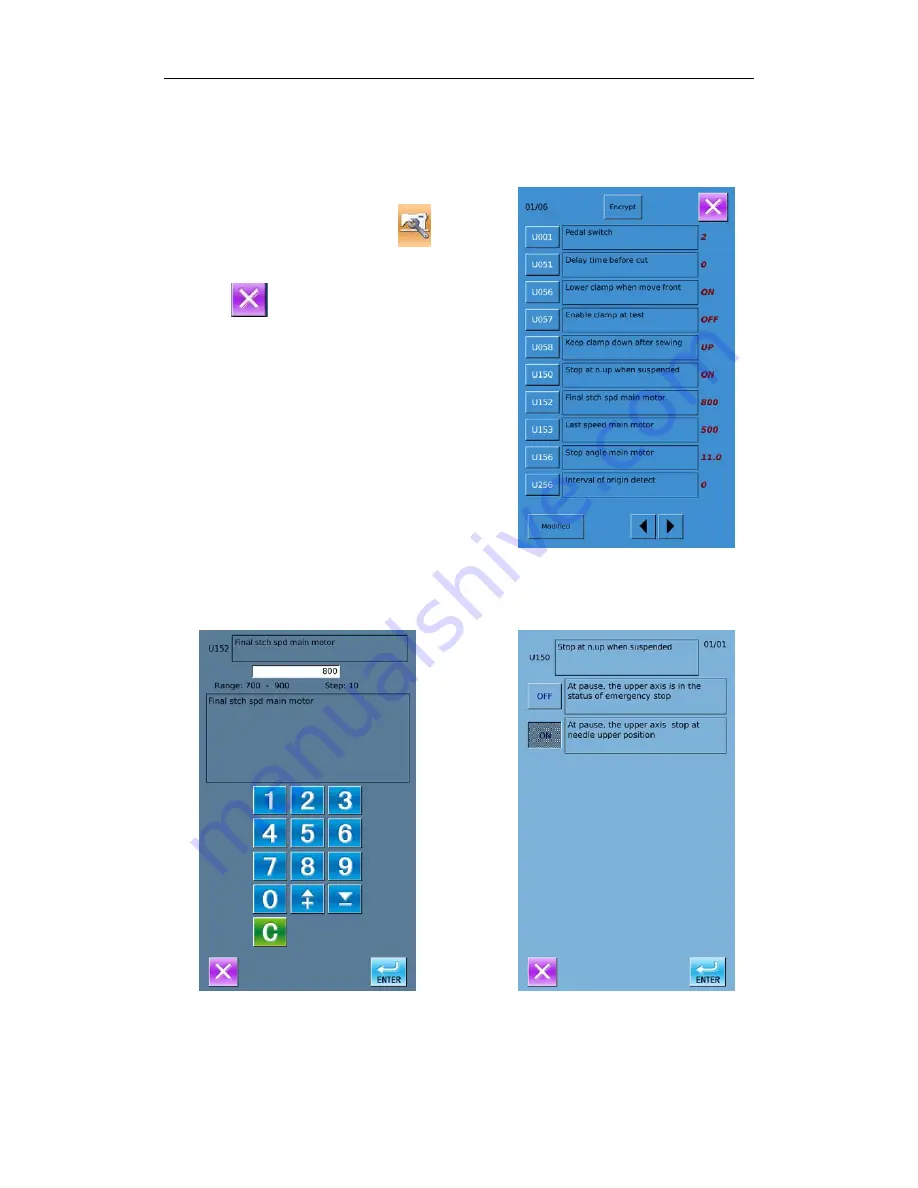
In Level 2 of Setting Mode, press

 to have 

access to the interface for setting U level parameters 
(as shown in right picture). 

Press 

  to quit the setting interface 

When some parameters are changed, the system 

will display the “Modified” in the parameter setting 
interface. 

 
Select the parameter for changing; Then the 

system will enter the setting status. The parameters 
are separated as “Data Input Type” and “Selection 
Type”. Please refer to the example at below: 


       Input Type


Selection Type 

 48

Summary of Contents for ZJ5820

Page 1: ......

Page 2: ......

Page 3: ......

Page 4: ......

Page 5: ......

Page 6: ......

Page 7: ......

Page 8: ......

Page 9: ......

Page 10: ......

Page 11: ......

Page 12: ......

Page 13: ......

Page 14: ......

Page 15: ......

Page 16: ...7 ...

Page 17: ......

Page 18: ......

Page 19: ......

Page 20: ......

Page 21: ......

Page 22: ......

Page 23: ......

Page 24: ...1 5 ...

Page 25: ...1 6 ...

Page 26: ......

Page 27: ...1 8 ...

Page 28: ...5 Basic Operating Instruction 5 Basic Operating Instruction 5 1 Operation Panel Front Side 4 Right Side Pattern Data Display Area Function Mode Button Area Power Cable U Disk Port 19 ...

Page 29: ...er turns on the power supply please turn the wheel 1 in the directions shown in figure B and make the print 2 face to the gap 3 directly A B Step Pedal for Start After user stepped the right pedal for start the feeding board will move to the position where the cloth is located In the operation panel the readiness status of the previous operation mode it might be Auto Mode Manual Mode Test Mode Cyc...

Page 30: ... pattern number patter shape length stitch number sewing speed and so on 2 Decrease Number of Software Parameter 3 Increase Number of Software Parameter 4 Increase Value Parameter Content 5 Decrease Value Parameter Content 6 ENTER Confirmation Key Confirm the parameter and the pattern data 7 Unlock Panel Lock Panel 8 Cloth tightening Permitted Cloth tightening Forbidden The default setting is the ...

Page 31: ...available sewing modes Auto Manual Test Cycle and Program 12 RESET Release the display of incorrect information 13 THREAD Have access to the threading mode 14 FRONT BACK Shift the positions of the feeding board Alternative positions Front Back 15 Cut before Sewing Cut after Sewing Non Cut Set the actions of knife 16 Parameter Management Have access to parameter setting 22 ...

Page 32: ...ode from P01 P20 1 for changing the content Pattern code 1 will change in the following sequence P01 P02 P20 C1 C2 C9 at each pressing press to change the code in the contrary direction Press The pattern data display area will display the parameter code 2 and the specific parameter information 3 at previous time Press to select the parameter code 2 Press to change the content of parameter 3 The sh...

Page 33: ...bar tacking sewing types set in parameter code No 40 are corresponding to the various values of bar tacking sewing length parameter 10 5 3 4 List of Pattern Parameters at S level According to the set content of other parameters the default value of some parameters may be unchangeable or invalid Parameter Code Content Range Unit Default Value S01 Sewing Speed 1000 2700rpm 100 1800rpm S02 Length of ...

Page 34: ...lt value of the parameter 01 sewing speed as standard 100 0rpm S14 Speed of Linear Bar tacking 1000 2500rpm if the sewing speed is lower than the linear bar tacking speed these two speeds will become equal 100 1800rpm S15 Stitch Number of Slow start 0 3 stitches 1 0 stitch S16 Speed of Slow start 400 1500rpm if the sewing speed is lower than the slow start speed these two speed will become equal 1...

Page 35: ...nt of Bar tacking in X Direction 1 0mm 1 0mm 0 1 0 0mm S29 Adjustment of incline angle of Bar tacking 3 1 1 0 S30 Round Head Correction 25 25 1 0 S31 Pitch of bar tacking at sewing end 20 100 5 100 S32 Stitch Number of Round coincidence 1 4 Stitches 45 以内 1 1 Stitch S33 Stitch moving when without cutting 1 2 1 1 S34 Cutting Size of Radial Hole 2 5mm 1 2 S35 Stitch Number of Radial 8 100 Stitches 1...

Page 36: ...Joint 0 2 0 8 0 05 0 Adjus 5 4 Confirm Pattern under Test Feed Mode tween needle and presser Press Test Key Test Feed Mode is that only cloth feeding board works normally when the upper shaft keeps still This mode is used to confirm the positional relation be Press to display the stitch form 1 pattern code 2 total stitch number 3 and leftover stitch number 4 in t display area he pattern data P20 C...

Page 37: ...ng under Test Mode or 2 stitches will be sewn at each pressing Holding for continuous sewing Note the leftover stitch number 4 displayed at the data display area will reduce 2 stitches at each time The buzzer will work at the last stitch No thread trimming actions and knife actions in test mode If user wishes the cloth feeding board to return to the cloth setting position at the ending of the test...

Page 38: ...ease press 2 stitches will be returned at each pressing The leftover stitch number 4 will add 2 stitches at each time Last Stitch Step Start Pedal 6 until the leftover stitch number turns to 0 and the cloth feeding board returns to the position for setting cloth After that the pattern data area will display END OF TEST FEED MODE 29 ...

Page 39: ...he interface shows as the picture at right Press the Knife Mode Key to shift the status to Non Cut 1 Cut before Sewing The sewing actions are after the cutting In the interface shown as the right figure shift the Knife Mode to the status of Cut before Sewing 2 At this time this mode will be displayed in area 3 30 ...

Page 40: ...board to a position more forward than standard position for setting cloth it will be easy for setting the cloth Especially at the status of Cut after Sewing the time of the cycle is shortened Move the cloth feeding board to the front In the readiness status of Auto mode Test Feed mode or Manual mode press Cloth Position Shift Key 1 to change the feeding mode to At this time the cloth feeding board...

Page 41: ...eading the upper thread Have access to threading mode In the readiness status of Auto mode Test Feed mode or Manual mode press Threading Mode Key 1 to shift from cloth feeding mode to threading mode At this time 1 The pattern data display area will have Threading mode press RESET 2 2 The thread holder goes into open status 3 The buzzer rings and the needle rod returns for 180 then the excitation o...

Page 42: ...ing Pattern 5 at pattern data display area as well as the Number of Production 6 at Production Counter Key Press to select the wanted pattern code 2 The pattern code will change in the following sequence P01 P02 P20 C1 C2 C9 at each pressing on Press to change the code in the contrary direction Select the wanted action of knife Non Cut Cut before Sewing Cut after Sewing Note For the detailed shift...

Page 43: ...Pattern Code 2 Knife Action 3 Total Stitch Number 4 and Leftover Stitch Number 5 are shown in the sewing data display area Press to select the wanted pattern code 2 The pattern code 2 will change in the following sequence P01 P02 P20 C1 C2 C9 at each pressing on Press to change the code in contrary direction Lay the fabric for sewing under the presser step the presser pedal 6 to lower the presser ...

Page 44: ...at sewing data display area will reduce 1 stitch Caution If the upper axis hand wheel turns reversly the cloth feeding board will not move the shape with the set stitch form Please don t turn the wheel reversely For stopping the manual sewing press emergence stop switch 8 when the cloth feeding board returns to the position for laying cloth The Pause Switch Is Pressed In Sewing is displayed on ope...

Page 45: ... position for laying cloth the system will hint END OF MANUAL MODE in the operation panel Caution When setting knife action as Cut after Sewing user shall look out the action of knife 6 3 Pause Switch Pause in Auto Sewing The pause switch is generally used for stopping the sewing machine at thread breakage and other circumstance 6 3 1 Methods for Pausing During the sewing press the pause switch 1 ...

Page 46: ...ESET button 2 when the interface displays InstancyStop Error Then the operation penal will show the sewing interface and the pattern data display area shows Press Reset or Down Release the error causing the pause If the upper thread is broken press to have access to the threading mode Press to display the total stitch number of pattern 3 and the leftover stitch number 4 in the pattern data display...

Page 47: ...ing Cyclical Pattern Program Max Amount for Cyclical Patterns 9 C01 C09 Max Amount of Single Pattern in a Cyclical Pattern 9 S1 S9 A single P pattern can be selected for many times Example We select a single pattern P01 3 steps with knife action and a single pattern P03 1 step without knife action to combine a cyclical pattern which is set as C1 for example The set contents of Cyclical Pattern Pro...

Page 48: ...the following contents 3 Step Code 4 Cyclic Program Code 5 Pattern Content Set in S1 Press to set the content of S1 5 as P01 The ___ in P01 means that this pattern has the knife action therefore the knife mark 6 is shown in the sewing data display area in P means the pattern in this step has not been set yet If you set the existing pattern as P the content in the following steps will be deleted Pr...

Page 49: ...to confirm the changed content Press to change the Step Code 3 to S4 Press to set the content of S4 6 as P03 Press Knife Action Key 7 to change the P03 at 6 to P03 Without Knife Action Press to confirm the changed content Press any key in 1 to end the setting in the Cycle Mode Note When selecting the cyclical program to perform the automatic sewing the user can change the knife action in the Auto ...

Page 50: ... data input interface and parameter setting mode interface as shown in right In the interface of parameter mode user can make some detailed settings and edition operations In the interface for inputting sewing data hold for 3 seconds then the system will have access to the setting mode Level 2 Setting Mode Level 1 Setting Mode Level 2 41 ...

Page 51: ... Software Version Inquiry In Level 1 of Setting Mode press to have access to the interface for inquiring the software version as shown in the right figure 1 Version of Operation Penal Program 2 Version of Controller Program 3 Version of X Axis Y Axis Stepping Motor Program 4 Version of Z Axis Stepping Motor Program 5 File System Version 6 Operation System Version 7 Compiling Time of Panel Program ...

Page 52: ...ess to confirm the input 7 4 Error Information Record In Level 1 of Setting Mode press to have access to the interface for recording the error information as shown in right In the interface the times of the various kinds of errors and the recent error information will be displayed The smaller number means the later occurrence Additionally the system will also record the production number at each w...

Page 53: ...pdate Have access to the interface of communication function Insert U disk in Level 2 of Setting Mode press to have access to the communication function mode as shown in the right figure Software Update Enter Software Update Interface Press to enter the software update interface as shown in right where user can update the software The updating software is located at update in U disk Click the cont...

Page 54: ...7 Interface of Parameter Setting Mode Finish Updating After the update the system will display the hint information Please restart the machine 45 ...

Page 55: ...erns from U disk user has to save the parameters into the DH_PARA in the U disk with name 9820Param When outputting patterns from operation panel user has to save the parameters into the DH_PARA in the U disk with name 9820Param The parameter file is the binary file which is operated on the control panel User can not change that file manually on PC or the file may be damaged Press Button A to Inpu...

Page 56: ...7 Interface of Parameter Setting Mode Press Button B to Output Parameters to Operation Panel A Press to output parameters from operation panel to U disk and quit B Press to quit directly 47 ...

Page 57: ...r setting U level parameters as shown in right picture Press to quit the setting interface When some parameters are changed the system will display the Modified in the parameter setting interface Select the parameter for changing Then the system will enter the setting status The parameters are separated as Data Input Type and Selection Type Please refer to the example at below Input Type Selection...

Page 58: ...t Press to erase one figure at each pressing Change the Parameter Input the right password to enter the interface for parameter encryption A Select the parameter for encryption B Press Select All to attach password to all the parameters C Press Reverse to select parameter for encryption in reverse way D Press to quit the encrypting function 49 ...

Page 59: ...t Space and then press Select Rest to restore this parameter to the default value User can select many parameters at here Press Parameter Number like U453 to enter the parameter setting interface where user can reset the parameter value 7 6 2 List of Parameters at U Level No Functions Description Range Changing Step Default Setting U001 1 Pedal 2 Pedals Switch 0 Single Pedal Simulation 1 Step the ...

Page 60: ... A Manual switch type or double pedal type press presser switch B pedal type return to pedal 0 1 1 0 U058 Keep clamp down after sewing 0 Up Presser goes up when the automatic sewing is finished 1 Down Presser keeps going down when the automatic sewing is finished Please perform the following operations when the presser rise A Manual switch type or double pedal type press presser switch B pedal typ...

Page 61: ... Forbid to change the sewing speed 0 1 1 0 U354 Forbid to edit the program code 0 OFF General Conditions 1 ON Forbid to change the program code but the step number in cycle can be changed 0 1 1 0 U355 Forbid to change Cut before Sewin g 0 OFF General Conditions 1 ON Forbid to change the action of Cut before Sewing If existing status is Cut before Sewing it will change to Non cut automatically 0 1 ...

Page 62: ...knife will become 25 200 5ms 25 U551 Air hammer origin height In readiness status Error code E650 will be activated when the value of air hammer position sensor is smaller than this value only effective when the air hammer origin error detection is turned on 150 170 1 160 U552 Air hammer origin error detection 0 OFF No air hammer origin error detection used when the air hammer position sensor is d...

Page 63: ...is parameter with a step at 5ms 0 50 5ms 30 U560 Bottom thread trimming time 0 100 the larger value is the later the thread trimming time will be 0 100 1 0 U561 Upper thread breakage sensor 0 OFF Device Invalid 1 ON Device Valid 0 1 1 0 U562 Start stitch number before upper thread breakage sensor 1 9 Sew the set stitches before the upper thread breakage detection 1 9 1 5 U563 Upper thread breakage...

Page 64: ...U752 Adjustment of X position on knife The set value is the adjustment of X position on knife which will be added into entire pattern program 0 50 0 5 0 0 05mm 0 U850 Sewing machine head configuration 0 00 Set configuration as 00 1 01 Set configuration as 01 2 02 Set configuration as 02 0 2 1 1 U852 Radial Hole Presser 0 OFF Use general presser except that of radial hole 1 ON Use the special progr...

Page 65: ...rameter initialization as shown in right 可以选择 User can select 1 LEVEL1 Para And C Program Level S pattern parameter and C pattern cycle program 2 LEVEL2 Storage Data Including U level parameters 3 LEVEL3 All Internal Data 4 LEVEL4 Initialize U disk The detailed initialization content is at below Level Content Clear of Initialization LEVEL1 LEVEL2 LEVEL3 Program Content Default value Default value ...

Page 66: ...er back up restoration as shown in right Clear Clear all the customized parameters that are saved Save Save current parameters Restore Restore the current parameters Click any key among to set the position for saving the parameter And then press Save to save that parameter Check the content on Custom xx On Off If On is displayed in bracket that means this position has the user parameter for an exa...

Page 67: ...5 8 ...

Page 68: ...9 ...

Page 69: ...6 0 ...

Page 70: ...6 1 ...

Page 71: ......

Page 72: ......

Page 73: ......

Page 74: ......

Page 75: ...6 6 ...

Page 76: ...6 7 ...

Page 77: ......

Page 78: ......

Page 79: ......

Page 80: ......

Page 81: ......

Page 82: ......

Page 83: ......

Page 84: ...7 5 ...

Page 85: ......

Page 86: ......

Page 87: ......

Page 88: ......

Page 89: ......

Page 90: ......

Page 91: ...8 2 ...

Page 92: ......

Page 93: ......

Page 94: ......

Page 95: ......

Page 96: ......

Page 97: ......

Page 98: ......

Page 99: ... load error M 013 Password save successful M 014 Clear all password failed Can not delete password file M 015 Fail to clear password After clearance of password the input of file has problem M 016 Password file is deleted without authorization Password file is deleted without authorization please turn off machine M 017 Can not input blank Input password again M 018 Current password not match Input...

Page 100: ...nter No X M 040 Not select an item Please select one or several parameters M 041 Successful Current operation is successful M 042 Failed Current operation is failed M 043 Initialize U disk Press Enter to perform operation Press ESC to quit The initialization will delete all the files in U disk M 044 Initialize memory Press Enter to perform operation Press ESC to quit The initialization will delete...

Page 101: ...age Threading method is wrong Thread correctly The upper thread tension is too large or too small Adjust the upper thread tension to a proper level The needle tip is broken or crooked Replace for a new needle The interval between needle and bend needle tip is incorrect Adjust the interval between the needle and bend needle tip to a proper level The needle bend needle and yarn divider don t match t...

Page 102: ... is not cut off The pressure on knife for trimming bottom thread is too low Adjust to a proper knife pressure level Can t hold bottom thread Adjust the bottom thread holder configuration 01 or bottom thread pressing board configuration 02 The leftover part of the upper thread after trimming is too short Adjust the assistant thread holder Stitch missing at sewing start The release upper thread is f...

Page 103: ...and check the device as below 1 Check the load at the main shaft and the blockage at the mechanism 2 Check the main motor 3 Initialize the main motor again 4 Check the mother board Special Malfunction E 006 Press Pause key at ready status Release pause switch E 007 Press Pause key at ready sewing Press RESET key E 008 Pause Key bad connection Turn off machine and check the device as below 1 Check ...

Page 104: ...ine and check the device as below 1 Check the connection of the cable at Z motor sensor 2 Check the Z sensor and its signal 3 Check the Z motor and its movement 4 Check the stepping driving board E 017 IPM Over current Turn off machine and check the device as below 1 Check the input voltage 2 Initialize the main motor again 3 Check the load at the main shaft and the blockage at the mechanism 4 Che...

Page 105: ...tion of the hammer and the blockage at mechanism 2 Check the pressure 3 Check the installation and working condition of the hammer sensor 4 Check the connection of the cable on the hammer sensor 5 Change the parameter U552 U553 and U554 to deactivate the detection sensor E 024 Power over voltage Turn off machine and check the device as below 1 Check the power supply Make sure it is stable 2 Check ...

Page 106: ...resser 2 Check the cable connection between the operation panel and the main control box E 034 Z motor running abnormal Turn off machine and check the device as below 1 Check the connection of communication cable on stepping board 2 Check the stepping driving board E 035 Motor close loop abnormal Turn off machine and check the device as below 1 Check the load at the main shaft and the blockage at ...

Page 107: ...troller 2 Check the stepping driving board E 044 Z motor busy Turn off machine and check the device as below 1 Check the cable connection between the stepping board and main controller 2 Check the stepping driving board E 045 Pattern stitch number error Turn off machine and check the device as below 1 Check the setting of pattern parameters 2 Check the cable connection between panel and main contr...

Page 108: ...10 Appendix 1 11 Appendix 2 11 1 Eyelet Buttonhole Machine System Diagram 99 ...

Reviews: