background image


Experiments – Z-stack (3D imaging) 
 

With Z-stack it is possible to acquire 3D dataset. There are two ways of doing Z-stacks, 
“first/last” or “center”. 
 
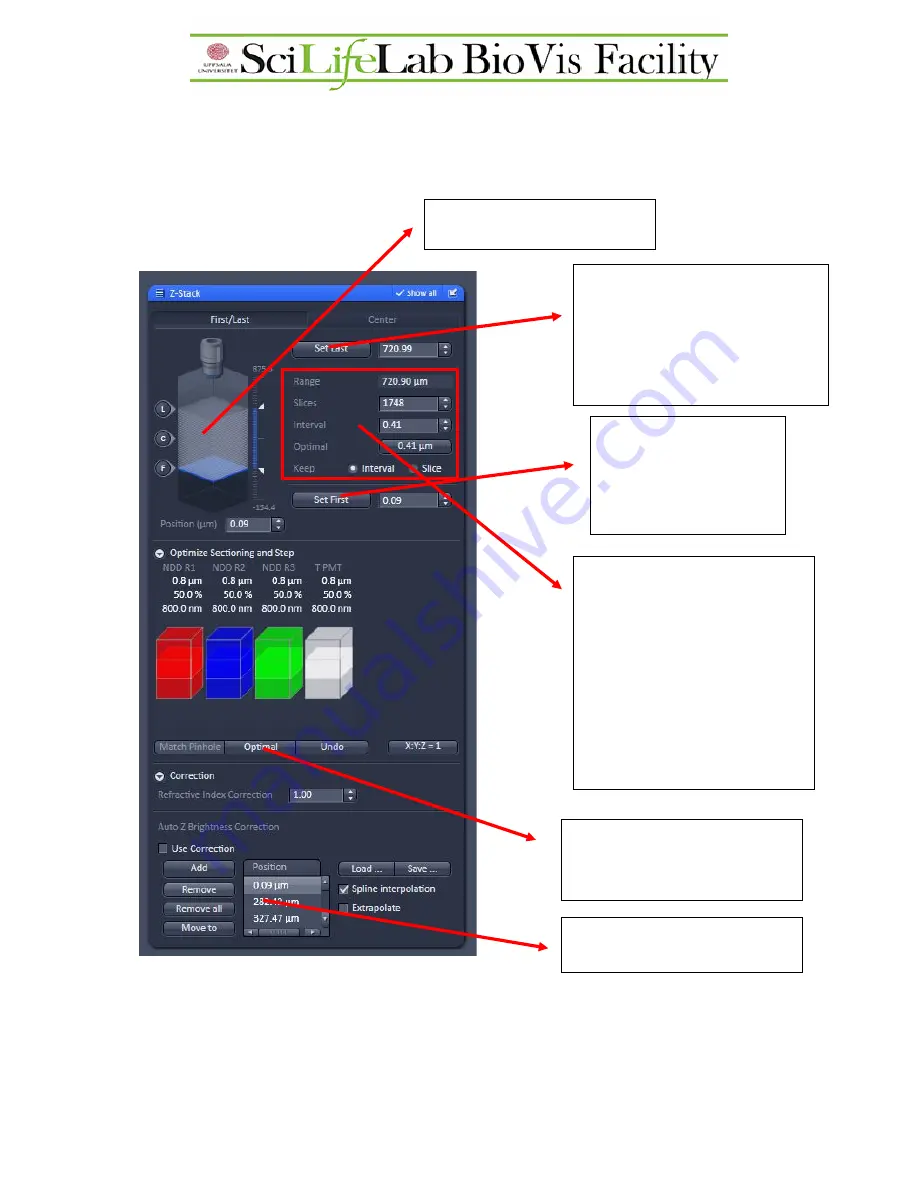
First/last: 


When finished with the setup, push 

Start experiment 

(in the experiments  menu)  to start 

acquire the Z-stack. If Snap is pushed, only a 2D image is acquired at the current location. 


Diagram showing the stacks and 
first/center/last positions   

1.


Go to 

Live

 mode, use the focus 

knob to find the end of the 
sample and push 

Set Last

 to 

select the end position of the 
sample where the last 2D stack 
should be made.


2.


Go to the other end of 
the sample and select 
the position where 
the first stack should 
be made


3.


Select the number of 2D 
stacks. Two ways of doing it, 
either one can select 

Interval 

and type in the interval 
between two stacks or select 
the 

Slice

 and type in the 

desired slice number. If 
unsure, push 

Optimal

 button 

to not lose any information 
between 2 stacks.


4.


Optimize the pinhole for all 
the channels. Note that this 
only works for LSM mode.


5.


Set up gradient intensity for 
deeper samples (if needed)


Summary of Contents for LSM 710 SIM

Page 1: ...ZEISS LSM 710 SIM Superresolution microscope Manual Quick guide confocal image SIM image Matyas Molnar Biovis 2016...

Page 2: ...box make sure all openings are closed before acquisition is started No need to touch Microscope stand Computer left side Real time PC open front and reset if ZEN cannot start Argon confocal laser Mai...

Page 3: ...cated on the laser box 5 Switch on the left computer 6 Login to the computer with your account 7 Wait 1 min so the system is fully booted 8 Start the ZEN software 9 If there is a connection problem wi...

Page 4: ...b Fluorescent lamp switch on with the button on its control box white box located on the laser box marked with X cite sign...

Page 5: ...amp ON OFF 1 Put into ON position 2 Tune it to 12 at least 3 Open the shutter Switching between fluorescence channels OBS The only available filter is the FSet77 HE which is a double filter for green...

Page 6: ...d SIM Elyra lasers ON OFF Acquisition mode changing the quality of the imaging resolution image speed averaging dynamic range setup Imaging setup selecting the excitation and emission for the differen...

Page 7: ...een simultaneous or sequential imaging Fastest is simultaneous best signal is sequential imaging imaging all fluorophores in different tracks Start stop acquisition Find the focus in the sample Auto a...

Page 8: ...se imaging Bleaching experiments Tile scan no stitching possibility exist for this instrument Imaging with specific regions Laser menu SIM lasers Elyra can be turned on here All the other lasers are e...

Page 9: ...he instrument as a spectrometer Emission profile for fluorophores Scanning windows for each PMT detectors Adding removing tracks Selecting excitation lasers Visible lasers Argon or HeNe or 405 invisib...

Page 10: ...ation is lost We must avoid seeing overexposed red areas By changing decreasing the detector gain or the laser AOTF in the channels menu we can move the overexposed areas into the range of the detecto...

Page 11: ...hange them freely to get the best image without ruining the sample Note that if you change the pinhole the signal is collected in a different Z range intensity is changed therefore new intensity adjus...

Page 12: ...ent if unsure try the sample with different speeds and use the best for the real acquisition Again COMPROMISE between time and quality decide what is more important Averaging noise random pixels are r...

Page 13: ...for contrasting the image or check the intensity Activating deactivating channels give virtual color or LUTs to channels Range indicator to see overexposure Reuse Reusing the acquisition settings of...

Page 14: ...find the end of the sample and push Set Last to select the end position of the sample where the last 2D stack should be made 2 Go to the other end of the sample and select the position where the first...

Page 15: ...ter of the sample and push Center to select the center position of the sample 2 Select Slice and give the slice number for the total range of the Z stack This will be divided above and below the cente...

Page 16: ...ents of the image window single plane of the export menu for exporting see next chapter When finished with the tiles setup push Start experiment in the experiments menu to start acquire the tiles If S...

Page 17: ...tton Note the data file is not an image file so it cannot be opened in all imaging software To save the data file go to File Save as select the saving location give a name to the file and save the dat...

Page 18: ...the fluorescent lamp and eyepiece Selecting excitation laser for SIM Elyra Resolution quality and cropping of the imaging make no change here Select the desired track number When laser selected the co...

Page 19: ...we work in the darker region of the histogram only What intensity is correct for SIM processing For each channel have at least 1000 2000 values in the histogram hover the mouse on the histogram to ge...

Page 20: ...th automatic processing then if needed fine tune the data with manual processing Automatic processing Go to Processing tab Select Structured Illumination from the list Select the desired dataset image...

Page 21: ...er space dummy not from the exact dataset but good for checking the effect of the different settings First check what parameters were used for automatic processing under the info tab Noise filter has...

Page 22: ...y check it in the booking homepage follow with these steps to shut down the microscope 6 Switch off all lasers in the ZEN software before close the software 7 Turn off the LASOS control panel idle pow...

Reviews: