
24
CLP-340/CLP-340M/CLP-340C
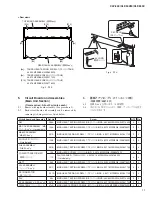
<Top view>
[120B]
[120C]
[120C]
[270]
[270]
[A]
[A]
PEDAL PIECE L
(ペダル本体(L))
PEDAL (SW)
PEDAL VR
ACTUATOR
(アクチュエータ)
RUBBER CONTACT
(接点ゴム)
VR ACTUATOR
(VRアクチュエータ)
SOLDER
(半田)
[B]
PEDAL VR
PEDAL (SW)
VR HOLDER
(可変抵抗取付金具)
WASHER
(ワッシャー)
Fig. 18(図 18)
[120B], [120C]: BIND HEAD TAPPING SCREW-B (B タイト+ BIND)
3.0X8 MFZN2B3 (WE774400)
[270]:
BIND HEAD TAPPING SCREW-B (B タイト+ BIND)
3.0X10 MFZN2W3 (WE774200) or
BIND HEAD TAPPING SCREW-B (B タイト+ BIND)
3.0X8 MFZN2B3 (WE774400)
Fig. 17(図 17)
27.
PEDAL (SW) シート、PEDAL VR シート
(所要時間:約 7 分)
27-1
PK ケーブルを外します。
(4-1 項参照)
27-2
ペダル Ass y を外します。
(26 項参照)
27-3
[270] のネジ 2 本を外して、アクチュエータを 2 個外し
ます。
(図 17)
27-4
[120B] のネジ 1 本を外して、ペダル本体 (L)を外し
ます。
(図 17)
27-5
PEDAL (SW) シートを止めている [A] のフレーム折り
曲げ部 3 箇所をペンチ等で真直ぐに戻し、[120C] の
ネジ 2 本を外します。PEDAL (SW) シートと PEDAL
VR シートを一緒に少し持ち上げて、右方向にスライド
させて外します。
(図 17)
27-6
PEDAL (SW) シートから接点ゴム 2 個を外します。
(図 18)
27-7
PEDAL VR シートに取り付けられている VR アクチュ
エータを抜き、[B] の六角ナット1 個とワッシャー 1 枚
を外して、可変抵抗取付金具を外します。
(図 18)
PEDAL (SW) シートと PEDAL VR シートを取り付け
ている半田を取り除いて、それぞれのシートに分けま
す。
(図 18)
27. PEDAL (SW) Circuit Board, PEDAL VR
Circuit Board
(Time required: About 7 minutes)
27-1 Disconnect the PK cable. (See procedure 4-1)
27-2 Remove the pedal assembly. (See procedure 26)
27-3 Remove the two (2) screws marked [270]. The two (2)
actuators can then be removed. (Fig. 17)
27-4 Remove the screw marked [120B]. The pedal piece L
can then be removed. (Fig. 17)
27-5 Straighten the three (3) bent frame portions marked
[A] securing the PEDAL (SW) circuit board using
pliers or the like and remove the two (2) screws
marked [120C]. Lift the PEDAL (SW) circuit board
together with the PEDAL VR circuit board a little and
then slide to the right to remove them. (Fig. 17)
27-6 Remove the two (2) rubber contacts from the PEDAL
(SW) circuit board. (Fig. 18)
27-7 Pull out the VR actuator mounted on the PEDAL VR
circuit board and remove the hexagonal nut marked [B]
and the washer. The VR holder can then be removed.
(Fig. 18)
Remove the soldering connecting the PEDAL (SW)
circuit board and PEDAL VR circuit board to separate
the PEDAL (SW) circuit board from the PEDAL VR
circuit board. (Fig. 18)
●
PEDAL ASSEMBLY
(ペダル Ass y)









![ADS AKX-FO(RS)-FO1A-[AKX-FO1]-EN Install Manual preview](http://thumbs.mh-extra.com/thumbs/ads/akx-fo-rs-fo1a-akx-fo1-en/akx-fo-rs-fo1a-akx-fo1-en_install-manual_2853544-01.webp)

