140
Automation
Digital Recording Console 02R User’s Guide
Event Extract
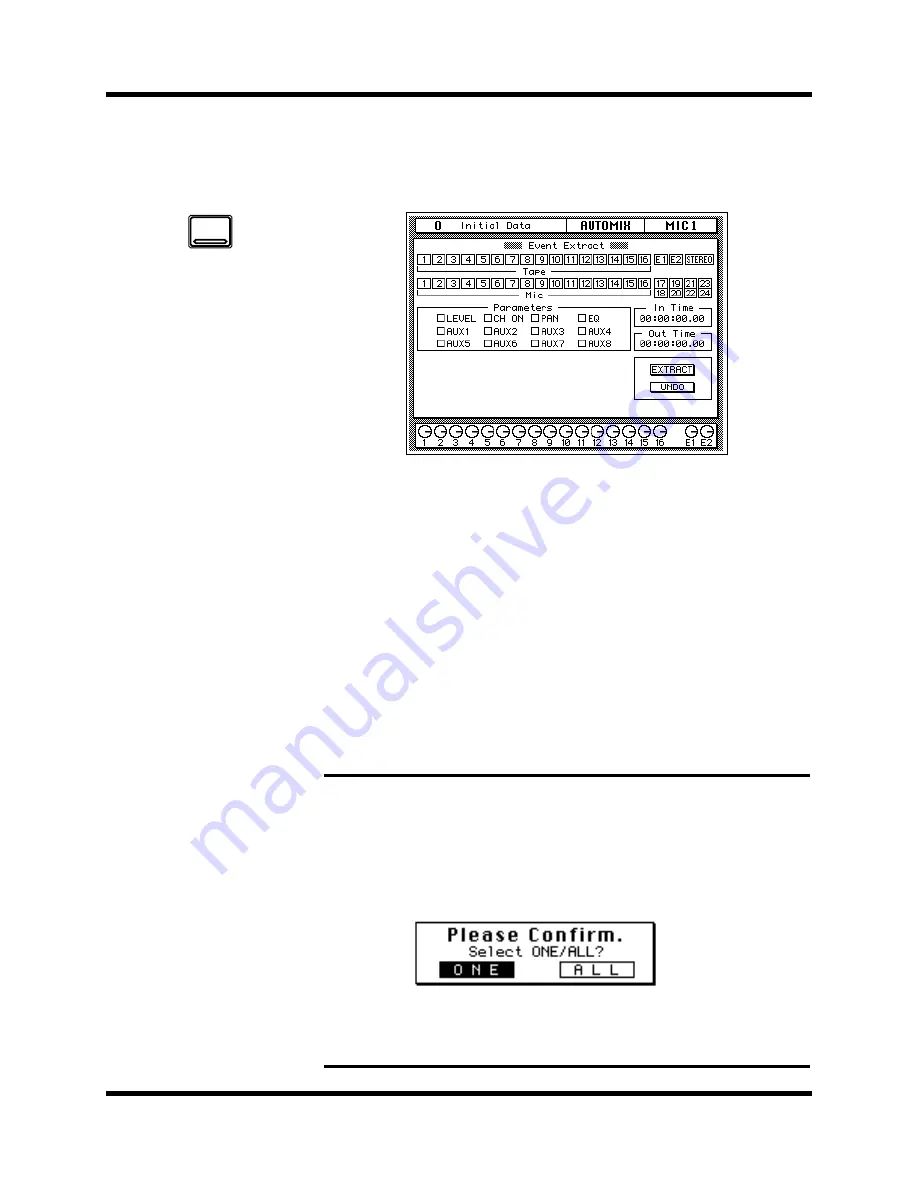
The last AUTOMIX display function is the Event Extract screen shown
below:
The top half of the display shows the channel status graphically for the
input channels (MIC/LINE 1 through 16, LINE 17/18 through 23/24), the
tape and effect return channels (TAPE 1 through 16, EFF1 and EFF2), and
the stereo output. The channels you want to extract are highlighted in
reverse video.
The bottom of the display consists of the “Parameter” block (LEVEL,
CH ON, PAN, EQ, AUX1, AUX2, AUX3, AUX4, AUX5, AUX6, AUX7, and
AUX8), the “In Time” timecode indicator, and the “Out Time” timecode
indicator. Below are the EXTRACT and UNDO control icons.
EXTRACT
Selecting this icon causes the 02R to delete all the applicable events
starting from the “In Time” timecode location up to, but not including,
the “Out Time” timecode location.
ONE/ALL
If you double-click the [ENTER] button when the cursor is on a channel
or an event type, that channel/event type will be turned on and all the
other channels/event types turned off,or all channels/event types will be
turned on.The 02R displays a confirmation popup which allows you to
chose one channel/event type or all channels/event types:
Use the CURSOR buttons to select “ONE” to turn one channel/event type
on and all the other channels/event types off, or select “ALL” to turn all the
channels/event types on. Press the [ENTER] button to execute your choice.
1.
Press the [AUTOMIX]
button.
An AUTOMIX display
function appears.
Press the [AUTOMIX ]
button repeatedly to get
to the “Event Extract”
screen.
2.
Select the desired
“Tape” and/or “MIC”
channel icons and the
“Parameters” check
boxes with the CURSOR
buttons and press the
[ENTER] button.
3.
Use the CURSOR buttons
to select “IN Time” and
change the value with
the encoder wheel.
4.
Use the CURSOR buttons
to select “Out Time” and
change the value with
the encoder wheel.
5.
Select the EXTRACT
control icon with the
CURSOR buttons and
press the [ENTER] button
to execute the
command.
6.
Use the CURSOR buttons
to select the UNDO
control icon and press
[ENTER] to undo the last
command.
AUTOMIX
Summary of Contents for 02R
Page 1: ...DIGITAL RECORDING CONSOLE E...
Page 7: ...DIGITAL RECORDING CONSOLE User s Guide User s Guide...
Page 21: ...12 Introduction to the 02R Digital Recording Console 02R Getting Started Guide...
Page 27: ...18 Getting Started Digital Recording Console 02R Getting Started Guide...
Page 49: ...40 Introductory Recording Tutorial Digital Recording Console 02R Getting Started Guide...
Page 75: ...66 Secondary Recording Tutorial Digital Recording Console 02R Getting Started Guide...
Page 103: ...94 Index Digital Recording Console 02R Getting Started Guide...
Page 104: ...DIGITAL RECORDING CONSOLE Getting Started Guide Getting Started Guide...
Page 106: ...ii Sections Digital Recording Console 02R User s Guide...
Page 126: ...16 Controls and Connections Digital Recording Console 02R User s Guide...
Page 192: ...82 Dynamics Digital Recording Console 02R User s Guide...
Page 222: ...112 Internal Effects Digital Recording Console 02R User s Guide...
Page 232: ...122 Scene Memories Digital Recording Console 02R User s Guide...
Page 262: ...152 Groups and Pairs Digital Recording Console 02R User s Guide...
Page 335: ...224 Specifications Digital Recording Console 02R User s Guide...
Page 343: ...232 Glossary Digital Recording Console 02R User s Guide...


