Automation
133
Digital Recording Console 02R User’s Guide
Memory Management
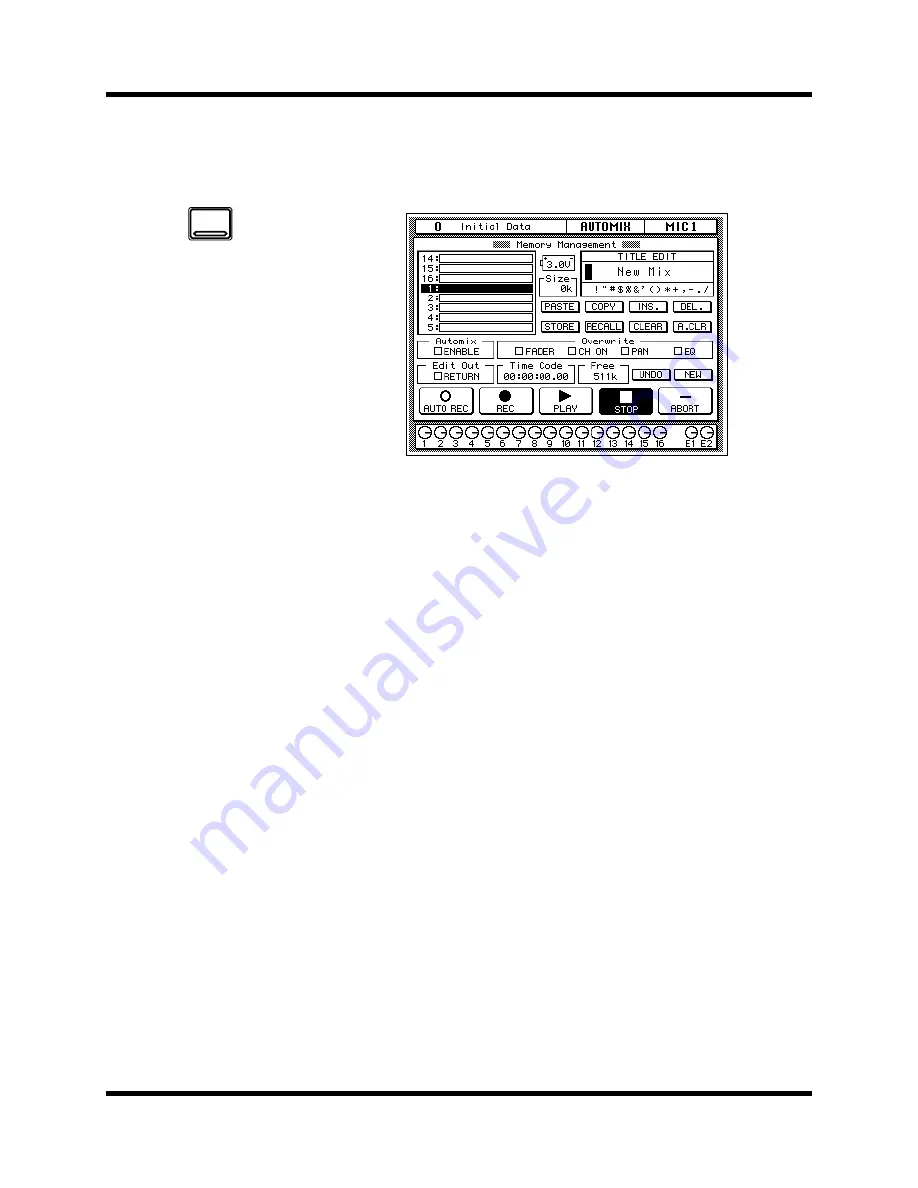
The second AUTOMIX display function is the Memory Management
screen shown below:
The top left of the display shows a scrolling list of the 16 AUTOMIX
memories.
The top right of the display is the Title Edit field. The CURSOR buttons
are used to select the character, and the encoder wheel is used to change
its value. AUTOMIX memory names can be up to 16 characters long.
Below the Title Edit field are the edit control button icons. Use the
CURSOR buttons to select from the PASTE, COPY, INS., DEL., STORE,
RECALL, CLEAR, and A.CLR icons.
Between the list of AUTOMIX memories and the Title Edit field is the
memory Size indicator.
The bottom of the display consists of three rows. The first row allows you
to set the Automix ENABLE and select the real-time edit Overwrite status
(FADER, CH ON, PAN, or EQ).
The second row allows you set the Edit Out RETURN. Beside that is the
current Time Code read-out and the Free memory indicator. At the end of
the row are the UNDO (which allows you to undo the last edit operation)
and NEW (which creates a new automix in the current buffer) icons.
The last row on the bottom contains the automation transport control
icons (AUTOREC, REC, PLAY, STOP, or ABORT).
1.
Press the [AUTOMIX]
button.
An AUTOMIX display
function appears.
Press the [AUTOMIX ]
button repeatedly to get
to the “Memory
Management” screen.
2.
Use the encoder wheel
to select an AUTOMIX
memory from the
scrolling list.
3.
Select the RECALL icon
with the CURSOR buttons
and press the [ENTER]
button.
4.
Edit the title with the
CURSOR buttons,
encoder wheel, and
[ENTER] button.
5.
Use the CURSOR buttons
to select the “Automix”
ENABLE check box and
press the [ENTER] button.
6.
Select the “Overwrite”
check boxes with the
CURSOR buttons and
press the [ENTER] button.
7.
Use the CURSOR buttons
to select “Edit Out”
RETURN check box and
press the [ENTER] button.
8.
Use the CURSOR buttons
and the [ENTER] button to
operate the automation
transport.
AUTOMIX
Summary of Contents for 02R
Page 1: ...DIGITAL RECORDING CONSOLE E...
Page 7: ...DIGITAL RECORDING CONSOLE User s Guide User s Guide...
Page 21: ...12 Introduction to the 02R Digital Recording Console 02R Getting Started Guide...
Page 27: ...18 Getting Started Digital Recording Console 02R Getting Started Guide...
Page 49: ...40 Introductory Recording Tutorial Digital Recording Console 02R Getting Started Guide...
Page 75: ...66 Secondary Recording Tutorial Digital Recording Console 02R Getting Started Guide...
Page 103: ...94 Index Digital Recording Console 02R Getting Started Guide...
Page 104: ...DIGITAL RECORDING CONSOLE Getting Started Guide Getting Started Guide...
Page 106: ...ii Sections Digital Recording Console 02R User s Guide...
Page 126: ...16 Controls and Connections Digital Recording Console 02R User s Guide...
Page 192: ...82 Dynamics Digital Recording Console 02R User s Guide...
Page 222: ...112 Internal Effects Digital Recording Console 02R User s Guide...
Page 232: ...122 Scene Memories Digital Recording Console 02R User s Guide...
Page 262: ...152 Groups and Pairs Digital Recording Console 02R User s Guide...
Page 335: ...224 Specifications Digital Recording Console 02R User s Guide...
Page 343: ...232 Glossary Digital Recording Console 02R User s Guide...


