background image

27

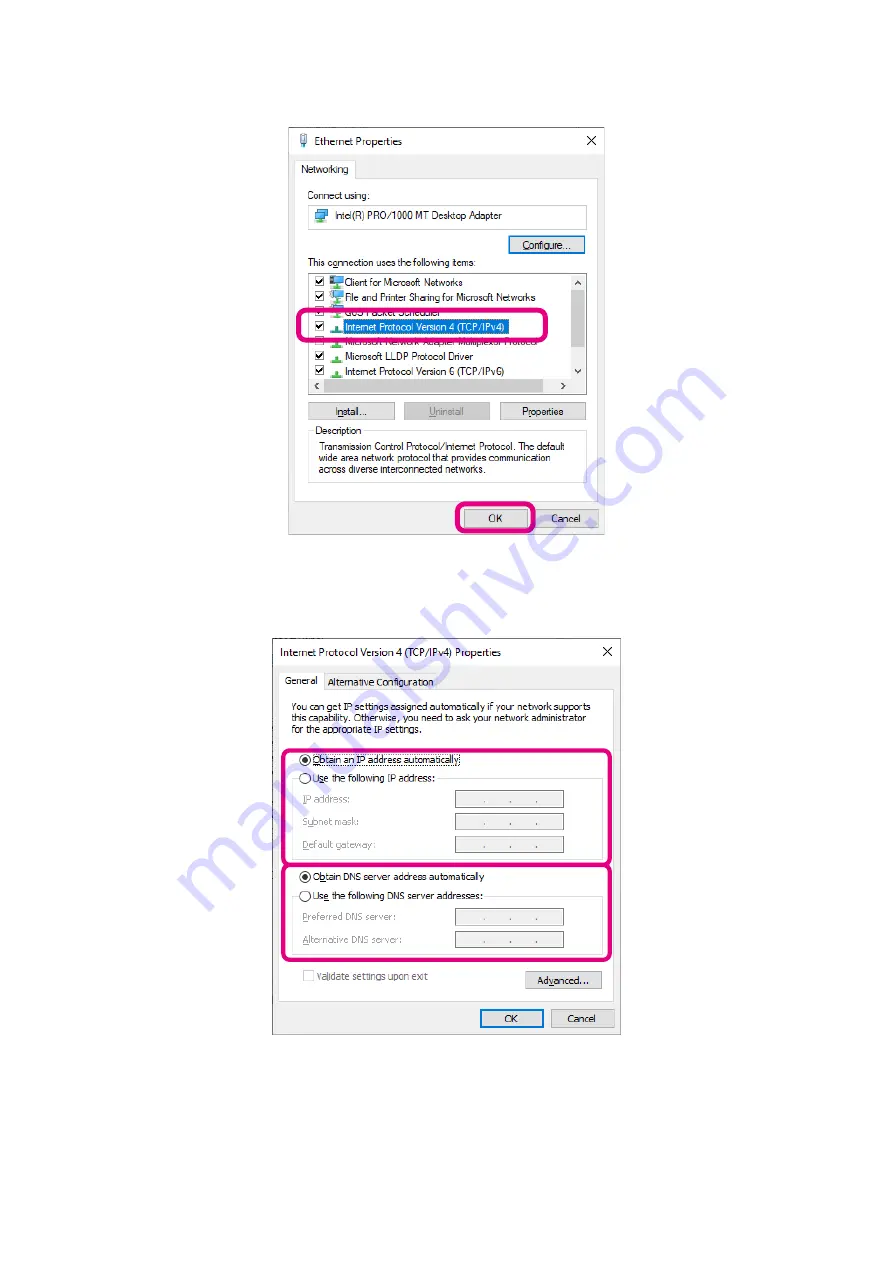
5.  Click [Internet Protocol Version 4 (TCP/IPv4)], and then click [

Properties

].

Internet Protocol Version 4 (TCP/IPv4) Properties

” screen appears.

6.  Set the LAN environment as it was in step 6 of “

Temporarily change the PC network settings

” (Page 

14)before the change.


If it was set to “

Obtain DNS server address automatically (B)

” before changing, it is automatically 

changed to “

Use the next DNS server address (E)

” So don't forget to bring it back.

7.  Click [

OK

] bottom.

8.  Close any open windows that you don't need.

This completes the work of restoring the network settings of the PC.

Summary of Contents for SCU-LAN10

Page 1: ...Network Remote Control System SCU LAN10 Installation Manual...

Page 2: ...at least 2 Mbps Upload speed at least 1 2 M bps are recom mended at the PC Side z z Ethernet cable Commercially available straight Ethernet cable category 5e or higher z z PC Software Download the SC...

Page 3: ...C network settings 14 Setting the SCU LAN10 18 Other functions of SCU LAN10 Setting Tool 23 Restore the network settings of the computer 25 Initial setting of FTDX101MP D 28 Settings for transmit audi...

Page 4: ...se Precautions for use Settings for remote operation require knowledge of PCs and networks as well as transceiver settings We do not provide support for the PC settings or network settings For the ope...

Page 5: ...ne or speaker the performance of the PC including the OS will be affected There fore the sound may be interrupted or the remote control may be delayed z z LAN z z Internet connection Download speed at...

Page 6: ...s not suitable for communications that require quick response such as contests and pileups The voice quality of the transmit and receive audio is altered It does not support image communication such a...

Page 7: ...old until the STAUS indicator red blinks with a thin object about 5 seconds and all the settings of this unit will return to the factory default Do not push the RESET switch too hard Rear panel AUDIO...

Page 8: ...es use a web browser such as Internet Explorer to access the IP address of the router or network device and display the setting screen Global fixed IP address or fixed domain name on the WAN side of t...

Page 9: ...LAN environment using a router such as in a house check the following three items with reference to the figure Router SCU LAN10 Other network device IP address Remote control PC IP address of the rou...

Page 10: ...ET Framework 4 X is enabled 1 Click Start 2 Scroll the Start menu and click the Windows System group 3 Click Control Panel The Control Panel screen appears 4 Click Programs and then click Programs and...

Page 11: ...older will be opened automatically 1 Double click SETUP exe in the folder The files are automatically extracted and the YAESU SCU LAN10 Installer screen is displayed If the User Account Control screen...

Page 12: ...U LAN10 setting software are installed When the installation is complete Congratulations Will be displayed 6 Click Finish Installation of SCU LAN10 Network Remote Control Software and SCU LAN10 Settin...

Page 13: ...igure and connect the SCU LAN10 directly to your computer with a commercially available straight Ethernet cable 3 Connect the SCU LAN10 and FTDX101MP D with the included ACC cable and USB cable ANT 1...

Page 14: ...al settings When you change the network settings you may not be able to connect to the Internet or network devices from your com puter so restore the settings at the end of this procedure Operations o...

Page 15: ...15 3 Double click the network adapter LAN card connected to SCU LAN10 The Ethernet status screen is displayed 4 Click Properties...

Page 16: ...erties Internet Protocol Version 4 TCP IPv4 Properties screen appears Please note that Internet Protocol Version 6 TCP IPv6 cannot be used 6 Make a note of all the settings below before making any cha...

Page 17: ...sk to 255 255 255 0 z z Leave the Default gateway field blank z z It is automatically changed to Use the following DNS server addresses No DNS server settings are required Leave the blank Enter 192 16...

Page 18: ...the same defaultuser as User When logging in for the first time or later enter the previously set value Enter defaultuser Automatically entered Automatically entered If you log in successfully the Ne...

Page 19: ...tion for initial setting Page 13 and recheck the device connection and network settings of the PC 4 On the New Account screen set User and Password for future remote control User Alphabet or number fr...

Page 20: ...control via the Internet WAN Modem LAN Router SCU LAN10 PC Other network device Internet Global fixed IP address or fixed domain name IP address of the router IP Address Subnet mask Set according to...

Page 21: ...a router only Set the same as IP address of LAN side of router Example 192 168 0 1 Control Port usually does not need to be changed If it conflicts with other software it can be changed within the ra...

Page 22: ...ge from 192 168 xxx 2 to 192 168 xxx 254 can be used but the range of IP address that may be automatically set by the DHCP function of the router It is recommended to leave it outside For general rout...

Page 23: ...he account settings for remote control Add Add the account used for remote control You can register up to two accounts 1 Click Add The new account settings screen is displayed 2 Enter User 4 to 32 alp...

Page 24: ...umeric characters and some symbols and click OK Uppercase and lowercase letters are distinguished The new password will be saved F W Update screen When the firmware of SCU LAN10 is updated the firmwar...

Page 25: ...the personal computer If you do not restore the settings you may not be able to connect to the Internet or network devices from your computer The following procedure uses Windows 10 operations as an...

Page 26: ...26 3 Double click the network adapter LAN card to which SCU LAN10 is connected The Ethernet status screen is displayed 4 Click Properties...

Page 27: ...p 6 of Temporarily change the PC network settings Page 14 before the change If it was set to Obtain DNS server address automatically B before changing it is automatically changed to Use the next DNS s...

Page 28: ...DE AM REAR SELECT USB FM RADIO SETTING MODE FM FM MOD SOURCE REAR RADIO SETTING MODE FM REAR SELECT USB CAT Rate setting Set the communication baud rate of CAT to 38400bps OPERATION SETTING GENERAL CA...

Page 29: ...gs such as Transmit Receive Interference Reduction Memory Scan etc CW operating Setting 3 Touch the item to set 4 Rotate the MULTI knob to select the item setting you want to change and touch the item...

Page 30: ...as Internet Explorer on your computer 2 Enter 192 168 default value in the address field and press the Enter key on your computer The initial value of the IP address of the router for displaying the s...

Page 31: ...X101MP D with the included ACC cable and USB cable Attach the two included ferrite cores to the bases of the connectors on both ends of the ACC cable using the cable ties accessory 1 Connection diagra...

Page 32: ...cially available straight Ethernet cable 3 Connection diagram for remote control within a local LAN using a router ANT 1 ANT 2 EXT SPKR KEY ACC TUNER PTT METER GND LINEAR 13 8V REM EXT ALC RS 232C A B...

Page 33: ...e control software When connecting to SCU LAN10 for the first time the Connection Setup screen will be displayed au tomatically You can also double click the YAESU SCU LAN10 icon on the desktop to sta...

Page 34: ...tial setting you need to set the same port number CAT Port PORT number used for remote control It can be set in the range of 49990 to 50009 Default setting 50001 Normally it does not need to be change...

Page 35: ...Make settings on the Windows system and fine tune on the screen of the remote control software during op eration Windows volume control 1 Click Setup and then click Audio Setup The Audio Setup screen...

Page 36: ...k the Level tab 5 Drag the Slide Bar to adjust the volume and then click OK This volume level is the system master volume You cannot hear the received sound if it is muted or is zero 6 Click the Recor...

Page 37: ...click Properties The Properties screen of the recording device is displayed 8 Click the Level tab 9 Drag the Slide Bar to adjust the microphone volume then click OK If it is muted no sound or set to...

Page 38: ...11 On the Audio Setup screen click Open System Mixer The Windows Volume Mixer screen appears 12 Drag the SCN LAN10 Remote Control Software slide bar to adjust the speaker volume 13 Click the X at the...

Page 39: ...same as the volume control bar on the SUB band operation block TX MONI Adjusts the volume of the transmit audio that is monitored by the monitor func tion This adjustment is the same as the MONI adju...

Page 40: ...beginning Click the warning sign to see the detected issues Refer to the Remote Control Unit SCU LAN10 Operation Manual for details on remote control operation The operation manual can be opened by cl...

Page 41: ...roduced without the permission of YAESU MUSEN CO LTD YAESU MUSEN CO LTD Tennozu Parkside Building 2 5 8 Higashi Shinagawa Shinagawa ku Tokyo 140 0002 Japan YAESU USA 6125 Phyllis Drive Cypress CA 9063...

Reviews: