Correct white balance adjustment is important for an exact color reproduction!
For an exact white balance, at least 10% of the recorded image should be white.
For a precise fixed white balance adjustment use the "One Push" white balance. This can be done by
pressing the assigned PRESET key
. When the white balance is stored an on-screen
message appears. Setting a "One Push" white balance switches off the "Auto Tracking" mode (when the
unit is switched off and on again the "Auto Tracking" mode will be reactivated).
For specialists: The Visualizer can be switched between "Auto Tracking", "One Push" and "Manual" white
balance mode in the on-screen menu (see page 18). If you work with negative transparencies and a
lightbox, use a blank (black in the image) part of the negative film for white balance adjustment! The "one
Push" white balance will be separately adjusted and stored for top light and external light (no light).
Each time the lighting condition changes, the Visualizer's camera must readjust its white balance, in order
to optimize the color reproduction. The lighting condition (color temperature) changes, for example, if
changing between the Visualizer's light and an external lightbox (optional bottom light) or if the room light is
turning on or off.
The standard setting of the Visualizer is "
Auto Tracking
" white balance.
(WHITE BALANCE)
Normally there is no need for a manual white balance adjustment. However, if the colors on the screen still
appear to be wrong, the white balance can be adjusted manually (one-push):
Hints to perform a One-Push white balance:
Top light (and room light)
:
Zoom in on a white object (e.g. a sheet of paper) until there is only white on the screen and press the
assigned PRESET key
(WHITE BALANCE)
.
Optional Lightbox with transparencies:
Turn off the light of the Visualizer with the assigned PRESET key
(LIGHT)
and switch on the lightbox.
Remove everything from the light box, zoom to the smallest picture size until there is only white on the
screen and press the assigned PRESET key
(WHITE BALANCE)
.
Optional Lightbox with x-rays:
Turn off the light of the Visualizer with the assigned PRESET key
(LIGHT)
and switch on the lightbox.
Place an x-ray on the light box, zoom out until the whole x-ray is picked up and press the assigned
PRESET key
(WHITE BALANCE)
.
Please note: False colors can also be caused by incorrect color settings on a connected projector or
monitor. It is recommended to adjust the white balance of the Visualizer at first and if the results are still not
satisfactory, the monitor or projector should be checked.
This means that the white balance
is continuously adjusted automatically.
White Balance Adjustment
13
IMPORTANT
Optional: Lightbox
When a lightbox is used, the top light of the Visualizer should be switched off with the assigned PRESET
key
(LIGHT)
. Using a bottom light has the disadvantage that the Synchronized Lightfield of the top light no
longer marks the pick-up area of the built-in cameras.
The recommended lightbox for the Ceiling Visualizer is the WolfVision Lightbox LB-38.
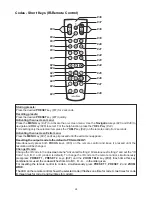
The info screen will be displayed by pressing the ? HELP key
(#24)
on the remote control.
Information like currently available recording time, recording state and audio settings will be displayed.
The info screen will be hidden after a few seconds automatically.
Info Screen (status)
At the left lower corner, respective icons will inform you about active streaming, recording and mic status
Status Icons
Summary of Contents for VZ-C6
Page 3: ...2 ...
Page 4: ...3 ...
Page 30: ... blank ...
Page 32: ...2 ...
Page 33: ...3 ...
Page 59: ... leer ...


