SmartPAC PRO User Manual
1143100
Chapter 6 – Using DiProPAC Die Protection (Optional)
197
Another difference is that the On and Off cursors move around the crank angle clock more slowly
when you press the plus and minus keys, enabling you to set Ready On and Ready Off angles more
precisely.
The On/Off actuation angles displayed in the Sensor window are not updated on every stroke. For
green and green quick check sensors, SmartPAC PRO displays the earliest On and latest Off angles
for the current sequence of press strokes (until you press UPDATE THE SENSOR ARC), updating
the display only when the sensor turns on before the previous earliest On signal or turns off after the
previous latest Off signal.
For green constant sensors, SmartPAC PRO displays the latest On and earliest Off angles, updating
the display only when the sensor turns on after the previous latest On angle and turns off before the
previous earliest Off angle.
EXAMPLE
If the On angle for a green quick check sensor fluctuates between 190
and 195
from stroke to
stroke, SmartPAC PRO continuously displays 190
as the sensor’s On value. However, if the
On angle changes to 189
, SmartPAC PRO displays the On angle as 189
on the next stroke.
To clear the actuation angles displayed for a sensor, press UPDATE THE SENSOR ARC. If the press
is stopped, the Sensor window displays zeros. If the press is running, SmartPAC PRO displays the
actuation angles for the next stroke.
NOTICE
Pressing the Update the Sensor Arc button may not properly update sensor actuations when you
are using a mechanical sensor, which vibrates constantly during the stroke. It is better to use an
electronic sensor that is not prone to constant contact bounce.
Pressing CHG REFERENCE ANGLE changes the reference angle used to determine earliest/latest
On and Off signals from 0
, the default, to 180
. Executing this function may be necessary to correct
On readings for green and green quick check sensors that actuate before and stay actuated after TDC.
When 0
is the reference angle, there can be no earliest On angle for a sensor that turns on before and
off after 0
since angles just before TDC (e.g., 330
) are numerically greater than those just after TDC
(e.g., 30
). You should press CHG REFERENCE ANGLE whenever the On/Off settings in the
Sensor window do not match the start and end points of the green actuation arc on the clock diagram.
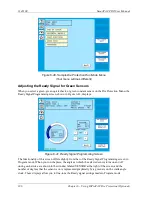
To adjust the Ready signal for green sensors, do the following:
1.
On the Die Protection Menu, select the desired sensor. The Ready Signal Programming screen
displays.
NOTICE
If you have turned off the sensor in Program mode, a message displays indicating that the sensor
is turned off. Press OK to clear the message.
2.
Run the press.
3.
Observe the On and Off angles displayed in the Sensor window and the green actuation arc
shown on the crank angle clock.
Summary of Contents for SmartPAC PRO
Page 1: ......
Page 2: ......
Page 4: ......
Page 6: ......
Page 20: ......
Page 22: ......
Page 24: ......
Page 42: ...1143100 SmartPAC PRO User Manual 42 Chapter 1 Introduction to SmartPAC PRO ...
Page 142: ...1143100 SmartPAC PRO User Manual 142 Chapter 4 SmartPAC PRO Program Mode ...
Page 200: ...1143100 SmartPAC PRO User Manual 200 Chapter 6 Using DiProPAC Die Protection Optional ...
Page 222: ...1143100 SmartPAC PRO User Manual 222 Chapter 7 ProCamPAC Instructions ...
Page 254: ...1143100 SmartPAC PRO User Manual Appendix C SmartView Remote Viewing and E mail Setup 254 ...
Page 280: ...SmartPAC PRO User Manual 1143100 280 Appendix C Reporting Downtime and Scrap to SFC ...
Page 290: ...SmartPAC PRO User Manual 1143100 290 Index Y yellow fault 232 yellow sensor 169 ...
Page 292: ......
Page 294: ......
Page 296: ......
Page 298: ......
Page 300: ......
Page 301: ......
Page 302: ......
Page 303: ......
Page 304: ......
Page 305: ......
Page 306: ......
Page 307: ......
Page 308: ......
Page 309: ......
Page 310: ......
Page 311: ......
Page 312: ......
Page 313: ......
Page 314: ......
Page 315: ......
Page 316: ......
Page 317: ......
Page 318: ......

