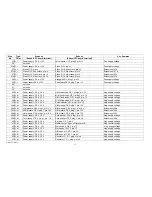
Transposer
Position
Frequency at
test point -
3520 Hz" in
Trimpot on
TP21 (Gen l)
M/Man
Trim pot on
TP 211(Gen
II) U /Man
Trimpot on TP
21 (Accomp.)
Accompanime
Key to hold
to achieve
'°middle A"
Hz
nt
C
3520
A
C #
3729
P12
P12
P1
G #
D
3951
P13
P13
P 2
G
D#
4186
P14
P14
P3
F#
E
4435
P15
P15
P 4
F
F
4699
P16
P16
P5
E
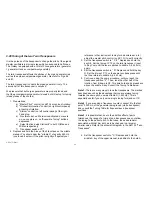
3.31 Testing of the Sound Computer
As we mentioned earlier, we urge you to postpone the installation
of the sound computer, especially its harness PR4, before the
entire organ is in perfect working condition under manual control.
If you followed the prescriptions of this manual so fat and have
reached this paragraph we must assume that your Galaxy is in
excellent health. That means it is ready to accept the sound
computer. Consult the manual AM 505 for information on the
installation, wiring and step-by-step initial operation of the sound
computer.
4 Final Steps
Your Galaxy building project is now completed. You deserve the
unconditional admiration of your family, friends and neighbours for
this accomplishment. As a result, you have created an outstanding
musical instrument which will provide you with a lot of excitement
and enjoyment for a long time to come. We are convinced that this
will be ample compensation for your work (and possibly some
frustrating stumbling blocks) luring the assembly period.
.
Now, once more, clean out the instrument by removing any residual
debris, temporary wires, hardware, tools, etc. Keep an eye open to
detect the smallest wire clippings. Remember the modified law of
gravity which applies to organ builders: Any conductive material will
eventually fall down (if it is at the bottom it will jump u p first). When
falling, it will deviate from a straight line towards the centre of the
earth and it will seek out a location where it can lodge between the
terminals of the most expensive components. (This law is also
called the "Revenge of the Neglected Wire Clipping.)
Dress the cables and harnesses again and fasten them together or
to the cabinet where needed. We know you will open the top of the
organ many times just to show it off.
Fasten the control panels to the uppermost C-bar, using a sheet
metal screw for each panel. Close the hinged rear panel, using
decorative screws (Phillips head with plastic plug). Close the
hinged front cover using two thumbscrews.
AM 075 (Part)
31
Summary of Contents for GALAXY
Page 1: ...Master Assembly GALAXY AM 075 AM 075 Part 1 ...
Page 4: ...Figure 1 Layout of the building blocks in the organ top AM 075 Part 4 ...
Page 5: ...Figure 2 Block diagram of the audio distribution and associated DC controls AM 075 Part 5 ...
Page 6: ...AM 075 Part 6 ...
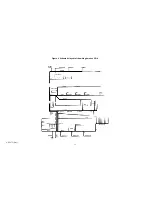
Page 33: ...Figure 4 Schematic layout of the wiring harness GO 4 AM 075 Part 33 ...


