background image


WAVELET DIGITAL VIDEO RECORDER 

46

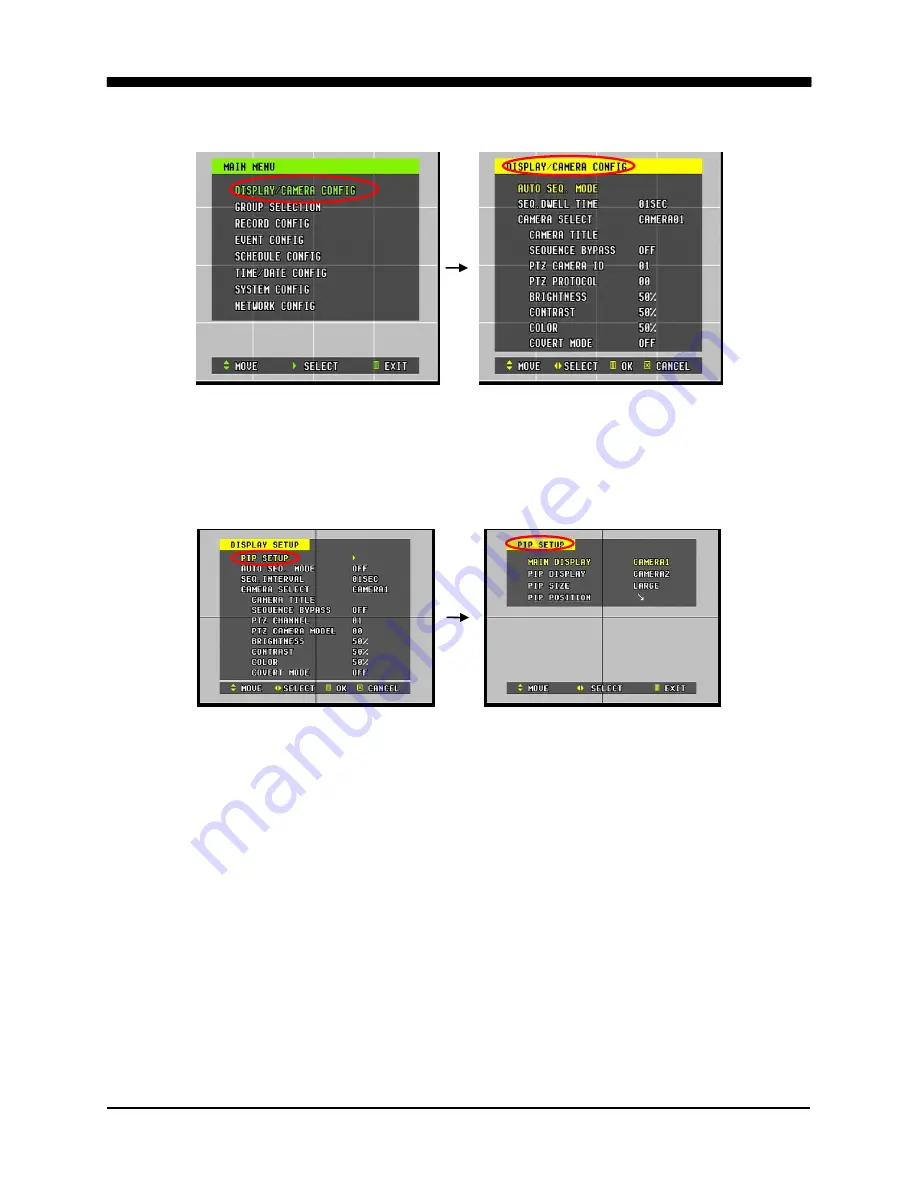
1.  DISPLAY/CAMERA CONFIG 


Display Config allows the user to change a variety of settings for cameras and main 
display options.  It includes sequenced display of cameras, PIP mode (4-ch DVR only), 
camera titles, PTZ configuration, picture adjustments and covert mode.   
 
1.  PIP SET 


Available only on the 4-ch DVR, the Picture-in-Picture function enables the display of 
secondary channel of choice in a smaller window while viewing one channel of choice in 
full screen mode.  Use the Display button to switch between the 4 channel mode and 
PIP mode.   
 

a. Main Display 

Select the Channel to display in the background. 
 

b. PIP Display 

Select the channel to display in the foreground. 


c. PIP 

Size 

Select between large and small size PIP window. 


d. PIP Position 

Select from the four corners of the screen. 


Summary of Contents for 16-ch Digital Video Recorder

Page 1: ...WAVELET DIGITAL VIDEO RECORDER 0...

Page 2: ...ng items are included in the box 1 Digital Video Recorder 2 NVAC RC110 Remote Controller 3 DVR Client Software CD 4 Power Cable 5 Two AAA Batteries 6 16 ch Loop Out Cable Only applicable to 16 ch unit...

Page 3: ...ftware described herein at any time without prior notice z No part of this guide may be reproduced transmitted transcribed stored in a retrieval system or translated into any language in any form by a...

Page 4: ...ur in a particular installation If this equipment does cause harmful interference to radio or television reception which can be determined by turning the equipment off and on the user is encouraged to...

Page 5: ...is machine sensible The Privacy act of 1974 5 U S C 552a Please note that Digital Video Recorders are intended for recording of surveillance use and should never be used in a manner that invades othe...

Page 6: ...ersonnel authorized by the equipment distributor z Stop operating the equipment immediately if it emits smoke or noxious fumes Failure to do so may result in fire or electrical shock Immediately turn...

Page 7: ...a heat source or expose it to direct flame or heat Neither should you immerse them in water Such exposure may damage the battery and lead to the leakage of corrosive liquids fire electrical shock exp...

Page 8: ...recharge the backup battery This procedure is necessary when using the DVR for the first time or after it has been unplugged for a long time from the power outlet Insufficient charging of the battery...

Page 9: ...L LA AY YO OU UT T 1 13 3 1 FRONT PANEL LAYOUT 13 2 REAR PANEL LAYOUT 16 3 REMOTE CONTROLLER 18 4 INSTALLATION AND CONNECTION 19 5 P T Z CAMERA CONNECTION 20 U US SI IN NG G T TH HI IS S M MA AN NU U...

Page 10: ...PIP SET 46 2 AUTO SEQUENCE MODE 47 3 SEQUENCE INTERVAL 47 4 CAMERA SELECT 47 CAMERA TITLE 48 SEQUENCE BYPASS 48 PTZ CHANNEL 48 PTZ CAMERA MODEL 49 BRIGHTNESS 50 CONTRAST 50 COLOR 50 COVERT MODE 51 2 G...

Page 11: ...HE DVR WEB CLIENT BY CONNECTING TO A DVR 88 INSTALLING THE DVR WEB CLIENT FROM THE PROGRAM CD 88 CONNECTING TO THE DVR USING THE WEB CLIENT 89 2 DVR WEB CLIENT 91 1 CAMERA DISPLAY SELECTION 92 2 WEB C...

Page 12: ...NA AG GE EM ME EN NT T S SO OF FT TW WA AR RE E 1 10 08 8 1 SYSTEM REQUIREMENT 108 2 INSTALLING DVRPLAYER 108 3 EXECUTING DVRPLAYER 111 4 DVRPLAYER 111 1 MAIN CAMERA DISPLAY WINDOW 111 2 CAMERA DISPL...

Page 13: ...135 Virtual DVR Context Menu 136 8 DVR SETUP 136 Display Setup 136 Group Selection 137 Record Setup 137 Event Setup 137 Schedule Setup 138 System Setup 139 V VI II II I S SP PE EC CI IF FI IC CA AT T...

Page 14: ...nel 2 DISPLAY This button is used to switch between multiple display modes single 4 channel 6 channel 8 channel 9 channel 13 channel and 16 channel split screen display modes 3 STATUS INDICATOR Four L...

Page 15: ...n Also used as a ENTER CH SEL button which selects and enables the configuration changes made on the menu and sub menu screens It is also used to reposition the camera from main display with another c...

Page 16: ...right corner of the screen AL VL and PL This button is also used to turn off the alarm buzzer 18 TIME SEARCH This button accesses the time search menu Use the directional buttons to select the date an...

Page 17: ...rmination for loop outs 4 AUDIO OUTPUT RCA jack connector 5 AUDIO INPUT RCA jack connector 6 MIC INPUT 1 8 Microphone Jack 7 ALARM SIGNAL INPUTS OUTPUT 8 USB 2 0 PORT External backup devices CD RW DVD...

Page 18: ...WAVELET DIGITAL VIDEO RECORDER 17 12 COMPOSITE VIDEO OUTPUT BNC connector for video output to a monitor 13 AC POWER SOCKET 14 115V 230V VOLTAGE SWITCH 15 POWER FAN 16 RS 422 485 PORT 17 VGA OUTPUT...

Page 19: ...NTROLLER REWIND PLAY POWER PAN TILT ZOOM BACK UP DVR ID MENU RESTORE RECORDING STOP FAST FORWARD DISPLAY MODE LOG INFORMATION AUDIO PB SCHEDULE REC ON OFF TIME SEARCH ENTER CH SELECT ZOOM FIELD BY FIE...

Page 20: ...WAVELET DIGITAL VIDEO RECORDER 19 4 INSTALLATION AND CONNECTION A1 A2 A3 A4 G A5 A6 A7 A8 G RELAY Example of a normally open alarm circuit...

Page 21: ...WAVELET DIGITAL VIDEO RECORDER 20 5 P T Z CAMERA CONNECTION...

Page 22: ...ft Right Use the directional buttons to navigate up or down between item selection Use the directional buttons to navigate left or right between item selections Use the directional buttons to modify t...

Page 23: ...r format and date using the numeric buttons Press the Menu Button to save and exit The password prompt will appear as soon as the time and date has been entered Enter 000000 as the default password Sc...

Page 24: ...counter Moreover it will also address several live view modes the DVR has to offer which include several multiple channel view modes automatic sequence modes and the channel swapping feature as well...

Page 25: ...he video signals every time the record button is pressed and continuously while the DVR is in recording mode 6 POWER LOSS ALERT Displayed when there was an interruption in the power supply The power l...

Page 26: ...late the remaining time until the next overwrite The remaining time may fluctuate based on the amount of information that changes per camera while recording 13 REMAINING HARD DRIVE SPACE Displays the...

Page 27: ...ard drives attached to the DVR USB DISK SIZE Displays the USB backup device s size HDD SIZE Displays the remaining and the maximum capacity of the internal hard drive s SYSTEM VERSION Displays the DVR...

Page 28: ...n to access the DVR s log chart The log chart keeps record of up to 255 pages of all the events and alerts totaling 2395 logs The events are recorded from the initial power on of the DVR The record of...

Page 29: ...and 480 frames per second for 16 ch DVR 1 LIVE VIEW SWITCH SEQUENCE The 4 ch DVR only has the quad view mode and the PIP view mode whereas the 8 ch DVR and the 16 ch DVR have quad 6 8 9 8 channels on...

Page 30: ...WAVELET DIGITAL VIDEO RECORDER 29 Live view sequence of 16 ch DVR...

Page 31: ...g will be displayed one after another If the 4 channel view mode is selected then it will maintain the format in sequence 3 CHANNEL SELECT REPOSITIONING On 6 8 and 13 channel view mode 6 and 8 channel...

Page 32: ...tched with camera 1 The switching function of cameras also applies during the playback 4 ZOOM During live view mode or during the playback it is possible to zoom into a section of the screen to get a...

Page 33: ...O RECORDER 32 Press the zoom button once more to zoom into the selected area on the screen Use the directional buttons to move the zoomed window around the screen Press the cancel OSD off button to re...

Page 34: ...ecord Group Picture Quality Fields Per Second per channel Audio Record Group 1 Super 15 off Group 2 Super 15 off Group 3 Super 15 off Group 4 Super 15 off 8 ch DVR Record Group Picture Quality Fields...

Page 35: ...repeat the playback from the earliest recorded data During the playback the DVR may be played back in reverse paused speed search up to 16 times normal speed or move field by field using the jog shutt...

Page 36: ...real time unlike the video data that can be recorded in various modes including real time There may be a slight delay in synchronization of the audio to video During the playback press the audio PB bu...

Page 37: ...tons except the lock button will be disabled Pressing the buttons on the DVR or the remote controller will have no effect To unlock the buttons press the lock button once more and then enter the admin...

Page 38: ...apacities they offer more flexibility Please note that internal hard drives inserted into an external bay have not been tested yet Moreover hard drives with additional features such as one touch backu...

Page 39: ...ictures during playback Please note that the backup icon will blink if the memory stick is below 1 GB Insert the memory stick into the USB 2 0 Port and the backup icon will appear and start blinking S...

Page 40: ...pages in the PTZ control menu can only be accessed using the fast forward and fast rewind button on the remote controller Please have the remote controller handy when using the PTZ camera 1 PAN AND T...

Page 41: ...omatic PTZ control offers basic automatic pan tilt or pan and tilt for the PTZ cameras It is also possible to customize the PTZ path as well as the focus zoom and iris of the PTZ camera All of these f...

Page 42: ...e directional button select the number that corresponds to the preset number to move the PTZ camera to preset positions Once all PTZ camera positions have been confirmed move the arrow to tour and the...

Page 43: ...s it is set to the standby mode until an alarm is triggered The DVR is not recording as long as the record LED is blinking When an alarm is triggered the record LED will turn solid The alarm alert and...

Page 44: ...tion grid setting may be ignored Press the record button and the record icon will appear as shown on the left The record LED will start blinking as it is set to the standby mode until motion detection...

Page 45: ...era and minute slot Press the time search button to start the playback The DVR will initially start to play all recorded channels simultaneously 2 EVENT SEARCH Press the alarm search button to access...

Page 46: ...WAVELET DIGITAL VIDEO RECORDER 45 IV ADVANCED SETTINGS Press the menu button to access the main menu for the advanced settings of the DVR The menu will display the following categories...

Page 47: ...ailable only on the 4 ch DVR the Picture in Picture function enables the display of secondary channel of choice in a smaller window while viewing one channel of choice in full screen mode Use the Disp...

Page 48: ...ny other channel view modes to stop the automatic sequence mode 3 SEQUENCE DWELL TIME 4 CAMERA SELECT This option enables the automatic sequencing of cameras connected to the DVR The default is off Th...

Page 49: ...systems press the appropriate numeric buttons or the number keys on the remote controller to enter the desired letters and numbers Refer to the following illustration for the sequence of alphabets and...

Page 50: ...PELCO P PROTOCOL 4800bps 18 PELCO P PROTOCOL 9600bps 19 PELCO Expanded PELCO 2400bps 20 PELCO Expanded PELCO 4800bps 21 PELCO Expanded PELCO 9600bps 22 Panasonic WV CS W85x WV CS86x 9600bps 23 HONEYW...

Page 51: ...t to previous menu f CONTRAST Highlight Contrast then press the right directional button to access the contrast adjustment screen Adjust the contrast using the left or the right button then press menu...

Page 52: ...RDER 51 h COVERT MODE Select between covert mode on and normal mode off If covert mode is activated the activated camera s display will be hidden on both the monitor and the DVR web client yet the vid...

Page 53: ...option may also be selected under group selection 1 RECORD GROUP This option selects the camera groups configured in the Record Setup which sets the fields per second and the picture quality The Defau...

Page 54: ...WAVELET DIGITAL VIDEO RECORDER 53 3 HDD OVERWRITE This option determines whether the DVR writes over old files when the hard drive becomes full By default the HDD overwrite is off...

Page 55: ...figured and stored 1 DEFINE GROUP 2 PICTURE QUALITY The file size represents the approximate size of each image per camera Define Group configures picture quality audio recording and field rate for ea...

Page 56: ...ution over cameras Select the audio recording on or off The default is off Please note that surreptitious third party interception of conversation is ILLEGAL under the federal law It is the user s res...

Page 57: ...to activate or deactivate the motion and the alarm features In the example to the left camera 1 s motion feature is activated Press the same numeric button once more to activate camera 1 s alarm featu...

Page 58: ...unt of time the DVR records after the initial motion or alarm detection The user may choose from 0 20 40 60 80 100 120 180 and 240 seconds Zero seconds continues to record until the recording is stopp...

Page 59: ...to stop the buzzer immediately Stopping the buzzer does not stop the alarm recording The buzzer is also heard when the HDD fails and will continue to buzz until the HDD failure has been addressed The...

Page 60: ...ional buttons to adjust the sensitivity level All grids are on by default b MOTION LEVEL This option configures the motion grid to trigger the motion recording It adjusts the motion sensitivity level...

Page 61: ...INPUT Select the different types of alarm circuit type The DVR accepts both normally open circuit signals and normally closed circuit signals Use the left or right directional buttons to select the ap...

Page 62: ...schedule is entered the schedule LED will blink a DAYS OF THE WEEK D W b START END The days of the week or all days of the week may be configured by pressing the numeric buttons Refer to the following...

Page 63: ...ecords everyday from 8am until 9pm as shown in example but records only from 12am until 8am on Mondays example and from 9am until 4pm on Tuesdays example Illustration will not be effective as it is en...

Page 64: ...ry that needs to be deleted Press the numeric button 6 to change the group to dotted bar Press the Menu button to save and exit to the main menu screen Press the right directional button to access the...

Page 65: ...new value and exit to the main menu If for some reason the date and the time were entered so that it conflicts and overlaps previously entered date and time the DVR will not overwrite the older data...

Page 66: ...ler 1 USER AND THE ADMINISTRATOR PASSWORD The user password is the general password used for non critical features such as unlocking the buttons after the auto button lock has been activated or to con...

Page 67: ...confirmed the DVR will automatically save the new password and exit to the System Setup Menu 2 FORMAT HDD Format HDD should only be used when the content of the internal storage needs to be wiped out...

Page 68: ...d displayed The example to the left displays 150 seconds remaining as it took 150 seconds to format previously Sometimes the internal storage cannot be formatted and the DVR will display Restart the s...

Page 69: ...matic mode Manual mode allows selective backup of recorded data Automatic mode backs up the entire content of the internal storage onto the external hard drive Automatic backup mode will also allow re...

Page 70: ...key tone to off to turn button beep off Up to 99 DVRs can be controlled using one remote controller To select the DVR to be controlled with the remote controller press and hold the DVR ID button Whil...

Page 71: ...al will distinguish the two solutions according to the commonly available service type to configure the DVR for the networking purposes 1 CONFIGURING THE DVR WITH A STATIC IP ADDRESS Internet service...

Page 72: ...ess the IP setup submenu Enter the IP address designated for the DVR and then enter the subnet mask and the gateway as provided by the Internet Service Provider If the network address and the host add...

Page 73: ...rts so that mainstream applications such as Hypertext Transfer Protocol HTTP Port 80 File Transfer Protocol FTP Port 21 Telnet Port 23 and Post Office Protocol 3 POP3 Port 110 are used The DVR utilize...

Page 74: ...AVELET DIGITAL VIDEO RECORDER 73 Open Internet Explorer then type in http 192 168 0 1 to access the router Enter the User Name and Password to access the router You will then be taken to the main menu...

Page 75: ...WAVELET DIGITAL VIDEO RECORDER 74 Click on Advanced tab to access port forwarding Virtual Server for D Link configuration page...

Page 76: ...as the three ports will have to be added individually Point each port to the DVR the default DVR IP address being 192 168 0 52 In the following examples DVR80 was used to label port 80 DVR7777 for po...

Page 77: ...WAVELET DIGITAL VIDEO RECORDER 76 The three ports are added as shown...

Page 78: ...namic IP addresses The following steps are not mandatory but they are highly recommended to properly set up the DVR directly with the Cable modems 1 The DVR and the modem should be powered off 2 Conne...

Page 79: ...no IP address has been issued yet 8 Wait approximately five minutes then the DVR Host Name should change to the DVR s unique host name At the same time the IP address should display the newly issued I...

Page 80: ...ngs 192 168 0 52 this section will explain how to configure the computer to connect directly to the DVR The following illustration was based on a computer system running Windows XP Professional On the...

Page 81: ...ER 80 Right Click on the Local Area Connection icon to drop a pull down menu then click on Properties to enter the Local Area Connection Properties Double Click on the Internet Protocol TCP IP to edit...

Page 82: ...address for the computer In this illustration the IP address entered is 192 168 0 50 Please note that any host address may be used as long as it does not conflict with the router s host address 1 and...

Page 83: ...tested and verified as compatible modems z US Robotics modem 2000 and on z Creative Labs Modem Blasters z Zoom z Hawkins z Dynalink The modems must be external modems with a serial interface and must...

Page 84: ...RECORDER 83 Click Next to continue Select Connect to the Internet and click Next to continue Select Set up my connection manually and click Next to continue Select Connect using a dial up modem and c...

Page 85: ...e phone number Enter dvr as the user name and enter the DVR s user password under the Password and Confirm password Uncheck Make this the default Internet connection and Turn on Internet Connection Fi...

Page 86: ...creen of the computer then double click on the icon to open the dial up connection window There will be no need to make any adjustments unless the number to be dialed is configured incorrectly This ex...

Page 87: ...rd has been verified a connection confirmation balloon will pop up at the bottom right corner of the monitor by the system tray Please note that the maximum connection speed between two modems is 33 6...

Page 88: ...irect to a server to download and install the plug in The second method involves installing from the program CD that was supplied with the DVR Installing the DVR web client also installs the DVR local...

Page 89: ...on the upper left corner of the internet explorer verifying the presence of the DVR web client If none present then an ActiveX security warning dialog will open Click on Yes to download install and ru...

Page 90: ...e if the host name of the DVR is Q00C66B then the host address of the DVR would be http q00c66b dvrhost com Following is a few sample addresses Static external public IP address http 24 168 44 180 Sta...

Page 91: ...ompt click on the advanced button to change the settings accordingly 1 Click on Modem user when logging onto the DVR after establishing a connection using the dial up modem enter http 192 168 0 60 on...

Page 92: ...WAVELET DIGITAL VIDEO RECORDER 91 2 DVR WEB CLIENT 1 2 3 4 5 6 7 8 9 10 11 12 13 16 15 17 14 18...

Page 93: ...on and the storage folder option for Live Record client background and grid color settings automatic timeout option and the data transmission method for the DVR It also displays currently installed we...

Page 94: ...hat the operation may slow down while accessing the DVR settings and live monitoring simultaneously It would be a good idea to disconnect by clicking on Suspend from the DVR if the connection speed is...

Page 95: ...ording or Schedule On Off b Change user password c Change administrator password 2 DISPLAY SETUP a Select camera b Enter camera title c Select PTZ channel and manufacturer d Adjust brightness Contrast...

Page 96: ...Select Record Group to record with b Select audio source c HDD overwrite On Off 4 RECORD SETUP a Select Record Group to define b Adjust picture quality c Audio Record on off d Adjust field rate activ...

Page 97: ...rd on off c Alarm Buzzer on off d Select camera for motion sensitivity and alarm input signal circuit type e Adjust motion sensitivity f Select alarm input signal circuit type 6 SYSTEM SETUP a Select...

Page 98: ...om live monitoring or to maintain the remote connection Note that previewing or downloading any recorded data will slow down both operations as it shares the same bandwidth After the selection has bee...

Page 99: ...o preview select the desired file in the following order Year Month Day Hour Time starting minute and seconds of the file b Click on Add to add the file to the list of files to be previewed or downloa...

Page 100: ...e window will pop up once the file preview has been completed as shown below Click on OK to return to the download manager 2 DOWNLOADING DATA FILE a To select a data file to preview select the desired...

Page 101: ...ll be downloaded into the directory The progress indicator will indicate the download progress of the current file and the total files e Download Done will pop up once the file preview has been comple...

Page 102: ...ull screen mode 6 P T Z CAMERA CONTROL When the P T Z camera control icon is clicked PTZ verification window pops up prompting the administrator s password If the correct password is entered the P T Z...

Page 103: ...tive of the recording settings on the DVR The field rates will vary depending on the connection speed to the DVR from the remote location and the performance of the computer 11 DATE AND TIME Displays...

Page 104: ...int screen and regional settings 2 CAMERA DISPLAY SELECTION From the left single 4 channel 6 channel 8 channel 9 channel 16 channel and next camera buttons These buttons will be automatically enabled...

Page 105: ...played on the DVR local player is reflective of the recording settings on the DVR However the field rates will vary depending on the playback resolution selected and the performance of the computer 7...

Page 106: ...REVERSE The playback speed can be increased up to 16 times the normal speed in forward and in reverse directions 15 PRINT The screen can be printed with the time and date by clicking on the print icon...

Page 107: ...player If no files are opened to play back then not loaded will be displayed If a file is opened then it will display the camera number the field rate it was recorded at the date and the time of the...

Page 108: ...pen the camera selection menu and scroll down to select the desired camera number for playback 8 PICTURE QUALITY SELECTION PULL DOWN MENU Click to open the picture quality selection pull down menu and...

Page 109: ...for its components and operating system The following chart displays the minimum and the recommended system specification to operate the CMS properly Minimum Recommended OS Windows 98SE Windows XP CP...

Page 110: ...Desktop Shortcuts The Start Menu Shortcuts and Desktop Shortcuts may be unchecked if desired Click on Next to continue Select the folder in which the program will be installed By default it is instal...

Page 111: ...WAVELET DIGITAL VIDEO RECORDER 110 3 EXECUTING DVRPLAYER Once you start the DVRPLAYER it will prompt you to enter a password The default password is 0...

Page 112: ...w When the actual video is displayed it will display the channel number and title as well as the field rate 2 CAMERA DISPLAY SELECTION From the top single 4 channel 6 channel 7 channel 8 channel 9 cha...

Page 113: ...he live or playback video These images can be saved in JPEG PNG BMP or PCX format 8 OSD MODE Toggles On Screen Display on or off 9 SETUP The general settings for the CMS Options for the OSD overlay an...

Page 114: ...If one or more Pan Tilt Zoom cameras are installed on the DVR they can be individually selected and controlled using the PTZ control box To control a channel specific PTZ camera simply click on the c...

Page 115: ...uto Pan Starts automatic panning of the camera between its preset boundaries 6 Auto Tilt Starts automatic tilting of the camera between its preset boundaries 7 Auto Pan Auto Tilt boundaries Button Fun...

Page 116: ...d events occur video loss video loss recovery alarm trigger motion detection recording stopped schedule off and backup stopped c BLUE The color remains blue as long as the DVRs are functioning within...

Page 117: ...on with the NAME block NAME DVR name either the host name or something created by the user In case of network connection error or power failure this block will blink in red in conjunction with the NUM...

Page 118: ...dow with its own DVR icon and name Moreover individual DVR icons also act as a supplementary icon to display individual DVR s status The status of the DVR is displayed in five different icons 1 Normal...

Page 119: ...alize the connection process or Cancel to return to the main window 4 System abnormality If alarm motion trigger or some system abnormalities such as video loss occurs the icon will display a question...

Page 120: ...nformation from the DVR icons in DVR Window the Camera Status Bar displays the status of individual cameras The cameras are displayed according to the channel When the CMS is in live mode for either a...

Page 121: ...default port for CMS is 9999 The port is entered automatically with Auto Scan Administrator s Password Enter the administrator s password to access the DVR The password is entered as 000000 with Auto...

Page 122: ...click on Del From List Setup If the settings of the DVR needs to be modified after adding the DVR click on Setup to open the DVR settings window Property Property displays general information about a...

Page 123: ...the cameras with alarm triggers to be prioritized and arranged automatically in either Auto Arrange or Auto Insert Arrange Motion Check this option to have the cameras with motion triggers to be prior...

Page 124: ...WAVELET DIGITAL VIDEO RECORDER 123 19 POWER Terminates and exits from the CMS...

Page 125: ...ra Title The DVR name and the camera title is displayed on top left corner of each channel DVR host name will be displayed if Auto Scan feature was used b Channel Status Displays the current status of...

Page 126: ...hat a Virtual DVR consists of multiple cameras selected from multiple individual DVRs Selecting a group of cameras to monitor Verify that individual DVRs are listed under DVR Window and a Virtual DVR...

Page 127: ...lable cameras under Virtual DVR In the example to the left all available 12 cameras are displayed starting at channel 7 Individual cameras can be added onto the Virtual DVR by click and dragging indiv...

Page 128: ...while the rest of the channels are in live monitoring mode Dual display is available for both individual DVRs and Virtual DVRs 1 Select a channel for playback In the example below channel 16 was selec...

Page 129: ...AVELET DIGITAL VIDEO RECORDER 128 3 Left click on Search Remote Search window will open The DVR in which the camera belongs to will be highlighted 4 Select the date and the time and then click on Play...

Page 130: ...WAVELET DIGITAL VIDEO RECORDER 129 5 The selected channel will begin playback in Dual Display Mode 6 Right click on the same channel and then select Live to revert back to the live mode...

Page 131: ...e Mode Selector button to switch to Playback Mode Select Channel During the remote or local playback any camera can be accessed and viewed in single channel view mode by clicking on any camera number...

Page 132: ...plays available files for remote playback or local playback one month at a time Time Displays available files for remote playback or local playback in 24 hour format It will also list any cameras with...

Page 133: ...Hour Minute and the Clip can be clicked at any time to move backward or forward in time 4 Selecting a file for download The file selection process is just as selecting a file for remote playback To do...

Page 134: ...he DVR file from which the file was downloaded from Select the date time and the minute slot and then click on Play Once the playback begins the video can be manipulated using the playback controls Th...

Page 135: ...k to Live mode Dual Display mode only Full Screen Changes the display to single channel view mode Remove Removes selected channel from the Main Camera Display Window Quality Adjust the picture quality...

Page 136: ...in low quality 180X122 B DVR Context Menu Live Start live monitoring for the selected DVR Quality Select the picture quality for all cameras Auto High Mid and Low Property Displays general informatio...

Page 137: ...e Removes the Virtual DVR from the Virtual DVR Window 7 DVR SETUP The DVR Setup allows modification of all system settings through CMS as it would be done accessing the DVR menu screen DVR setup can b...

Page 138: ...default recording camera group to modify b Select the recording picture quality c Select audio recording on or off d Adjust the field rate and select alarm and or motion recording for individual camer...

Page 139: ...ay was selected for a sample schedule recording Enter the beginning time and the ending time in 24 hour format Please note that the time cannot overlap one another Select the recording camera group to...

Page 140: ...139 6 System Setup a Select Backup Mode b Select the playback disk c Enter an e mail address for notifications and alerts from the DVR d Start recording e Stop recording f Run schedule recording stop...

Page 141: ...levels Search Modes Time Date Camera Alarm Motion Playback Modes Forward Reverse Pause Field by Field Normal Speed 2X 4X 6X 8X 16X Multitasking Full Triplex Simultaneous Live Display Record Playback...

Page 142: ...onvert the composite signal to VGA signal 3 Is there a way to disable the password prompts The administrator password prompt is never disabled However the user password can be disabled by turning Auto...

Page 143: ...calls the settings from the hard drive when it is powered on at a later time 11 How can I reset the DVR to the factory default setting The factory default setting can only be reset at the vendor or di...

Page 144: ...rotocol over Ethernet Though the PPPoE DSL service may be dynamic it is different from the conventional dynamic IP address for the following reasons 1 A user name and password is required to log in to...

Page 145: ...and communicate with external backup devices such as CD RW DVD RW external hard drives and memory stick Web Client Viewer Local Player CMS 1 Is it possible to download the recorded data only for a sp...

Page 146: ...level of access is necessary to install programs Moreover verify the Internet Explorer security setting involving Active X is set to default 8 Can the saved video clips be played on Windows Media Pla...

Page 147: ...WAVELET DIGITAL VIDEO RECORDER 146...

Page 148: ...lock 15 37 66 103 C cable modem 28 78 CABLE MODEM 78 CAMERA DISPLAY SELECTION 93 104 112 CAMERA NUMBER TITLE 103 105 CAMERA SELECT 48 60 CAMERA SELECTION 108 CAMERA TITLE 49 CAMERAS 102 104 CANCEL OSD...

Page 149: ...GROUP SELECTION 53 H HARD DRIVE INFORMATION 103 HDD FAIL 117 HDD OVERWRITE 54 HEALTH 115 Health report 116 host name 15 27 79 89 90 117 125 HOST NAME 27 HTTP 73 Hypertext Transfer Protocol 73 I INFO 1...

Page 150: ...SS ALERT 25 PRE RECORD 58 PREVIEWING DATA FILE 99 PRINT 102 106 PROGRESS SLIDER 106 108 Property 122 123 136 137 PTZ 102 PTZ CAMERA MODEL 50 PTZ CHANNEL 49 PULL DOWN MENU 108 Q Q DVRHO 79 quad view mo...

Page 151: ...125 132 TIME 25 Time Date 23 141 TIME AND DATE 113 TIME AND DATE SETUP 65 TIME SEARCH 16 45 Tour 41 115 U UDP protocol 93 USB 2 0 PORT 17 USB DEVICE 27 USB interface 104 USB VENDOR 27 USER AND THE ADM...

Page 152: ...WAVELET DIGITAL VIDEO RECORDER 151 Notes...

Reviews: