background image

60

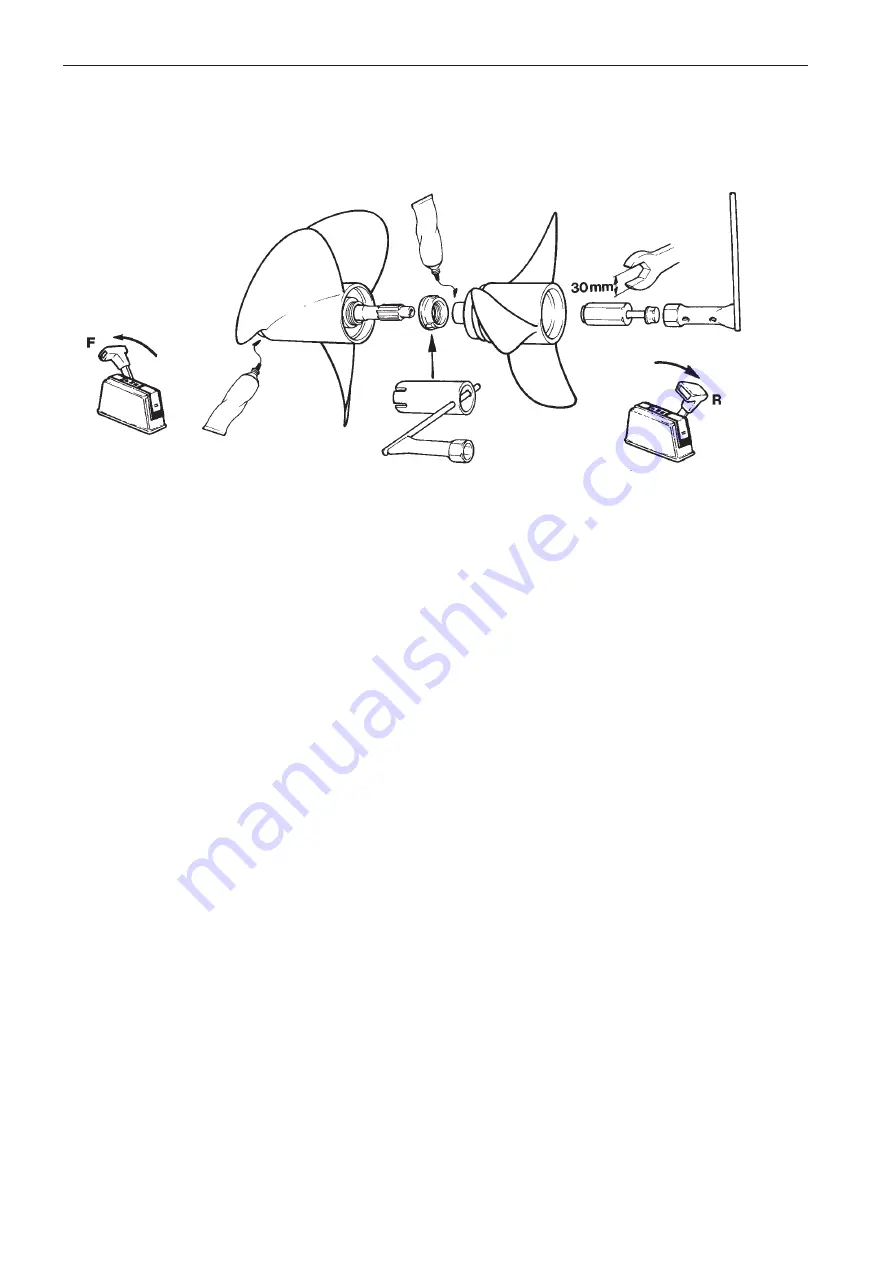
Propeller installation. DPX

1. Control lever in “Ahead” position.

2. Use the tool supplied when removing and install-

ing propellers.

3. Lubricate both propeller hubs. Use Volvo Penta

grease 828250-1.

4. Push the front propeller onto the shaft. Screw on

large locknut and tighten with tool. Tightening
torque 50–70 Nm (5–7 kpm).

5. Control lever in “Astern” position.

6. Push rear propeller onto the shaft and tighten with

nut. Use a 30 mm socket and tighten to 25–35 Nm
(2.5–3.5 kpm)

7. Screw in the lock screw and tighten to 70–80 Nm

(7–8 kpm).

Summary of Contents for KAD44P

Page 1: ...INSTRUCTIONBOOK KAD44P KAMD44P ...

Page 2: ......

Page 3: ...first class performance reliability and durability have been upheld We believe that this also reflects what you require and expect from your new marine engine To help you fulfil your expectations we want you to read through this instruction manual carefully and take our advice about operating and maintaining the engine before you cast off on your maiden voyage Best regards AB VOLVO PENTA CALIFORNI...

Page 4: ...e 22 23 Operation 24 28 Checkinginstruments 24 Cruisingspeed 26 PowerTrim 27 Stopping the engine 29 After stopping the engine 29 Layingup 29 Coldweatherprecautions 30 Maintenanceschedule 31 Maintenanceandcare 32 59 Engine general 32 Lubrication system 36 Cooling system 37 Fuel system 42 Electrical system 44 Reversegear 49 Drive 51 Steering 56 Propellers 59 Layingup Launching 61 63 Inhibiting 61 Br...

Page 5: ...ta dealer for assistance This symbol is used in the book and on the engine to make you aware of safety information Always read these safety precautions very carefully In the Instruction Manual warning texts have the following priority WARNING If these instructions are not followed there is a danger of personal injury exten sive damage to the product or serious mechanical malfunction IMPORTANT Used...

Page 6: ...of checking the engine and engine com partment visually before operating the boat before the engine is started and after operating the boat after the engine has been stopped This will help you to quickly detect fuel coolant or oil leaks and spot anything else unusual that has or is about to happen Maneuvering Avoid violent and unexpected changes in course and gear engagement This could cause someo...

Page 7: ...ay if an awning is rigged Contact the dealer where the boat was purchased to get more in formation on how to solve this problem should it occur on your boat Checklist Safety equipment Life jackets for all passengers communication equipment emergency rockets approved fire extinguisher first aid equipment life belt anchor paddle torch etc Replacement parts and tools impeller fuel filters fuses tape ...

Page 8: ...ifting equipment may then be required in order to maintain the correct balance and make the engine safe to han dle Never carry out work on an engine suspended on a hoist Before starting the engine Reinstall all protective parts removed during service operations before starting the engine Check that no tools or other items have been left on the engine Never start a turbocharged engine without insta...

Page 9: ...y out and cause burns If work must be carried out with the engine at operat ing temperature and the coolant filler cap or a cock open or a coolant hose disconnected open the cool ant filler cap carefully and slowly to release pressure before removing the cap completely Note that the coolant may still be hot and can cause burns Lubrication system Hot oil can cause burns Avoid skin contact with hot ...

Page 10: ...erating hours as follows Operate the engine normally Do not operate it at full load except for short periods Never run the engine at a constant engine speed for long pe riods during the running in period The engine can be expected to use more engine oil during the running in period than would otherwise be normal Check the oil level more often than is normally recommended A First Service Inspection...

Page 11: ...ing of ignition timing and fuel injection systems gasoline or injector pumps pump set tings and injectors diesel must always be carried out be an authorized Volvo Penta workshop The engine must not be modified in any way apart from with accessories and service kits developed for it by Volvo Penta No modifications to the exhaust pipes and air sup ply ducts for the engine room ventilation ducts may ...

Page 12: ...rdless of the engine coolant temperature ECT lower fuel consumption and reduced exhaust emissions The compressor provides air to the engine at low engine speeds and during acceleration after which the turbo charger takes over the supply of air These units combined together with the four valve per cylinder design en sures a rapid air flow through the engine and an extremely high torque throughout t...

Page 13: ...ntake 10 Corrosion protection 11 Fuel pump 12 Fuel filter 13 Seawater pump 14 Air Cleaner 15 Oil level dipstick 16 Topping up the engine coolant 17 Compressor 18 Trim cylinders 19 Oil filter reverse gear 20 Oil dipstick reverse gear 21 Water cooled exhaust elbow KAMD44P EDC HS1E 11 20 12 13 3 4 5 19 6 2 14 15 16 17 21 C 21 14 15 16 17 C 1 2 3 4 5 6 13 A 12 11 B KAD44P EDC DPX 7 8 9 10 ...

Page 14: ...ake a copy of the page and keep it so that you have a copy should the boat be stolen An example of an identification plate is shown below The figures in brackets refer to the location of the identifica tion numbers on the identification plate For plate locations refer to illustrations A B C Engine Product designation 1 Serial number 2 Product number 3 Certification number 4 Key code The key code i...

Page 15: ...with instruments not described here please contact your Volvo Penta dealer Main panel Master control position panel 1 Tachometer and hour counter 2 Warning display 3 Siren for acoustic alarm 4 Switch for instrument lighting 5 Alarm test acknowledgment switch 6 Key switch 7 Oil pressure gauge Displays the oil pressure in the engine 8 Voltmeter Displays system voltage 9 Temperature gauge Displays th...

Page 16: ...witch Panel for Flying Bridge alternative operating posi tion To start the engine from this panel the ignition key in the master panel must be in the operating position l 1 Siren for acoustic alarm 2 Switch for instrument lighting 3 Alarm test acknowledgment switch 4 Starter button Release the button as soon as the engine has started 5 Stop button See description on page 15 Warning display Display...

Page 17: ... lamps and the acoustic alarm are operating correctly before starting the engine Testing the alarm Press the switch All warning lights light and the acoustic alarm sounds Alarm acknowledge Press the switch if there is an alarm The acoustic alarm stops but the relevant warning lamp continues to flash until the malfunction is corrected Key switch S Stop position 0 The key can be inserted and removed...

Page 18: ...mation See the section Control 2 Diagnostics yellow Flashing Indicates that an abnormal signal value has been returned from the sensors on the en gine control or other equipment Selection A diagnostic trouble code DTC will be displayed if the button is pressed in For further in formation See section Fault tracing 3 Active control station red Light remains on Indicates the control position is activ...

Page 19: ...verse gear engaged for movement astern T Control of engine speed RPM Note If the on board diagnostics OBD warning lamp in the con trol panel indicates with a diagnostic trouble code DTC that the control requires calibration follow the instructions in the section Fault tracing Diagnostics Disengaging the shift function Electronic controls Press in the green Neutral button on the control panel while...

Page 20: ...urning counterclock wise makes it easier to move the lever Reinstall the cover and lever 2 1 Disengaging the shift function Mechanical controls Move lever 1 to the neutral position N Press in button 2 move the lever slightly forward and release the button The shift function is now disengaged and the lever affects only engine speed When the lever is moved back to the neutral position it will auto m...

Page 21: ...es the bow in relation to the horizontal while moving it towards the stern will lower the bows Button 1 Press button to lower the bow of the boat drive is trimmed inward Button 2 Press button to raise the bow of the boat drive is trimmed out Button 3 Press the button while simultaneously pressing button 2 or 4 is pressed up to raise or trim the drive out to Beach range Button 4 Press button up to ...

Page 22: ...ow is raised Otherwise no indication 2 Yellow light indicates that the bows are below the horizontal line Flashes when the drive moves and the bow is lowered Other wise no indication 3 Green light comes on in the trim range 9 to 0 Otherwise no in dication 4 Green light comes on in the trim range 0 to 2 Otherwise no in dication 5 Green light comes on in the trim range 2 to 5 Otherwise no in dicatio...

Page 23: ...he Trim and Beach ranges Take care to observe the instrument when trimming the drive out so that the drive does not enter the Beach range Twin and triple installations In twin and triple installations the drives may be trimmed individually within the permitted trim range WARNING When lifting drives within the Beach range both drives must be always lifted at the same time in parallel so as not to p...

Page 24: ... circuit with the main switch while the engine is running This could damage the generator Start the engine compartment fan if one is fitted and let it run for at least four minutes Check there is sufficient fuel for the planned journey Lower the drive s if raised WARNING Twin and triple installations DPX the drives must be trimmed at the same time parallel Starting the engine 1 Move the control le...

Page 25: ... five minutes before trying to start the engine again Note The electronic diesel control EDC system is active during starting in order to minimize exhaust emissions At low operating temperatures the starter turns over the engine 1 4 times depend ing on temperature to raise the combustion temperature before fuel is injected 4 There is no need to warm the engine up at idle speed The best way to warm...

Page 26: ... engine is stopped the voltage is approximately 12 V The acoustic alarm will automatically sound if the charging system mal functions Alarms and fault indications When the acoustic alarm sounds one of the four warning lamps starts to flash to indicate the source of the alarm High engine coolant tem perature ECT 1 low oil pressure 2 and power out 3 IMPORTANT In the event of a low oil pressure alarm...

Page 27: ...the gear control lever quickly and firmly into astern then in crease the speed IMPORTANT If the boat has two engines it is important that they are both running during maneuvers astern rearward movement otherwise water might get into the exhaust of the engine which is not running Changing control position Set the control in the neutral idle position at the control position you are about to leave Ch...

Page 28: ...nc button lights up In practice however the synch function does not take effect until both engines have an engine speed over 800 rpm and the control levers are set so that the engines are both running at approximately the same speed If these conditions are met the engine speed of the starboard engine the slave will automatically be adjusted to the speed of the port en gine master The synchronizati...

Page 29: ...ctors involved only general advice is giv en here on how to get the best trimming angle for your boat It can generally be said that when the boat feels well balanced easy to steer and pleasant to operate then that is the optimal trim angle for the boat When starting Trim the drive The bow will be pressed down and the boat acceler ates faster This gives improved running and steering characteristics...

Page 30: ... by an authorized Volvo Penta workshop IMPORTANT To prevent galvanic corrosion any damage to the paintwork on the drive and propeller must be repaired before launching the boat See section Laying up Launching DPX twin and triple installations WARNING If the parallel strut shows signs of damage run at reduced speed to harbor The parallel strut is a vital safety com ponent damage may affect steering...

Page 31: ...s Boats with drives The drive must be trimmed in to its maximum to protect the trim cylinders untreated surfaces from fouling IMPORTANT If there is a risk that the drive can run aground it must instead be trimmed out to its maximum lift position WARNING Twin and triple installations DPX The drives must be lifted at the same time parallel Switch off the main switches if the boat is not to be used f...

Page 32: ...stem in Care IMPORTANT A poorly charged battery may burst as a result of freezing Transporting on a trailer Before pulling boats with on to a trailer trim the drive out to Lift range maximum lift An automatic stop will cut off the current to the hydraulic pump when the drive has reached its max lift point The stop is auto matically reset when trimming down NOTE Check local legislation for transpor...

Page 33: ...ques on steering cap bolts Every 200 operating hours Valve clearance Adjustment Turbo Check Clean if needed Every other year Coolant Replace Drive Replace universal joint and exhaust bellows Every 500 operating hours At least every fifth year Reverse gear Replacing propeller shaft seal Every 600 operating hours Check injectors If the freshwater system is filled with an anti corrosion agent mixture...

Page 34: ...on key turning off the power supply with the main switch Engine general Air Cleaner Replacement Remove air cleaner cover Remove the old air filter Clean the air cleaner cover housing as required Take care that no contaminants enter the engine Install the new air filter and air cleaner cover Compressor Checking oil Checking and topping up Unscrew counter clockwise and remove the dip stick Wipe off ...

Page 35: ...rting maintenance work The coolant pump and generator can be damaged if the drive belts are too tight and slip if they are too loose Check the drive belt tension regularly by pressing down the belts using thumb pressure at the check points A B C and D as shown below for the differ ent belts Adjust as required Check and adjust as necessary after operating the engine when the belts are warm Check th...

Page 36: ...n the hole and turn the belt tensioner counter clockwise so the belt is correctly tensioned At the correct belt tension it should be possible to press the belt in 5 mm at C 4 Servo pump belt Undo the retaining bolt 1 Tighten belt using the ad juster screw 2 so the belt can be depressed approx imately 10 mm between the belt pulleys at D Tight en bolt 1 Replacement Slacken belt off so that it can be...

Page 37: ...and turn the ignition key to position I operating position Keep the button pressed in at least 3 seconds until the yellow indicator lamp begins to flash Release the button The green Neutral and the yellow Diagnostics lamps will flash indicating that the EDC system is in calibration mode 4 Start the engine The engine idle speed can now be adjusted using the control lever throttle lever within the r...

Page 38: ...ill the oil above the MAX level Oil and oil filters Changing Run the engine to operating temperature so that the oil is easier to suck out Stop the engine Suck up oil using an oil scavenging pump through the hole for the dipstick WARNING Hot oil and hot surfaces can cause burns Unscrew the old filter To avoid oil spills put a plastic bag over the filter before it is unscrewed Check that the mating...

Page 39: ...the engine coolant system must be filled with a mixture of 50 Volvo Penta antifreeze and 50 clean water as neutral pH as possible This mixture prevents corro sion and protects against freezing down to approx 40 C It should be used all year round NOTE There should be at least 40 antifreeze in the sys tem for complete protection against corrosion Where there is no risk of damage from freezing the en...

Page 40: ...inue by draining the coolant from the other drain cocks 2 5 Flush out the heat exchanger as follows before fill ing coolant NOTE Deposit old coolant at a properly designated disposal site Heat exchanger Flushing out Cooling performance is reduced by scaling in the heat exchanger It should therefore be flushed when the coolant is changed 1 Drain the coolant as above 2 Insert a hose into the filler ...

Page 41: ...ning in the drive water galleries the drive must be completely trimmed down in the water Make this plug from a 100 mm long piece of 30 mm diame ter hose Plug one end of the hose with a piece of dowel or similar and hold the dowel in place with a hose clamp Engine with reverse gear Close the sea cock Drain oil cooler by opening the plug 2 Discon nect hose 3 and bend down so that the water runs out ...

Page 42: ...d the exhaust outlet WARNING Approaching a running engine is dangerous Watch out for rotating components and hot surfaces IMPORTANT The impeller will be damaged if it runs dry 4 Set the gear control lever in the neutral position Check that nobody is near the propellers Start the engine Let it run at fast idle a few minutes Stop the engine 5 For inhibiting fill a bucket with antifreeze mixture 50 5...

Page 43: ...k for water penetration If the boat is in the water the following measures should be carried out before starting work Re verse gear Close the sea cock Remove the cover from the seawater pump and re move the impeller 1 If there are cracks or other de fects the impeller must be replaced If the pump shaft can be turned by hand the flange must be replaced Lubricate the pump housing and the inside of t...

Page 44: ...s Avoid fuel spillage Use rags around the venting point 2 Pump the fuel using hand pump 2 until there are no more air bubbles visible in the fuel Continue pumping and at the same time tighten the venting screw If the pump effect is poor turn the engine over slightly so that the pump drive cam changes position If the engine does not start continue venting as follows 3 Use the handpump 2 and pump fo...

Page 45: ...ttle oil Screw on the new filter by hand until it is in contact with the mating surface And then a further half turn but no more Vent fuel system Deposit the old filter at a properly designated disposal site Start the engine and check for leaks WARNING Approaching a running engine is dangerous Watch out for rotating components and hot surfaces Fuel pre filter Replacing filter insert Close fuel coc...

Page 46: ...pped Reset the fuse by pressing on the button on the junction box IMPORTANT Always investigate the cause of an overload before resetting the fuse The control lever with integrated Power Trim button has a 5 A standard fuse in its cabling IMPORTANT Always carry extra fuses on board Electronic shift drives have a 5 A standard fuse 1 in the cabling at the actuator Electrical connections Also check tha...

Page 47: ...ecting and disconnecting First connect the red battery lead to the battery terminal Then connect the black battery lead to the battery terminal When disconnecting the battery disconnect the lead black first and then the lead red Cleaning Keep batteries dry and clean Oxidation or dirt on the battery and battery terminals can cause short cir cuits voltage drop and discharge especially in damp weathe...

Page 48: ...scharged it must be charged If the boat has not been used for some time charge the battery and then trickle charge it see manufacturer s recommendations A poorly charged battery will be damaged and may burst in cold weather IMPORTANT Follow the instructions supplied with the battery charger carefully To avoid elec trolytic corrosion when an external charger is connected always disconnect the batte...

Page 49: ... protector ground should be ashore never in the boat Shore power should always have a ground fault circuit breaker Shore power units transformer rectifier battery chargers etc must be intended for marine usage and the high tension circuit must be galvani cally separated from the low tension circuit 2 Route and clamp electric cables so that they will not be exposed to rubbing damp or bilge water in...

Page 50: ...tween its terminal and the fuse block and the terminal and the termi nal block for the boat s electrical equipment The main switch for the auxiliary battery must cut off all power consuming equipment connected to that battery and be turned off when power is no longer needed All equipment connected to the auxiliary battery should have separate switches To simultaneously charge two independent batte...

Page 51: ...r without screwing it in Remove again and check that the oil level is between the MAX and MIN markings on the dipstick Top up if necessary For oil grades and capacity See the chapter Technical Data IMPORTANT Do not fill the oil above the MAX level Oil change Oil is sucked up using an oil scavenging pump through the hole for the dipstick 1 Unscrew filter 2 Check that the oil cooler mating surface i...

Page 52: ... vented and lubricated directly after launch ing Vent the bushing by pressing it together while press ing down on the shaft until water appears Then press in approx 1 cc water repellent grease into the seal IMPORTANT The seal must be replaced every 500 running hours or every 5th year ...

Page 53: ...r and electronic operation Corrosion protection Checking Replacing Check the sacrificial anodes regularly Replace with new anodes when approximately 1 3 of the anode has been eroded Tighten the new anode so that there is a good electrical contact Where boats are kept laid up on land when not in use there is a lower level of galvanic corrosion protection due to the oxidation on the sacrificial anod...

Page 54: ...housing 3 and the bottom edge of the shield 4 Twin and triple installa tions also have anodes on the parallel brace 5 All anodes are screw mounted Note that there is a ground cable mounted on one of the screws Undo the screws holding the anode Clean the mating sur face and install the new anode Inside the anode 4 is a support plate holding the trim sensor in place Check carefully that the plate lo...

Page 55: ...rive After a while check the oil level with the dipstick The dipstick should not be screwed down when checking the level If the level is too high oil must be drained off If the level is too low top up with oil through the dipstick hole Check the tightening of the dipstick and bottom plug Reinstall the cover Oil level Power Trim Trim the drive in as far as possible Check the oil lev el is between t...

Page 56: ...sition so that it cannot fall down A fall ing drive can cause serious personal injury Tool 885143 8 when properly installed prevents the drive falling Install the tool as follows Trim the drive down to 0 Remove cotter pins and knock out trim cyl inder bolts DPX Also remove steering cylinders by removing pins Tie up the steering cylinder so that they do not hang in the way The drive can now be lift...

Page 57: ...en tightened DP If the drive has been removed the steering rack and drive controlling the trim sensor may have come out of position Turn the cog until the notched tooth is visible Install the steering rack so that the first cog position meshes with the marked tooth ...

Page 58: ...rmal ly change oil consumption is negligible over a year If the oil level drops there is probably a leak This leak must immediately be localized and remedied Please contact your nearest authorized Volvo Penta work shop for repairs The steering system is filled with au tomatic transmission fluid ATF the fluid should not normally require changing As long as the oil is red and contains no visible con...

Page 59: ...ine drive belts or pulleys Fill the system Start the engine s The steering system engine circuit is automatically vented when the engines have been running for 2 3 minutes Other parts of the system are vented as follows Turn the wheel 2 3 times port and starboard to full lock Check the oil level as the wheel is being turned and top up as necessary The oil level can drop rapidly when the wheel is t...

Page 60: ...ng and at worst steer ing can be lost altogether Please contact your nearest authorized Volvo Penta workshop for assistance DPX Parallel strut Checking The parallel strut twin and triple installation is a vital safety component Inspect it carefully if the drive kick up function has been triggered by the boat going aground or hitting an object in the water Check paral lel strut ball joints and for ...

Page 61: ...ting the boat with a damaged propeller should be undertaken with extreme care and only at reduced engine speeds Propeller installation DP 1 Control lever in Ahead position 2 Use the tool supplied when removing and install ing propellers 3 Lubricate both propeller hubs Use Volvo Penta grease 828250 1 4 Slide on the line cutter and the front propeller 5 Screw on nut and tighten with tool Tightening ...

Page 62: ...s Use Volvo Penta grease 828250 1 4 Push the front propeller onto the shaft Screw on large locknut and tighten with tool Tightening torque 50 70 Nm 5 7 kpm 5 Control lever in Astern position 6 Push rear propeller onto the shaft and tighten with nut Use a 30 mm socket and tighten to 25 35 Nm 2 5 3 5 kpm 7 Screw in the lock screw and tighten to 70 80 Nm 7 8 kpm ...

Page 63: ...r filter Clean and inhibit the seawater system Remove the impeller from the seawater pump Store the impeller in a sealed plastic bag in a cool place Check the condition of the engine coolant anti freeze Top up if required IMPORTANT An anti corrosion mixture in the engine coolant system provides no pro tection against freezing If there is any possi bility the engine will be subjected to freezing te...

Page 64: ...and tighten hose clamps Check engine coolant level and antifreeze protec tion Top up if necessary Connect the fully charged batteries Paint the drive and hull See next page Check the sacrificial anode on the drive If there is less than 2 3 of the anode left it must be replaced Clean with emery cloth just before the boat is launched IMPORTANT Do not use a wire brush or other steel tools when cleani...

Page 65: ...pplied onto the original paintwork on the drive without sanding it down first Teflon is the registered trademark of the Du Pont Corp Underwater hull All types of paints with anti fouling properties are poi sonous and cause damage to the marine environ ment Avoid the use of such agents Most countries have introduced legislation controlling the use of anti fouling agents Always abide by these regula...

Page 66: ... pump drive belt slipping 20 Defective impeller 21 Defective incorrect thermostat 22 Lubricating oil level too high 23 Generator drive belt slipping Problem Probable cause Starter motor not turning or slow 1 2 3 Engine does not start 4 5 6 7 Engine starts but stops again 6 7 Engine difficult to start 4 5 6 7 Engine does not reach correct speed at wide open throttle WOT 5 6 7 8 9 10 11 15 18 19 20 ...

Page 67: ... stored until erased This should be done after the malfunction or source of the DTC has been identified and repaired NOTE If the On board Diagnostics OBD system has triggered an event for example stopped the engine you must erase the DTC before the en gine can be restarted Refer to Erasing Diagnostic Trouble Codes DTC below Note When the engine is stopped the diagnostic trouble code DTC is flashed...

Page 68: ...ff again by pressing the yellow button A table with the EDC diagnostic trouble codes DTCs can be found on the next page Example pause DTC 2 6 Fault on the control unit potentiometer Erasing stored Diagnostic Trouble Codes DTC 1 Check the ignition key is in the 0 position 2 Press the yellow Diagnostics button and hold it in while turning the ignition key to the I operat ing position Erase the diagn...

Page 69: ...alibrate control Check terminals on actuator solenoid valves Check actuator solenoids for short open circuit Erase diagnostic trouble code Recalibrate control Calibrate control Diagnostic trouble code erased automatically Check connections on injection pump and control module Erase diagnostic trouble code Start the engine Contact authorized workshop if fault persists Check connections on injection...

Page 70: ...ting the engine NOTE High engine coolant tempera ture alarm is not working Check wiring terminals on control potentiometer and wiring and terminals up to the control position Erase diagnostic trouble code Start the engine If the fault persists shifting can be carried out directly on the reverse gear solenoids Check wiring terminals on shift control potentiome ter and wiring and terminals up to the...

Page 71: ...he engine Contact authorized workshop if fault persists Check wiring and terminals to starter relay in junction box Check the starter relay Erase diagnostic trouble code Check wiring and terminals to main relay in junction box Check main relay Erase diagnostic trouble code Check bulb in Neutral button Check wiring and terminals up to control position Erase diagnostic trouble code Check wiring and ...

Page 72: ...t is a function of engine speed This can reduce performance and increase exhaust emissions If fuel temperature is abnormal the system will assume a fuel tempera ture of 40 C 104 F If actual fuel temperature is lower than this there is a risk of power surges Higher actual temperature results in reduced perform ance If the engine coolant temperature is too high the system will reduce the volume of f...

Page 73: ...wide open throttle WOT astern position Hold lever in this position Acknowledge the position by pressing in the green button for at least three seconds 6 Return the lever to the Neutral position Hold le ver in this position Acknowledge the position by pressing in the green button for at least three seconds 7 End calibration by pressing down the green but ton the yellow and green buttons then stop f...

Page 74: ...control from other manufactur ers Disengage the shift function and at the same time move the lever forward to WOT Hold lever in this position Note Check that the control cable movement does not exceed the values noted earlier Acknowledge the position by pressing in the green button for at least three seconds 3 Move the lever to neutral position Hold lever in this position Acknowledge the position ...

Page 75: ...ster the position by pressing the green but ton Hold for at least 3 seconds 4 Move the shift function lever to the position at which the drive reverse gear is engaged for Ahead forward movement Hold lever in this po sition Register the position by pressing the green but ton Hold for at least 3 seconds 5 Move the gearshift lever to the position where the drive reverse gear is engaged for astern Hol...

Page 76: ...rn Forward Reverse on the control unit do not correspond to Ahead Astern on the boat swap the P S Primary Secondary connectors be tween the reverse gear solenoids From Volvo Penta the connectors on the rev gear is fitted for a left hand rotating propeller ...

Page 77: ...2 5 0 Fuel specifications The fuel must be approved according to national and international standards for commercial fuels for example EN 590 With environmental and sub zero temperature specifications according to national requirements ASTM D 975 No 1 D and 2 D JIS KK 2204 Sulfur content According to current legislation in the respective country DP drive Oil capacity dm 2 7 Oil grad viscosity Volv...

Page 78: ...ron Aviation Fluid A Mobil Aero HFA Hydraulic steering DPX Oil grade ATF type G Cooling system Thermostats open completely open 81 C 94 C Freshwater system capacity dm 20 Electrical system System voltage Volts 12 Starter motor battery capacity Ah 140 Battery electrolytic specific gravity Charge at g cm 1 230 Fully charged g cm 1 275 1 285 Alternating current AC generator GEN max output 14V 60A Sta...

Page 79: ......

Page 80: ...7737719 0 English 7 1997 ...

Reviews: