4
ENGLISH
•
Never use the unit if the power cord or the power
plug is damaged, if the unit works improperly or
after it was dropped.
•
Do not attempt to repair the unit. Do not disas-
semble the unit by yourself, if any malfunction is
detected or after it was dropped, unplug the unit
and apply to any authorized service center from
the contact address list given in the warranty cer-
tificate and on the website www.vitek.ru.
•
Transport the unit in the original package only.
•
For environment protection do not discard the
unit with usual household waste after its service
life expiration; apply to a specialized center for
further recycling.
•
Keep the unit out of reach of children and dis-
abled persons.
THE UNIT IS INTENDED FOR HOUSEHOLD USAGE
ONLY
BEFORE THE FIRST USE
After unit transportation or storage under cold
(winter) conditions, it is necessary to keep it for
at least three hours at room temperature.
There may be water spots in the air humidifier,
this is normal, as the unit has undergone factory
quality control.
–
Unpack the unit, remove any stickers and pack-
age materials that can prevent unit operation.
Check the unit for damages. In case of damages
do not switch the unit on.
–
Before plugging the unit in make sure that your
home mains voltage corresponds to the unit
operating voltage.
Notes:
Use the air humidifier at the room temperature from
+10° С to +40°С, and relative humidity less than 80%.
Water temperature should not 40°С.
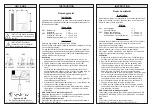
Installing batteries in the remote control (RC)
•
Open the RC battery compartment lid and insert
a CR2025 battery, strictly following the polarity.
•
Install the battery compartment lid back to its place.
Note:
The unit can be supplied with the battery
installed in the RC battery compartment.
In this case
if there is an isolation insert in the RC battery com-
partment, remove the insert.
Battery replacement
•
Open the battery compartment lid, replace the old
battery with a new one, strictly following the polar-
ity, then close the battery compartment lid.
USING THE AIR HUMIDIFIER
–
Remove the nozzle (5).
–
Take the water tank (4) and remove it from the
unit body.
–
Turn over the tank (4), open the lid (8) rotating it
counterclockwise.
Notes:
–
before the first use it is recommended to put the
mineral filter (7) into a container filled with water
of room temperature for several minutes.
–
remove the filter (7) from the lid (8) turning it
counterclockwise, put the filter (7) into water for
several minutes, take the filter out and drain the
remaining water, then install it back on the lid (8),
turning it clockwise until bumping.
–
Fill the tank (4) with necessary amount of water,
insert the lid (8) into the water inlet (6) and screw
it rotating it clockwise.
–
First place the filled water tank (4) back to its
place and then install the nozzle (1).
–
Wait till the process chamber (10) is filled with
water.
–
If you want to use the aromatization function,
remove the aromatic oil container (11). Add some
drops of water-soluble aromatic oil on the sponge
and install the container (11) back to its place.
Notes:
–
use water-soluble aromatic oils only.
–
if you are not going to use the aromatization
function, remove the sponge from the con-
tainer (11), wash it and install back to its place.
–
Insert the plug into the socket; you will hear a
sound signal, the connection icon will appear in
the operation mode icons (18) row.
–
Switch the unit on by touching the button (12).
There will be a sound signal, and the following
icons will appear on the display: operation mode
icons (18), mist release intensity icons (19),
room temperature icons (20), relative humid-
ity icons (21), and the water tank (4) lighting will
light up blue. The air humidifier will operate at the
maximal mist release intensity.
–
You can adjust the mist release direction by turn-
ing the nozzle (5) in various directions.
–
To finish the unit’s operation touch the but-
ton (12) again, the icons on the display will go
out except the connection icon in the operation
mode icons (18) row.
–
Unplug the unit.
Notes:
–
the operation mode buttons on the control
panel (3) are sensory, you just need to touch the
button to switch the necessary operation mode on.
–
the humidity level indications shown on the dis-
play (8) may be slightly different from the read-
ings of another hygrometer.
–
the humidity level indications depend on the
room temperature.
–
draughts or other air flows may significantly
affect the air humidity and temperature indica-
tions in the room.
IM VT-2331.indd 4
07.04.2017 11:06:46
Summary of Contents for VT-2331 BK
Page 1: ...1 VT 2331 BK 3 7 13 18 Humidifier 23 IM VT 2331 indd 1 07 04 2017 11 06 45...
Page 2: ...IM VT 2331 indd 2 07 04 2017 11 06 46...
Page 8: ...8 www vitek ru IM VT 2331 indd 8 07 04 2017 11 06 46...
Page 14: ...14 www vitek ru 10 C 40 C 80 40 CR2025 IM VT 2331 indd 14 07 04 2017 11 06 47...
Page 19: ...19 www vitek ru 10 40 C 80 40 CR2025 5 3 4 4 8 IM VT 2331 indd 19 07 04 2017 11 06 47...
Page 24: ...24 www vitek ru 10 C 40 C 80 40 CR2025 5 4 4 8 7 7 8 7 IM VT 2331 indd 24 07 04 2017 11 06 48...
Page 27: ...27 12 8 12 8 7 1 1 1 220 240 50 40 4 5 350 25 2 3 IM VT 2331 indd 27 07 04 2017 11 06 48...