


3445C
JAN 06
HR1 & HR2
37
83
136
50
1 2 3
+
1 2 3
+
4 5 6
+
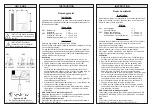
HR1
HR2
5A, 250VAC
5A, 250VAC 5A, 250VAC
Fig 2
Systemair AB
739 30 Skinnskatteberg, Sweden
Tel:+46 222 440 00 Fax:+46 222 440 99
!
VIKTIGT: Läs denna instruktion
innan produkten monteras och
ansluts.
INSTRUKTION
INSTRUCTION
Rumshygrostat
Installation
Hygrostaten bör placeras på en plats med jämn temperatur där god
luftväxling råder. Hygrostatens fästhål har centrumavstånd 60 mm
för att passa på eldosa.
Inkoppling
HR1
Befuktning
1 + 2
Avfuktning
1 + 3
HR2
Befuktning i två steg
1 + 2 och 4 + 5
Avfuktning i två steg
1 + 3 och 4 + 6
Befuktning och avfuktning 1 + 2 och 4 + 6
Underhåll
Kalibrera hygrostaten då den monterats på plats.
Den bör sedan kalibreras med jämna mellanrum, förslagsvis i början
på varje eldningssäsong.
För alla känselelement, oavsett material (hår, plast mm.) gäller att
en beläggning minskar elementets möjlighet till fuktutbyte med den
omgivande luften. Avlägsna därför damm och andra beläggningar
med en mjuk borste eller pensel.
Kalibrering
1. Mät den relativa fuktigheten invid hygrostaten med t. ex. en
slungpsykrometer eller annat instrument av god noggrannhet.
2. Tag av locket och lossa rattens låsskruv om den är låst.
3. Vrid hygrostatens börvärde till du hittar det läge där brytaren
sluter.
Är värdet på börvärdesratten högre än uppmätt värde skall
kalibreringsskruven vridas medurs. Är värdet på ratten lägre än
uppmätt värde skall kaliberingsskruven vridas moturs.
Kalibreringsskruven nås med en smal skruvmejsel genom
gälarna i den nedre gaveln. Se fig 2.
Justera med kalibreringsskruven till dess att brytaren bryter då
ratten ställs på uppmätt värde.
4. Ställ ratten på det önskade reglervärdet och, om så önskas, lås
ratten med skruven till höger om ratten.
5. På HR2 kan stegdifferensen ändras. Differensskruven sitter på
vippbryggan. Leveransinställning 0%. Vrid medurs för att öka
differensen.
EMC emission och immunitet standard:
Produkten uppfyller kraven för gällande Europeiska EMC standard
CENELEC EN50081-1 och EN50082-1 och är CE-märkt.
LVD, lågspänningsdirektivet:
Produkten uppfyller kraven för gällande Europeiska LVD standard
IEC 669-1 och IEC 669-2-1.
Room humidistat
Installation
Mount the humidistat in a location with an even temperature and
good air circulation.The mounting holes have a c:c distance of
60 mm in order to fit on a wall box.
Wiring
HR1
Humidification
1 + 2
Dehumidification
1 + 3
HR2
2 steps humidification
1 + 2 and 4 + 6
2 steps dehumidification
1 + 3 and 4 + 5
Humidifi dehumidification
1 + 2 and 4 + 6
Maintenance
Calibrate the humidistat after it has been mounted. Thereafter it
should be calibrated at regular intervals, for example at the
beginning of each heating season.
If dust or other matter is permitted to accumulate on any type of
sensing material (hair, cotton or plastic) its hygroscopic
interchange with the surrounding air is impaired. So remove all
deposits at regular intervals using a soft brush.
Calibration
1. Measure the relative humidity close to the humidistat using
for example a psychrometer or other accurate instrument .
2. Remove the front and loosen the setpoint locking screw.
3. Twist the setpoint knob until you find the switching point.
If the switching point value is higher than the measured
actual value the calibration screw should be screwed
clockwise, if the switching value is lower than the measured
value the screw should be screwed counter-clockwise.
The calibration screw is reached through the slits at the lower
end of the humidistat using a narrow screwdriver. See fig 2.
Adjust the calibration screw until the switch switches when
the setpoint knob is set to the actual measured humidity.
4. Set the setpoint knob to the desired control value and, if
desired, lock the knob using the locking screw.
5. On HR2 the step differential can be set using the screw on
the micro switch actuator. factory setting is 0%. To increase
turn the screw clockwise.
EMC emissions & immunity standards:
This product conforms with the requirements of European EMC
standards CENELEC EN 50081-1 and EN 50082-1 and carries
the CE mark.
LVD
This product conforms with the requirements of
European LVD standards IEC 669-1 and IEC 669-2-1.
!
IMPORTANT: Read these
instructions before installation
and wiring of the product.