


2
Table of Contents
Terms
Identification of Controls
Front and Rear Panels
Remote Control
Installation and Remote Control Usage
System Connections
Connect to a TV
Connect to 5.1 channel amplifier
Connect to an amplifier with digital decoder
System connection for recording external signals
NAVIGATION
Mode
Recording Mode
Introduction
Entering the recording mode and menu description
Manual Record
Recording to DVD or HDD
Recording Quality
One Touch Record (OTR)
DV Controlled Recording
Copy from HDD to Optical disc
Copy from Optical to HDD
PIP (Picture in Picture)
File manager
Timer Recording
Chapter Editing
Introduction
Entering the Chapter Editing mode
Menu description
Operation steps
Selecting the title to be edited
Split title
Chapter Marker
Hide/Unhide the title
Index Picture
Play
Exiting the Chapter Editing
Features of the recorder
5
6
8
9
10
11
12
12
13
14
14
14
15
15
15
16
16
16
17
17
17
18
20
20
20
20
20
21
21
21
21
21
21
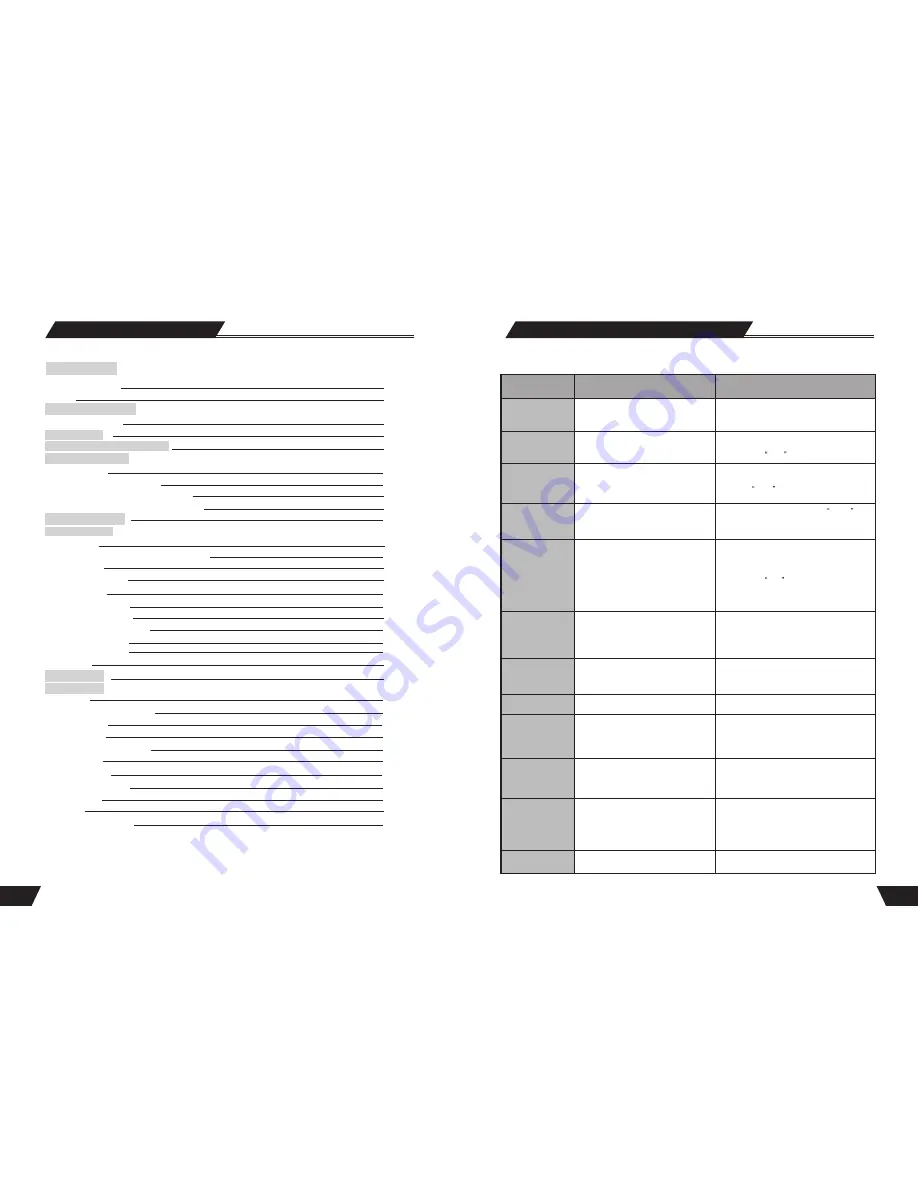
Basic Information
Before contacting service personnel, please check possible causes according to the following
instructions.
Appendix (Troubleshooting Guide)
Symptom
Possible Cause
Remedy
No Power
1.Power supply disconnected;
2.Bad contact between the power plug
and the receptacle;
3. The power of the receptacle is switched off.
1. Connect to the power supply.
2. Plug again or replace the receptacle with a new one.
3. Switch on the receptacle.
No sound
1.Incorrect signal connection;
2.The disc is deformed or dirty;
3. The system is in the mute status.
1. Connect the signals properly.
2. Clean or fix the disc.
3. Press the
Mute
button.
No picture
1. Incorrect signal connection;
2. Incorrect TV status.
3. TV system out mode is Progressive,
but your TV system is Interlace mode
1. Connect the signals properly.
2. Adjust the TV/AV status.
3. Press
PS/IS
to angle to mode.
No color
1. Wrong selection of TV system;
2. Improper color adjustment;
3. Incorrect video output settings
1. Set up the system by pressing the
System
button of the remote controller.
2. Readjust the color.
3. Check if the video output settings are correct.
Disc cannot
be played
1. No disc in the drive;
2. Disc placed wrongly;
3. Moisture has condensed in the unit;
4. Not in a playing status;
5. Wrong disk format;
6. Disc is dirty.
1. Insert a disc;
2. Put the disc on the disc tray properly
with the label side up.
3. Leave the unit on for about an hour
(without disc) before using it again.
4. Press the
Play
button to switch to
playing status.
5. Replace it with a supported disc.
6. Clean the disc with a soft cloth from the
centre to the edge.
Remote controller
malfunction
1. The remote controller is not directed at the
sensor;
2. The receiving distance is more than 8 meters;
3. Low voltage of the RC batteries;
4. There is an obstacle between the unit and RC.
1. Direct the remote controller at the
sensor.
2. Reduce the receiving distance.
3. Replace all the batteries.
4. Remove the obstacle.
Sudden malfunction
1. Bad disc quality;
2. Press other buttons by mistake;
3. Static from the outside.
1. Wait for 5~10 seconds and the playing
will be restored.
2. Operate again.
3. Shut off the unit for 1-2 minutes and
open it again.
Picture dividing
1. The selected system is incompatible
with the disc;
1. Set up the correct system.
External signals
cannot be recorded
1. Incorrect system connection;
2. No disc or non-recordable disc;
3. The disc has been finished;
4. There is no free space in the disc.
1. Connect properly.
2. Insert a recordable disc.
3. Change a disc.
4. Change a disc.
No monitoring signal
1. Input source not prepared;
2. Wrong video output system;
3. The actual input source is not
consistent with the selected one.
1. Prepare the input source.
2. Switch the video output system.
3. Select a proper input source.
Timer recording
cannot be done
1.The disc does not meet the requirement;
2. Wrong time settings (System Clock or
Recording Time);
3. The input source doesn't work properly
during the recording time;
4. System power failure.
1. Replace it with a new DVD+R or
DVD+RW disc.
2. Set up the time again.
3. Ensure the input source work properly
during the recording time.
4. Set the system to standby status.
Recording
aborted halfway
1. There is no free space in the disc;
2. Bad disc quality.
1. Replace it with a blank disc.
2. Replace it with a high quality disc.
51
51


