


IN
OUT
TV75
ANTENNA
~110-230V 50/60Hz
Y
Y
Cb
Cb/Pb
Cr
Cr/Pr
INPUT
S-VIDEO
VIDEO
L
SR
SW
SL
C
L
R
R
S-VIDEO
AUDIO OUTPUT
OPTICAL
COAXIAL
DIGITAL OUTPUT
VIDEO INPUT
VIDEO OUTPUT
VIDEO
OUTPUT
5.1 CH
USB
DV
VIDEO
L
---AUDIO---
R
8
Identification of Controls
45
TV Type
TV Display
Video Output Format
1
SETUP MENU -VIDEO
PAL
4:3 LB
Interlaced
Progressive
Video Output Format
1. In the General Settings menu, use the or button to move
the cursor, select the
Video Output Format
item and press
the
SELECT
button.
2. Select the Progressive or Interlace option for video scan
output mode, and press the
SELECT
button to confirm.
* This function can do by pressing
PS/IS
button on the
remote controller.
System Setup
SETUP MENU- AUDIO
1. Enter the System Setup control menu.
2. Use the or button to select the
AUDIO
item.
3. Press the
SELECT
button to enter the Play Setting
mode. The following chart is the Play Setting main menu.
Analog Audio output
The unit can set the analog audio output at 2-CH or 5.1-CH. The output of 2-CH comes from L and R channels.
1.Enter the play settings menu, use the or button to select
SPDIF Output
item, and press the
SELECT
button.
2.Use the or button to select 2-CH or 5.1-CH, and press the
SELECT
button to confirm.
SPDIF Output
This unit has a digital audio output. You can enjoy music of better quality through an amplifier with a digital audio
decoder.
1.Enter the play settings menu, use the or button to select
SPDIF Output
item, and press the
SELECT
button to drop down a menu.
2.Use the arrow buttons to select a proper value (RAW, LPCM), and press the
SELECT
button.
3.Press the
RETURN
button to return to the upper level menu and set up other items.
Analog Audio output
SPDIF Output
LPCM Output
Dynamic Range
1
SETUP MENU -AUDIO
2CH
RAW
LPCM 96K
Off
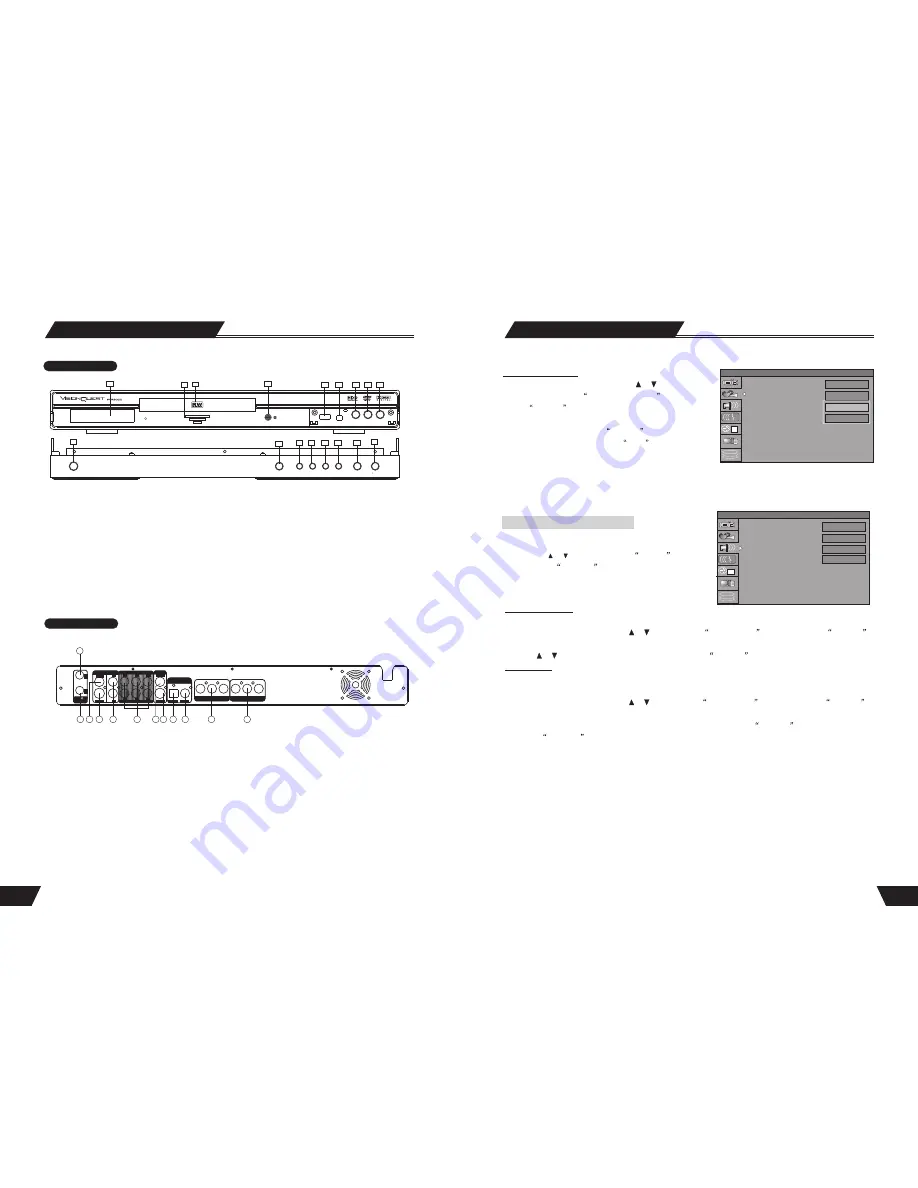
REAR PANEL
1. RF SIGNAL INPUT
2. RF SIGNAL OUTPUT
3. COMPOSITE VIDEO INPUT(REAR)
4.S-VIDEO INPUT
5. AUDIO INPUT (REAR LEFT/RIGHT)
6. 5.1CH AUDIO OUTPUT
(L, R, SL, SR, C, SW )
1
2
3
4
5
7 8
10
11
9
6
7. COMPOSITE VIDEO OUTPUT
8. S-VIDEO OUTPUT(REAR)
9. DIGITAL AUDIO- OPTICAL OUTPUT
10. DIGITAL AUDIO-COAXIAL OUTPUT
11. COMPONENT VIDEOS INPUT
(Y, Cr, Cb)
12. COMPONENT VIDEOS OUTPUT
(Y, Cr/Pr, Cb/Pb)
12
OPEN
STANDBY/ON
PLAY
STOP
HDD
DVD
SOURCE
REC
FRONT PANEL
1.STANDBY/ON BUTTON
2.STANDBY LED
3.IR(REMOTE SENSOR)
4.DVD DOOR
5.VFD DISPLAY
6. OPEN/CLOSE BUTTON
7.PLAY BUTTON
8.STOP BUTTON
9.HDD BUTTON
10.DVD BUTTON
.SOURCE BUTTON
12.RECORD BUTTON
11
13.USB INPUT
14.DIGITAL VIDICON INPUT
15. VIDEO INPUT
16.AUDIO INPUT (FRONT RIGHT)
17.AUDIO INPUT (FRONT LEFT)
1
2
13
6
11
3
7
4
8
9
10
5
12
14
16
17
15


