background image

(pressed once)

Display

CH+/-   

0-9
FF

Slow

Replay

Skip

Mute
VOL+/-

Display

Display

(pressed twice)

(pressed three times)

15

Recording Mode

Manual Recording

Recording Source

You can select which video input  the machine should record from.  The following options are available:


Rear CVBS (Composite)    


Rear S-Video    


Tuner     


Front CVBS (Composite)    


DV Input

Press the 

SOURCE 

button (repeatedly) to change the video source and select one of the above.

Note

: If you are recording from a rear source, make sure your audio connections are connected to the rear audio inputs.  

 If you are recording from a front source, make sure your audio connections are connected to the front audio inputs.   

One Touch Recording (OTR)

This function enables you to set up the timer during the recording process. Once the scheduled time is reached, the 

system will stop recording automatically.

1.   Enter the 

Recording Mode

 and start recording.

2.   For desired timer recording, press the 

REC/OTR

 button once or several times. 

           The recording time will increase by 30 minutes with every pressing of the 

REC/OTR

 button. If the 

           scheduled time exceeds the recordable time of the disc, normal recording mode will restore.

           If the timer recording is paused or stopped, the system will cancel the timer recording process.

Recording to DVD or HDD

Select Recorder to HDD or optical disc:

 Press Timeshift button once to switch to manual recording mode, and press 

REC TO

 button to switch difference HDD or

DVD Record source.

If you have a recordable media in the tray,  you can press Rec and start recording (OTR) to DVD. Press Stop to 

finish recording.

Note

: The product will continue to record until the disc is full. To set the product to record for 30 minutes only, press 

the 

REC/OTR

 button after recording has started. A message will be displayed on the screen indicating that the product 

will record for 30 minutes.  Each time the 

REC/OTR

 button is pressed, an additional 30 minutes will be added to the 

record time. To pause the recording, press the 

PAUSE

 button on the remote control .  Press the 

PAUSE

 button or the 

REC/OTR

 button to resume recording. Recording will continue until the 

STOP

 button on the remote control or the 

product front panel is pressed.

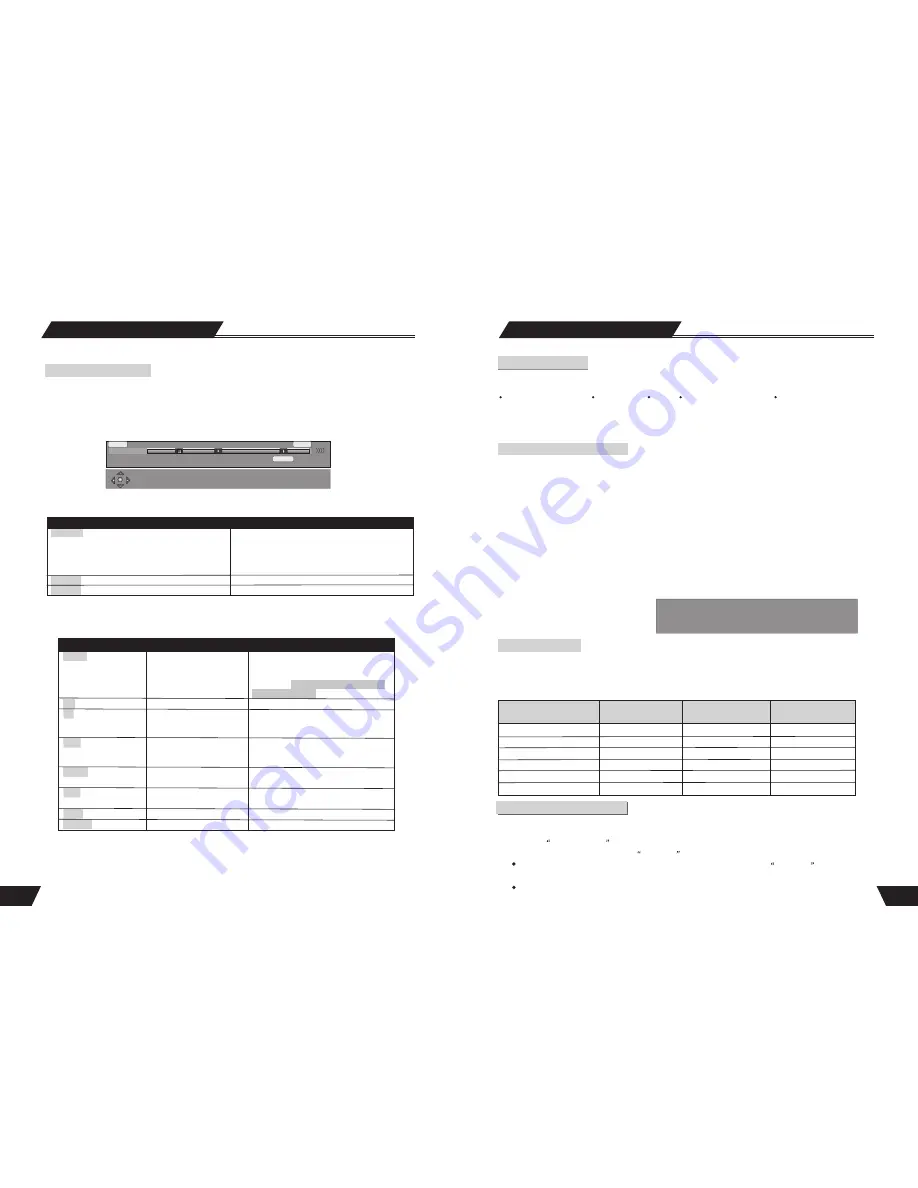
Press the remote control Timeshift  button once, turn on Timeshift mode, press the button twice, switch to manual 

recording mode display the chart below.

Note: In the display chart, you may press REC 

TO button to switch difference HDD or DVD 

Record source.

Sys state: STOP
Record To Optical Disc As SP(25 min/GB)
Elapsed Time: 00:02:38 Remain Space: 02:05: 02

Recording Quality 

You can select from up to six record quality settings to define the picture quality of the recordings and the amount of 

space you want to use on the DVD/HDD. Higher quality recordings will consume more space and low quality recordings 

will consume less space on the DVD/HDD.

NOTE: 

Use the ADD/CLEAR button to switch between different record quality options.

Very Good

Good

Moderate

53 Hours

106 Hours
132 Hours
159 Hours

212Hours

319 Hours

38

HDD Play Mode

Time shifting

Time shifting introduction

Time shifting: Record, Stop, Pause, Play keys.
Other options: DVD, Timeshift, USB, Setup, Timer, Source Keys

18:15

19:15

19:06

+30 min

When the product is turned on, if the setup menu setup->Timeshift->Timeshift default source-> Tuner(ON) or 
you press Timeshift button from other menus, the last viewed TV channel will be tuned in and Time shifting 
starts automatically. Time shifting allows 'PAUSE’ the live TV broadcast for up to 60 minutes. At any time, the 
viewing can resume. Press PAUSE to pause the broadcast, press PLAY to resume TV viewing. If the system is 
paused for 60 minutes, it will automatically resume TV viewing. 

On-Screen Display

Time shifting buffer information. Current playback
time, time of recording, time of recording minus 1
hour, trick mode status, Saving status,
Channel/Source information, Dubbing indicator (if
Dubbing is on-going)  - see 

Time shifting 

figure 

Hot keys and navigation information
Removes all On-screen Display

You can navigate in Time shifting mode and control the audio output by using the following remote control
keys:

Key   

Result  

Note

Change the channel

Change the channel
Fast Forward. Press to 
cycle through 4, 8, 32x
speeds.
Slow forward. Press to 
cycle through 1/2, 1/4 or
1/8x speeds
Jump back 10 seconds

Jump forward 30 seconds

Mute audio on/off 
Decrease/increase volume

Note: By default, changing the channel
will erase all Time shifting required for
the current channel. This option can be
reset in the 

Setup-> HDD-> Time shift

Buffer-> Preserve

Hold the left key for 2 seconds, it will 
jump back 60 seconds.
Hold the right key for 2 seconds, it will 
jump forword 60 seconds.

(250GB,HDD) 

Record Quality 

Recording Time
  (4.7GB,DVD)

Recording Time

Video Quality

Best

Normal

Low

1 Hour

2 Hours

2.5 Hours

3 Hours

4Hours

6 Hours

HQ (High Quality)
SP (Standard Play)

SP+(Standard Play)

EP(Extended Play)

LP (Long Play)

SLP (Super Long Play)

Remote contro

Summary of Contents for PVR-5000-250G

Page 1: ...USB DV VIDEO L AUDIO R OPEN PVR5000 HDD DVD RECORDER...

Page 2: ...ratio 90dB Audio distortion noise 65dB 1KHz Audio Level 2 0 Vrms 10k ohm Load General specifications Power supply AC110 230V 50 60Hz Power consumption 40W Standby power consumption 3W Size 430mmX48mm...

Page 3: ...be used for a long time disconnect the power plug from the wall outlet Note Do not pull the power cord When disconnect the unit from the wall outlet For optimum performance do not place heavy objects...

Page 4: ...adjust the color 3 Check if the video output settings are correct Disc cannot be played 1 No discin the drive 2 Disc placedwrongly 3 Moisture hascondensed in theunit 4 Not ina playing status 5 Wrongdi...

Page 5: ...channel NOTE Refer to Time Shift introduction page fordetailed explanation Space Management Automatic When Space Management is Automatic and the HDD is full the system shouldoverwrite un protected ti...

Page 6: ...no response from the user up to 1 minute before the timer recording is due to start If Ok is pressed or assumed the system should continue dubbing and graciously reduce the speed to the maximum possi...

Page 7: ...to display the SYSTEM SET UP MENU Use the CURSOR buttons of the remote control to select the Date dd mm yy and press the SELECT button to confirm Enter the correct date in mm dd yy format Month Day Y...

Page 8: ...recordable DVD disk can record 4 hour programs EP Good resolution a bosseyed recordable DVD disk can record 3 hour programs SP Ordinary resolution a bosseyed recordable DVD disk can record 2 5 hour p...

Page 9: ...SETUP MENU LANGUAGE 1 To satisfy the needs of consumers in different regions the unit provides various interface languages 2 Enter the system setup mode In the System Setup control bar menu use the or...

Page 10: ...select 2 CH or 5 1 CH and press the SELECT button to confirm SPDIF Output This unit has a digital audio output You can enjoy music of better quality through an amplifier with a digital audio decoder 1...

Page 11: ...SELECT button to confirm This setting must be in accordance with the TV system otherwise the video output might not work properly TV Type The product supports two different television systems that are...

Page 12: ...the or and SELECT buttons to select this item and press the or button to tune the frequency slightly Skip Yes or No use the or and SELECT buttons to select this item you can select Yes or No to decid...

Page 13: ...items For the differences of the six quality levels SP SP LP SLP EP and HQ see the glossary for reference Autoscan Auto program scan The unit has a channel tuner You can receive TV signals directly f...

Page 14: ...the System Setup mode Now the system setup control bar menu will appear on the top of the OSD as shown in the following chart The meanings of the icons are as follows 1 Auto Chapter Marker 2 Record Q...

Page 15: ...fect titles that are selected to be copied to DVD The selected tiles will be kept until copying operation is over Even after this procedure there is no space on the HDD to record the product will prov...

Page 16: ...g buffer data will be maintained Note If you change the input source of video and the video standard is different NTSC vs PAL the Time shifting buffer will be erased Note During Time shifting a Timer...

Page 17: ...isplay chart you may press REC TO button to switch difference HDD or DVD Record source Sys state STOP Record To Optical Disc As SP 25 min GB Elapsed Time 00 02 38 Remain Space 02 05 02 Recording Quali...

Page 18: ...to enlarge an image that is currently displayed on the screen and pan through to specific areas on the zoomed image There are two zoom options available 1 5x 2 0x which will be indicated on the scree...

Page 19: ...anged to a more interesting content then unpause time shifting to watch the remaining of the previous program Live broadcast shall be available in PIP ON OFF View live video in PIP during optical play...

Page 20: ...VPS Ch029 HDD SP Once Once Daily Weekly 35 DVD VCD Play Mode The Use of the GOTO Button 1 In the playing status press the GOTO button to cycle through various options in the play control bar menu With...

Page 21: ...ured with the set values before completing expected recording jobs Select any timer recording item and press the ADD CLEAR button to delete it Do not use the finalized DVD R RW disc 11 Switch the VPS...

Page 22: ...title in two 8 Time Time Selection Play Chapter Editing Editing Mode Title 04 04 Chapter 01 01 Play Chapter marker Hide Chapter Index picture Split title Time 0 00 02 Editing Mode Title Chapter 01 01...

Page 23: ...ng the system will write information to the disc So the system might not respond for some time Chapter Editing Editing Mode Title 04 04 Chapter 01 01 Play Chapter marker Hide Chapter Index picture Spl...

Page 24: ...ol select another title to be combined and pressENTER Press returnto cancel Note It ispossible to combinetwo MPEG 2 or MPEG 1 video titlesthat have beenrecorded by thesame recorder after being combine...

Page 25: ...utton to enter the Normal Play mode 4 Pressing the PLAY button directly is another way preform Normal Play There are various Repeat Play modes including Repeat Title DVD only Repeat Chapter DVD only R...

Page 26: ...3308 The user will be asked to Unlock the program before Play or any Edit or Dubbing operation In order to Unlock once you have highlighted the program on the HDD title list bring up the Popup menu by...

Page 27: ...then press the SELECT button To judge if a disc is write protected try the Browse Disc Information operation Awrite protected disc cannot be recorded erased or edited unless the write protection is ca...

Page 28: ...Title Overwrite Disc Lock Disc Optical Disc Copy All DVD RW DVD RW DVD RW DVD R 27 1 2 3 4 5 6 7 8 1 TITLE 1 01 04 2004 2 13 09 58 3 SP 00 01 00 4 5 Introduction Different recorded programs make diffe...

Reviews: