background image

25

Introduction

 The Disc Operation means operations done to recordable discs in the drive, including browsing disc information,

 finalizing a disc, removing disc content, deleting the last title, setting compatibility and write protection, etc.

Enter the Disc Operation Mode

Press DVD button, the unit read out the title menu for DVD

R/RW disc, press the   button move cursor to top 

of title menu, than press the    button to display the disc operation menu by the remote controller.

Menu Description

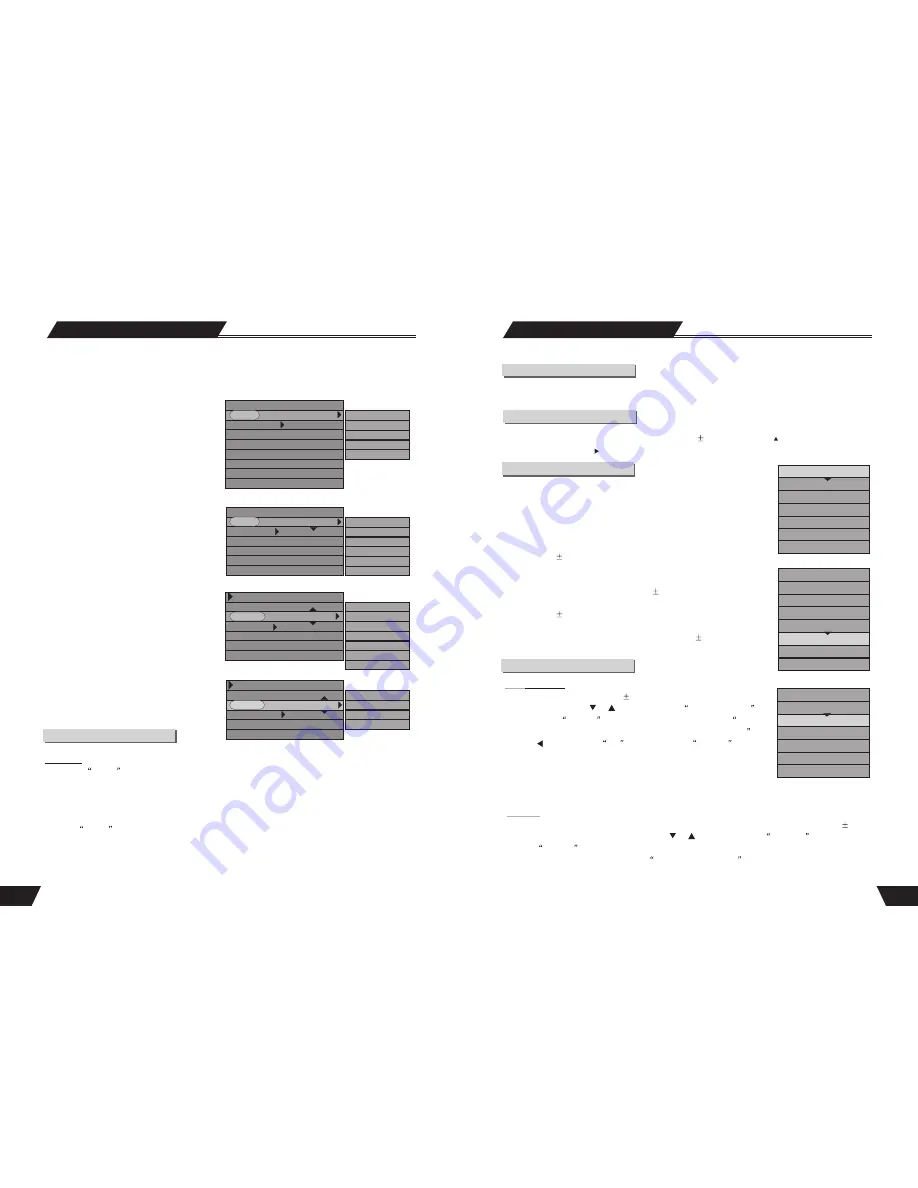
        The control bar menu under this mode is as shown in the chart.

        The meanings for the icons are as follows.

        1. Play: Play the content of the current disc.

        2. Rename Disc: Rename the disc (default name: MY DVD).

        3. Erase Optical Disc: Once this operation is done, all content in the disc will 

        be removed completely. The disc index will appear as blank on the screen.


(Only for DVD

RW disc).

        4. Record a new title: Add a new title to record.

        5. Overwrite Disc: An operation on a recorded DVD+RW disc to 

        overwrite its previous content

(Only for DVD

RW disc).

        6. Lock Disc:. This function prevents the deletion of recorded content.


(Only for DVD

RW disc)

        7. Copy All: This function is select all subtitle.

        8.Finalize Disc:This operation enables the recorded DVD

R/-RW discs 

          to be played in other DVD players. You cannot add new content to such discs.


Play

Rename Disc

Erase Optical Disc

Record a New Title

Overwrite Disc

Lock Disc

Copy All

Operation Steps

Erase Optical Disc

This operation is effective for 

DVD

RW 

 discs. In the Disc Operation 

control bar menu, use the 

 or 

 button to select the 

Erase Optical Disc


option, press the 

SELECT

 button and a warning message pops up,  This 

operation will erase all data on the disc. Are you sure you want to continue

Press the       button to select 

Yes

, and then press the

SELECT

 button

to confirm. Then the system will start erasing the disc.

The Erase Disc operation may take some time. During the operation, do not 

conduct any other operation, including standby; once the operation starts, it 

cannot be cancelled midway. Never switch off the power during the operation; otherwise the disc may be 

damaged. 

 Lock Disc

 This operation will cancel the write protection of a locked disc. This function is available only for 

DVD

RW 

discs.

1. In the Disc Operation control bar menu, use the 

 or 

 button to select  the 

Lock Disc

 item, and then 

press the 

SELECT

 button.

To judge if a disc is write-protected, try the 

Browse Disc Information

 operation. A write-protected disc 

cannot be recorded, erased or edited unless the write protection is canceled. 

Disc Operation

DVD+RW:

Play

Rename Disc

Erase Optical Disc

Record a New Title

Overwrite Disc

Lock Disc

Copy All

DVD+RW:

28

1

1

13

13

3

3

3

3

9

14

9

11

11

1

2

3

9

11

12

10

The following charts are control bar menus for DVD, VCD, CD and MPEG 4 respectively. Please note

 that the menu may vary to some extent for different discs.

The meanings for the icons are as follows.

1. This icon shows the disc type.

2. 

MODE. 

Options include Normal Play, A-B 

Repeat ,  Chapter Repeat ,  Title Repeat ,  Disc 

Repeat, Program Play, etc.

3. 

TRICK.

 Options include Play, Stop, Pre-stop,

Pause, FF/FB, Slow, etc.

4. 

TITLE.

 The DVD title being played  and the total

number of titles.

5. 

CHAPTER.

  The chapter of the  DVD  title

being played  and the total number of chapters.

6.

 AUDIO.

 Select the DVD Audio.

7. 

SUBTITLE

. Select the DVD subtitle.

8. 

ANGLE.

 Select the DVD shooting angle.

9. 

T-TIME.

 Displays the time played and left.

10. 

TRACK.

 Track being played of the VCD/CD 

and the total number of tracks.

11. 

AUDIO.

 Channel selection when playing VCD, 

CD.

12. 

PBC

 ON/OFF. Play menu control. This function

is available only for 2.0 and above versions.

13.

File 

Type:Such as Audio,PIC(picture),Video.

14.

LANGU: 

only for MPEG 4 play, select the 

language.

Operation

Direct Play

1. Press the 

EJECT

 button to open the

disc tray. 

2. Insert the available disc.

3. Do not put the disc upside-down. The smooth side should face downward, while the printed side should 

face upward.

Press the 

EJECT

 button to close the disc tray. The system will start playing.

Play a VCD

1

2

3

4

5

6

7

8

9

Play a DVD

DVD

MODE:            Normal                                Normal 

Trick mode:                                                  A-B Repeat

TITLE:             01/01                                   Chapter Repeat

CHAPTER:      02/14                                   Title Repeat

AUDIO:           01/03-OTH                          Program 

SUBTITLE:     01/03-OTH                       

ANGLE:          01/01              

T-TIME:          00:02:04-00:51:25

VCD

MODE:         Normal                                     Normal 

Trick mode :                                                 A-B Repeat 

Track:           01/01                                       Track Repeat

Audio:          Stereo                                      Disc Repeat

PBC:            PBC ON                                  Program

TIME:   00:02:04-00:51:25                         Random

Play a  MPEG 4

File play

File Type:     AUDIO                                    Normal 

MODE:        Normal                                    Repeat Track

Trick mode:                                                  Repeat DIR

AUDIO:      Stereo                                       Disc Repeat

TIME:         00:02:48-00:51:25                    Program

LANGU      Language 1                               Random  

                                                                       Intro Play

Play a CD

CDDA PLAY

File Type:     AUDIO                                    Normal 

MODE:        Normal play                            A-B Track

Trick mode:                                                  Track Repeat

AUDIO:      Stereo                                       Program

TIME:         00:02:48-00:51:25                    


Play Mode

1

2

3

4

5

6

7

8

Play

Rename Disc

Erase Optical Disc

Record a New Title

Overwrite Disc

Finalize Disc

Lock Disc

Copy All

DVD-RW:

Summary of Contents for PVR-5000-250G

Page 1: ...USB DV VIDEO L AUDIO R OPEN PVR5000 HDD DVD RECORDER...

Page 2: ...ratio 90dB Audio distortion noise 65dB 1KHz Audio Level 2 0 Vrms 10k ohm Load General specifications Power supply AC110 230V 50 60Hz Power consumption 40W Standby power consumption 3W Size 430mmX48mm...

Page 3: ...be used for a long time disconnect the power plug from the wall outlet Note Do not pull the power cord When disconnect the unit from the wall outlet For optimum performance do not place heavy objects...

Page 4: ...adjust the color 3 Check if the video output settings are correct Disc cannot be played 1 No discin the drive 2 Disc placedwrongly 3 Moisture hascondensed in theunit 4 Not ina playing status 5 Wrongdi...

Page 5: ...channel NOTE Refer to Time Shift introduction page fordetailed explanation Space Management Automatic When Space Management is Automatic and the HDD is full the system shouldoverwrite un protected ti...

Page 6: ...no response from the user up to 1 minute before the timer recording is due to start If Ok is pressed or assumed the system should continue dubbing and graciously reduce the speed to the maximum possi...

Page 7: ...to display the SYSTEM SET UP MENU Use the CURSOR buttons of the remote control to select the Date dd mm yy and press the SELECT button to confirm Enter the correct date in mm dd yy format Month Day Y...

Page 8: ...recordable DVD disk can record 4 hour programs EP Good resolution a bosseyed recordable DVD disk can record 3 hour programs SP Ordinary resolution a bosseyed recordable DVD disk can record 2 5 hour p...

Page 9: ...SETUP MENU LANGUAGE 1 To satisfy the needs of consumers in different regions the unit provides various interface languages 2 Enter the system setup mode In the System Setup control bar menu use the or...

Page 10: ...select 2 CH or 5 1 CH and press the SELECT button to confirm SPDIF Output This unit has a digital audio output You can enjoy music of better quality through an amplifier with a digital audio decoder 1...

Page 11: ...SELECT button to confirm This setting must be in accordance with the TV system otherwise the video output might not work properly TV Type The product supports two different television systems that are...

Page 12: ...the or and SELECT buttons to select this item and press the or button to tune the frequency slightly Skip Yes or No use the or and SELECT buttons to select this item you can select Yes or No to decid...

Page 13: ...items For the differences of the six quality levels SP SP LP SLP EP and HQ see the glossary for reference Autoscan Auto program scan The unit has a channel tuner You can receive TV signals directly f...

Page 14: ...the System Setup mode Now the system setup control bar menu will appear on the top of the OSD as shown in the following chart The meanings of the icons are as follows 1 Auto Chapter Marker 2 Record Q...

Page 15: ...fect titles that are selected to be copied to DVD The selected tiles will be kept until copying operation is over Even after this procedure there is no space on the HDD to record the product will prov...

Page 16: ...g buffer data will be maintained Note If you change the input source of video and the video standard is different NTSC vs PAL the Time shifting buffer will be erased Note During Time shifting a Timer...

Page 17: ...isplay chart you may press REC TO button to switch difference HDD or DVD Record source Sys state STOP Record To Optical Disc As SP 25 min GB Elapsed Time 00 02 38 Remain Space 02 05 02 Recording Quali...

Page 18: ...to enlarge an image that is currently displayed on the screen and pan through to specific areas on the zoomed image There are two zoom options available 1 5x 2 0x which will be indicated on the scree...

Page 19: ...anged to a more interesting content then unpause time shifting to watch the remaining of the previous program Live broadcast shall be available in PIP ON OFF View live video in PIP during optical play...

Page 20: ...VPS Ch029 HDD SP Once Once Daily Weekly 35 DVD VCD Play Mode The Use of the GOTO Button 1 In the playing status press the GOTO button to cycle through various options in the play control bar menu With...

Page 21: ...ured with the set values before completing expected recording jobs Select any timer recording item and press the ADD CLEAR button to delete it Do not use the finalized DVD R RW disc 11 Switch the VPS...

Page 22: ...title in two 8 Time Time Selection Play Chapter Editing Editing Mode Title 04 04 Chapter 01 01 Play Chapter marker Hide Chapter Index picture Split title Time 0 00 02 Editing Mode Title Chapter 01 01...

Page 23: ...ng the system will write information to the disc So the system might not respond for some time Chapter Editing Editing Mode Title 04 04 Chapter 01 01 Play Chapter marker Hide Chapter Index picture Spl...

Page 24: ...ol select another title to be combined and pressENTER Press returnto cancel Note It ispossible to combinetwo MPEG 2 or MPEG 1 video titlesthat have beenrecorded by thesame recorder after being combine...

Page 25: ...utton to enter the Normal Play mode 4 Pressing the PLAY button directly is another way preform Normal Play There are various Repeat Play modes including Repeat Title DVD only Repeat Chapter DVD only R...

Page 26: ...3308 The user will be asked to Unlock the program before Play or any Edit or Dubbing operation In order to Unlock once you have highlighted the program on the HDD title list bring up the Popup menu by...

Page 27: ...then press the SELECT button To judge if a disc is write protected try the Browse Disc Information operation Awrite protected disc cannot be recorded erased or edited unless the write protection is ca...

Page 28: ...Title Overwrite Disc Lock Disc Optical Disc Copy All DVD RW DVD RW DVD RW DVD R 27 1 2 3 4 5 6 7 8 1 TITLE 1 01 04 2004 2 13 09 58 3 SP 00 01 00 4 5 Introduction Different recorded programs make diffe...

Reviews: