36
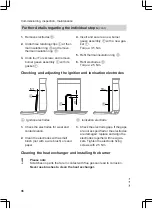
1.
Remove electrodes
B
.
2.
Undo three retaining clips
C
at ther-
mal insulation ring
D
and remove
thermal insulation ring
D
.
3.
Undo four Torx screws and remove
burner gauze assembly
E
with its
gasket
F
.
4.
Insert and secure a new burner
gauze assembly
E
with a new gas-
ket
F
.
Torque: 3.5 Nm.
5.
Refit thermal insulation ring
D
.
6.
Refit electrodes
B
.
Torque: 2.5 Nm.
Checking and adjusting the ignition and ionisation electrodes
6
+2
0
4
+0,5 0
10
±1
A
A
B
A
Ignition electrodes
B
Ionisation electrode
1.
Check the electrodes for wear and
contamination.
2.
Clean the electrodes with a small
brush (not with a wire brush) or sand
paper.
3.
Check the electrode gaps. If the gaps
are not as specified or the electrodes
are damaged, replace and align the
electrodes together with new gas-
kets. Tighten the electrode fixing
screws with 2.5 Nm.
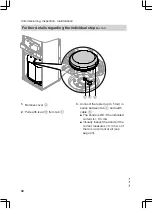
Cleaning the heat exchanger and installing the burner
!
Please note
Scratches on parts that are in contact with flue gas can lead to corrosion.
Never use brushes to clean the heat exchanger.
Commissioning, inspection, maintenance
Further details regarding the individual steps
(cont.)
5457 552 GB
Summary of Contents for FS2B
Page 163: ...163 5457 552 GB ...


