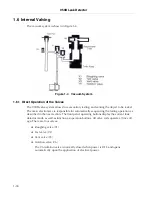


959D Leak Detector
2-7
2.2 959D Startup Procedure
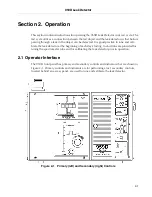
The controls referred to in the following procedure are shown in Figure 2-2 on page 2-2 and
Figure 2-4 on page 2-4.
1. Be sure that the plug is in the test port and that the nut is tight.
2. Check the vacuum connections at the top of the TriScroll 610 pump and at the rear of
the 959D for tightness.
3. Turn the cart power strip ON.
The TriScroll 610 pump starts.
4. Open the access panel door and move the MAIN POWER switch to ON.
Check that the ON/AUTO switch is ON.
The turbo pump will start.
5. Set the FIL toggle to ON/AUTO.
❑
The HOLD button will be lit.
❑
The HI VAC OK and TURBO READY indicator LEDs will light.
❑
Wait until the FIL indicator lights.
You may have to repeat step 5 until the FIL light stays on. If the filament will not light
after repeated attempts, the ion source may have to be replaced.
Qualitative analysis can begin immediately.
Allow 1/2-hour warm-up time to perform calibration and qualitative analysis.
To calibrate the 959D, see Section 2.5 “Calibration and Tuning” on page 2-11.
Summary of Contents for 959D
Page 16: ...959D Leak Detector 1 2 D R A F T 9 1 3 0 2 Figure 1 1 Model 959D Leak Detector ...
Page 28: ...959D Leak Detector This page intentionally left blank D R A F T 9 1 3 0 2 ...
Page 48: ...959D Leak Detector This page intentionally left blank D R A F T 9 1 3 0 2 ...
Page 68: ...959D Leak Detector This page intentionally left blank D R A F T 9 1 3 0 2 ...
Page 78: ...959D Leak Detector This page intentionally left blank D R A F T 9 1 3 0 2 ...
Page 81: ......