959D Leak Detector
2-6
DRAFT
9/13/02
2.1.4 Connecting to the Test Port
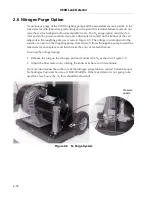
The unit under test or the associated vacuum system to be monitored is connected to the
test port at the top of the 959D (Figure 2-6). Information regarding the various leak detection
methods is given in Appendix A “Introduction to Leak Detection” on page A-1.
NOTE
You should have a variety of adapter tubulation sizes on hand
to fit the test port. The Test Port Adapter Kit (Varian
p/n 86428801) has twelve adapters ranging from
1/16" to 1" in diameter.
CAUTION
To avoid contamination of the vacuum system, the test port
plug should be in place when the 959D is not being used for
testing.
Figure 2-6
Vacuum Test Port
To connect to the test port:
1. Loosen the tightening nut to remove the test port plug.
2. Place the object to be tested onto the test port and tighten the nut.
Reasonable hand-tightness is sufficient to compress the O-ring and establish a
vacuum-tight seal in the test port.
CAUTION
Be careful not to drop the test port plug when you remove it. It
is deceptively heavy for its size.
Test Port
Test Port Plug
Tightening Nut
Plug
Test
Port Nut
Summary of Contents for 959D
Page 16: ...959D Leak Detector 1 2 D R A F T 9 1 3 0 2 Figure 1 1 Model 959D Leak Detector ...
Page 28: ...959D Leak Detector This page intentionally left blank D R A F T 9 1 3 0 2 ...
Page 48: ...959D Leak Detector This page intentionally left blank D R A F T 9 1 3 0 2 ...
Page 68: ...959D Leak Detector This page intentionally left blank D R A F T 9 1 3 0 2 ...
Page 78: ...959D Leak Detector This page intentionally left blank D R A F T 9 1 3 0 2 ...
Page 81: ......

