


Getting Started
Network Camera
Please read the Important Information manual before using.
This Getting Started explains how to connect, set up and mount the
camera. See the Operating Instructions on the Setup CD-ROM for
details about the camera's features.
•
The Setup CD-ROM provides Getting Started in the following languages:
English, French, German, Italian, Spanish, Russian, Chinese and Korean.
•
If you cannot complete the setup, see the Troubleshooting manual on the
Setup CD-ROM.
This product is a wireless Network Camera. Using a PC and wireless router, it allows you to view images in a residence or from distant places over the
Internet.
2006 Panasonic Communications Co., Ltd. All Rights Reserved.
PQQX14969ZA
KK0206YR0 (CE)
Indoor Use Only
Model No.
BL-C20
Trademarks
•
Adobe, Acrobat and Reader are either registered trademarks or trademarks of Adobe Systems Incorporated in the United States and/or other countries.
•
Microsoft, Windows and ActiveX are either registered trademarks or trademarks of Microsoft Corporation in the United States and/or other countries.
•
Screen shots reprinted with permission from Microsoft Corporation.
•
All other trademarks identified herein are the property of their respective owners.
•
This software is based in part on the work of the Independent JPEG Group.
Abbreviations
•
UPnP is the abbreviation for "Universal Plug and Play".
•
"Network Camera" is called "camera" in this manual.
•
"Setup CD-ROM" is called "CD-ROM" in this manual.
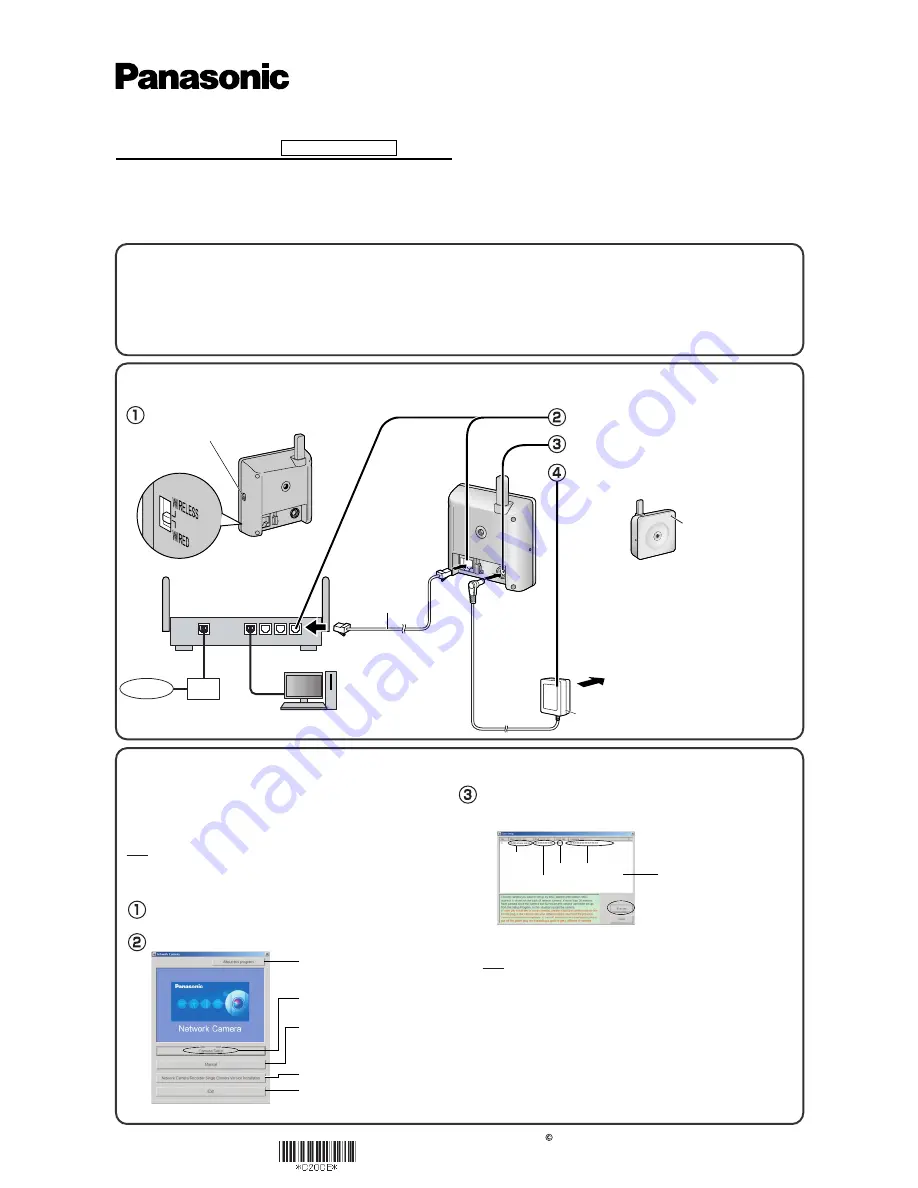
1.
Connect the camera to your router.
The PC should be connected to the router and then to the Internet in advance.
Router
(Customer-provided)
WAN
4
3
2
1 LAN
•
When you operate the camera, the power outlet
should be near the camera and easily accessible.
•
Use only specified Panasonic AC adaptor (Order
No. PQLV206CEY[for use in countries/areas other
than the United Kingdom], PQLV206EY [for use in
the United Kingdom]).
•
If the indicator does not light green, see page 3
and 4 of Troubleshooting on the CD-ROM.
•
The camera may become warm. This is not a
malfunction.
The indicator
lights green.
Ethernet cable
(Straight Cat5 cable,
Customer-provided)
To the power outlet
AC adaptor
Modem
Internet
PC
(For setup and display, Customer-provided)
Confirm that the switch on the side of the camera
is set to WIRED.
Connect the Ethernet cable (customer-
provided) to the camera and the router.
Connect the AC adaptor cord to the DC In
jack.
Plug the AC adaptor into the power outlet.
•
Confirm that the indicator lights green after about
1 minute.
<Side>
Switch
Insert the CD-ROM into the CD-ROM drive of the PC.
2.
Set up the camera.
Click [Camera Setup].
Important
•
If a Windows Security Alert is displayed, click [Unblock].
Select the camera to set up and click [Execute].
• If the indicator does not light green, check the connection (see page 19 of the
Operating Instructions, or page 3 and 4 of Troubleshooting on the CD-ROM).
• If more than 20 minutes have passed since the camera was turned on, the
camera cannot be set up from the Setup Program. In this situation, disconnect
the AC adaptor from the power outlet, and reconnect it again.
• The Setup Program may not list any cameras due to your firewall or antivirus
software settings on your PC. If you cannot disable your firewall or antivirus
software, you can set up the camera by entering the camera MAC address. The
camera's MAC address can be found on the label affixed to the rear of each
camera. See page 20 of the Operating Instructions on the CD-ROM for details.
• The MAC Address on the rear side (see page 20 of the Operating Instructions
on the CD-ROM) of the camera shows which camera you select on the
Camera List window.
•
This program searches for the cameras that are connected to the router
and displays their MAC Addresses, IP addresses and Port Numbers.
Note
• When the setup program is run on a PC with a Chinese, French or Japanese
operating system, program screens will be displayed in that language. In addition,
the language settings of the software will also be set to the same as the OS.
• The images used in the following procedures are of the English-language version.
Note
•
To avoid any possible problems, temporarily disable any firewall
or antivirus software.
•
This procedure explains installation of the camera on the same
network as your PC.
•
Before proceeding, close your web browser.
•
If the Network Camera Setup window is not displayed automatically,
double-click the "Setup.exe" file on the CD-ROM.
Displays the camera manuals.
If your PC does not have Adobe®
Acrobat® Reader®, install it from
the Adobe Reader website.
Closes the Setup Program.
Displays version information
about this program.
Sets up the camera.
Installs Network Camera Recorder
Single Camera Version.
Camera
List window
Camera
Status
Port
No.
MAC
Address
IP
Address


