


959D Leak Detector
2-12
DRAFT
9/13/02
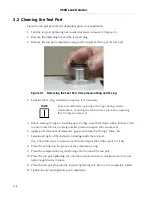
The calibrated leak level is printed on a label on the side of the leak. The first step is to
attached the calibrated leak to the test port.
1. Press
VENT
.
2. Place
RESIDUAL BACKGROUND
in
RUN
.
3. Loosen the test port tightening nut and remove the test port plug.
4. Install the calibrated leak with its valve open into the test port and re-tighten the
tightening nut.
5. Press
START
and wait until
TEST
lights up.
6. Check the leak rate indication on the vertical bar graph. It will probably be different
from the calibrated leak value.
7. Set
RANGE
to the value that corresponds to the exponent on the calibrated leak.
8. Close the valve on the calibrated leak.
The leak rate shown on the bar graph should drop to zero (one bar lit).
❑
If the leak rate drops to zero, go on to step 9.
❑
If the leak rate
does not
drop to zero, the 959D is not detecting helium.
Go to Section 2.5.3 “Tuning the Spectrometer Tube Using a Calibrated Leak for
Tuning to He”.
9. Rotate
RANGE
to the far left, its most sensitive position.
10. Slowly
ZERO
the 959D using the control on the primary panel.
If a larger adjustment is necessary, first adjust
COARSE ZERO
on the secondary panel
and then
ZERO
on the primary panel.
11. Open the calibrated leak valve and wait about 10 seconds for the leak rate bar graph to
settle.
12. Use
CAL
to set the bar graph to the value that corresponds to the mantissa on the
calibrated leak.
If you can set the bar graph equal to the calibrated leak value, calibration is successful.
13. If calibration is successful, press
VENT
and remove the calibrated leak.
You can now proceed with testing.
14. If calibration is not successful, the leak detector requires tuning using the procedure in
Section 2.5.3 “Tuning the Spectrometer Tube Using a Calibrated Leak for Tuning to He”.
CAUTION
To prevent a build-up of helium and minimize deterioration of
the calibrated leak, always store the calibrated leak with its
valve open.
Summary of Contents for 959D
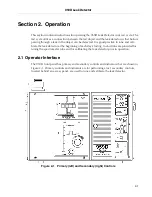
Page 16: ...959D Leak Detector 1 2 D R A F T 9 1 3 0 2 Figure 1 1 Model 959D Leak Detector ...
Page 28: ...959D Leak Detector This page intentionally left blank D R A F T 9 1 3 0 2 ...
Page 48: ...959D Leak Detector This page intentionally left blank D R A F T 9 1 3 0 2 ...
Page 68: ...959D Leak Detector This page intentionally left blank D R A F T 9 1 3 0 2 ...
Page 78: ...959D Leak Detector This page intentionally left blank D R A F T 9 1 3 0 2 ...
Page 81: ......


