background image


GelDoc-It

TS3

 and ChemiDoc-It

TS3

 Imagers 


28 

81-0360-01 Rev B


7.4 

Running Saved Templates


Once the template is selected, all template settings and actions will automatically be 
performed on the system. 


1.  To select the quick-access templates to be shown at the top of the TS3 screen, press the 

Templates 

button until the list of saved templates is shown.  


2.  A template is active when the template button shows white letters on a purple 

background. A template is inactive when black letters are shown on a gray background. 


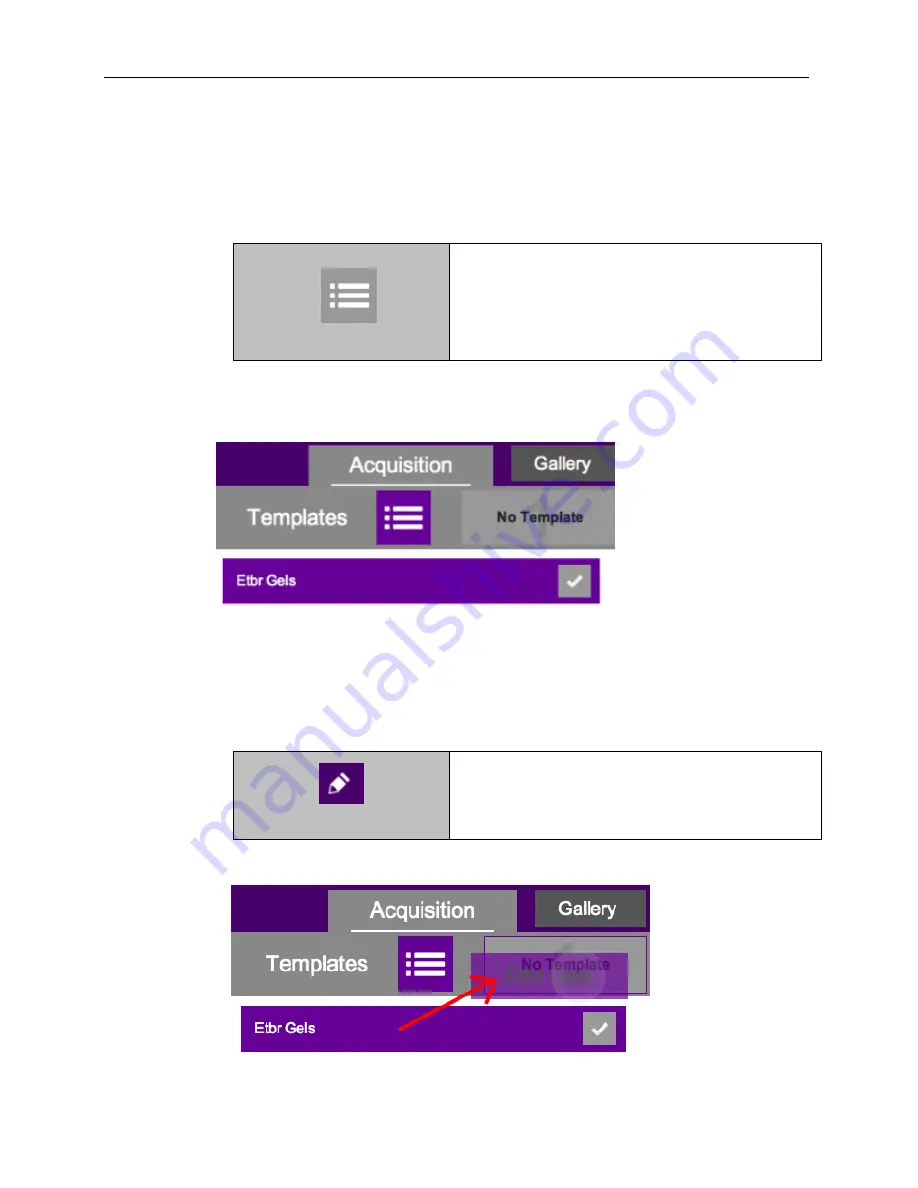
3.  To edit a template name, press the gray pencil icon to the right of the template name in 

the list of saved templates. The template settings will be shown. An on-screen keyboard 
will appear. Use the keyboard to enter the desired template name. Press the 

Checkmark


button to accept the revised name, or press the 

“X”

 button to cancel. 


4.  Then, press and drag the template to the desired quick-access position. 


Templates


Templates: To access saved templates, press the 

Templates

 button.  


Template Settings


Press the pencil icon in the upper-left corner of the 
screen to the left of the template name. 

Summary of Contents for ChemiDoc-It TS3

Page 1: ...ation and User Instructions UVP LLC Ultra Violet Products Ltd 2066 W 11th Street Unit 1 Trinity Hall Farm Estate Upland CA 91786 Nuffield Road Cambridge CB4 1TG UK Phone 800 452 6788 Phone 44 0 1223 420022 Fax 909 946 3597 Fax 44 0 1223 420561 Web Site www uvp com ...

Page 2: ... 8 LCD Touch Screen 9 3 9 VisionWorks touch 9 3 10 Fluorescent Focus Target 9 3 11 Optional Equipment 10 4 0 Setup Instructions and Installation 12 4 1 Components 12 4 2 Connecting the Transilluminator and Accessories 12 4 3 Installing the Camera Brackets and Cables 13 5 0 Operating the System 16 5 1 Powering Up the System 16 5 2 Preparing the Transilluminator for Use 16 6 0 Setting up VisionWorks...

Page 3: ...s 28 8 0 Image Enhancement and Analysis 30 8 1 Using the Gallery to Access Images 30 8 2 Compositing for Applications 32 8 3 Additional Features 35 9 0 Service Procedures 39 9 1 Return Procedure 39 9 2 Replacement Parts and Accessories 39 9 3 Troubleshooting 40 9 5 Technical Support 41 ...

Page 4: ...Doc It TS3 darkroom has a fold down chemiluminescence tray with multiple levels for placement built in overhead epi white lighting a UV transilluminator and a five position slide out emission filter wheel with an ethidium bromide EtBr emission filter included as standard Save images to the internal hard drive to an external USB storage device or to a network drive for later quantitative analysis o...

Page 5: ...vice must only be operated if all protective equipment is present and the system is properly installed and fully functional Free access to the power plug and main power switch on the back of the unit must be ensured Disconnect the power supply before servicing the system For UV protection and to extend the life of the UV transilluminator the system incorporates a customizable transilluminator shut...

Page 6: ...nts included with the system GelDoc ItTS3 ChemiDoc ItTS3 Camera and Lens Located at Top of Darkroom 15 6 Touch Screen Computer Power Button USB Port Built In Overhead White Lights Five Position Slide Out Emission Filter Wheel Transilluminator on Roll Out Tray UV Safety Interlock Switch Override BioLite Access Port Power Indicator Lights Fold down tray for blots ...

Page 7: ...ategory II Altitude Up to 2000m Ambient Temperature 5 C to 40 C Humidity Maximum relative humidity of 80 for temperatures up to 31 C decreasing linearly to 50 maximum relative humidity at 40 C 3 2 Built In Touch Screen General Technical Data Operating System Windows 8 1 64 Bit Connectivity Ports 1 USB side of system 6 connections for USB VGA Ethernet rear of system Wireless Networking Capability 8...

Page 8: ...uminator The filter is placed in the slide out filter wheel assembly on the side of the Imager The filter allows visualization of fluorophores from 580 630nm targeting the ethidium bromide emission peak of 605nm Additional filters are available for other specific fluorophores including custom filters Filters can also be removed when imaging non fluorescent media including chemiluminescent blots pr...

Page 9: ...lly integrated 15 6 inch color touch screen computer The touch screen allows the user to perform a variety of tasks including previewing capturing saving and printing images as well as selecting preference options without the use of an external mouse or keyboard The screen can be pressed by finger or with the included stylus For users who prefer not to use the touch screen interface an external ke...

Page 10: ...tation and emission filters enable a wide spectral range of wavelengths including red green blue and NIR Thermal Printer The thermal printer provides archive quality 256 grayscale prints and five optional cost effective print sizes UV Modules for Overhead Lighting A set of two 4 watt ultraviolet modules can be connected inside the darkroom to provide epi UV illumination These modules can be switch...

Page 11: ...0nm wavelength designed for use with blue excitation samples and SYBR Green SYPRO Orange and GFP stains VisionWorks Analysis Software All TS3 systems include a copy of VisionWorks software for analysis of gels plates and membranes The software features image enhancement complete analysis tools and reporting capabilities and is ideal for users who require image analysis functions in addition to the...

Page 12: ...tors or any other large magnetic equipment This system is designed for indoor use only Do not position the system so that it is difficult to access the power cable and operate the main power switch at the back of the unit 4 2 Connecting the Transilluminator and Accessories 1 Inside the darkroom place the transilluminator on the roll out tray Connect the transilluminator to the internal power jumpe...

Page 13: ...Mount 1 Install the bracket and mount unit to the top of the darkroom using black screws and brass thumbscrews 4 3 2 Installing the Camera and Lens After installing the bracket and mount unit the camera and lens must be mounted to the top of the darkroom 1 If attached pull the lens cover off the camera do not unscrew 2 Mount the camera making sure that the white label stating Front is facing the f...

Page 14: ...stalling the Camera Cables 1 Plug in the camera USB cable and camera power cable to the top of the camera 2 The connection ports for the camera and lens are labeled on the back of the system 3 Install the connectors to the appropriate connection ports as pictured below ...

Page 15: ...foam block holding the filter wheel in place 3 Press in on the slide out filter wheel door and the door will pop out slightly Pull the filter wheel assembly out until it stops 4 Manually rotate the filter wheel to the desired position Place the ethidium bromide filter in Position 1 NOTE Before placing the filter in the filter wheel ensure that the text on the edge of the filter is positioned so it...

Page 16: ...hen ultraviolet illumination is active within the darkroom Note It is recommended to leave the power switch on the back of the system in the ON position except when the system will not be used for an extended period of time one day or longer 5 2 Preparing the Transilluminator for Use 1 Open the darkroom door and turn on the main power switch located on the front of the transilluminator Place this ...

Page 17: ...tain assistance from a network administrator to ensure that the process is completed properly Follow Microsoft or local standard network protocols for network configuration To minimize the software interface and access Microsoft Windows for network configuration press the Minimize _ button in the upper right corner of the software 6 2 Installing Drivers or Additional Software In the event that add...

Page 18: ...otate slider button to turn on this function There are three options for rotation settings in the drop down menu The image can be rotated 90 degrees clockwise 90 degrees counterclockwise or 180 degrees upside down Auto Invert Image Set Auto Invert Image to ON to automatically invert the image upon image capture Note Auto Invert Image must be set to ON in order to invert images during image capture...

Page 19: ...ically save the image after capture The image will automatically save to the location selected in Save Images To and in the format selected in Save Format as described above NOTE If the Auto Save After Capture function is set to OFF press the Save button in the Gallery view to manually save an image Auto Print After Capture Select ON to automatically send the captured image to the default printer ...

Page 20: ...ng button on the main TS3 screen to access the lighting selection menu Epi Illumination Select the desired button to choose from the following epi illumination sources White Accessory or Off Accessory lighting is only functional when optional epi UV modules are installed in the system darkroom Transillumination Select the desired button to choose from the following transillumination sources UV Whi...

Page 21: ... filter wheel alignment after the wheel has been moved by hand to load change or remove filters NOTE If Reset Wheel is not pressed after the filter wheel has been manually rotated the system will not be able to accurately determine the position of the emission filter wheel Edit To change a filter name press the desired radio button to select the emission filter and then press the Edit button A scr...

Page 22: ...text and pictogram are shown in purple and read Stop Preview When active press the button again to deactivate live preview 3 To view the window full screen Maximize Minimize Full Screen Mode When an image preview is open press the Maximize button to show the image in full screen mode Press the Minimize button to close full screen 4 To capture the image Start Capture Press the Start Capture button ...

Page 23: ...view window Note that the higher the zoom percentage is the larger the image will appear Tap and drag within a window to move around on the zoomed in image NOTE When using a zoom lens optical zoom lens adjustment can be done with the slider bar found under the Focus and Aperture screen For additional information on optical and digital zooming refer to section 8 3 Additional Features 7 3 Image Capt...

Page 24: ...ture Use the vertical slider bars and or the and buttons to make adjustments to the desired portion of the exposure time min sec ms or microseconds To adjust capture modes select the desired mode from the drop down menu Capture modes include Manual Exposure Captures one or more images with a pre selected exposure time Auto Exposure Captures an image with an ideal exposure time determined automatic...

Page 25: ...o apply to the Gallery view discussed later in this manual Binning Interpolation Binning Interpolation Press the Binning Interpolation button to access image binning and interpolation adjustment options Binning is the process of combining multiple image pixels into one larger pixel For example 4x4 binning combines a four by four area of pixels sixteen pixels all together into one large pixel and s...

Page 26: ... when a template is selected Available actions include Start Capture When a template includes this Action all system settings will be adjusted according to the template and then the image will automatically be captured Start Preview When a template includes this Action all system settings will be adjusted according to the template and an image preview will automatically be shown Do Nothing When a ...

Page 27: ...tes the keyboard will appear with the template name shown The user can then accept the current name by pressing the Checkmark button enter a new template name then press the Checkmark button or press the X button to cancel saving 5 The following screen will list the saved settings of the new template which can now be accessed at a later time to automatically apply the saved settings ...

Page 28: ...ate is inactive when black letters are shown on a gray background 3 To edit a template name press the gray pencil icon to the right of the template name in the list of saved templates The template settings will be shown An on screen keyboard will appear Use the keyboard to enter the desired template name Press the Checkmark button to accept the revised name or press the X button to cancel 4 Then p...

Page 29: ...a Select the desired template from the Templates menu by pressing the gray check box icon to the right of the template name or b Select the template from the quick access area 6 To delete a template press the gray trash can icon to the right of the template name 7 To disregard a template and enter settings and actions manually press the Manual Input button located at the top right of the software ...

Page 30: ...th all modifications such as time stamp and histogram modifications embedded in the image Or press the Save button to save the raw image without any modifications embedded Images will be saved to the location specified in Preferences Time Stamp To add a date stamp to the captured image press the Time Stamp button then press the slider until the check mark appears This will add mmm dd yyyy hh mm ss...

Page 31: ...umination focus and aperture settings Press the i button again to close the image information screen NOTE Image information is only available for images captured using the TS3 Imager Minimize and Close Minimize Press the Minimize _ button in the upper right corner of the screen to minimize VisionWorks touch Close Press the Close X button in the upper right corner of the screen to close the softwar...

Page 32: ... radio button to select the desired pseudocolor Invert Press the Invert button to access image inversion selection Under Invert touch the slider until the check mark appears to activate image inversion NOTE Pseudocolors and image inversion are not saved to the image unless Save Burned is selected as described earlier in this manual Fluorescent Compositing Tool Fluorescent Compositing The Fluoresce...

Page 33: ... pulled from the image in each box is shown in the colored bar below the gray box red on top green in the middle and blue on the bottom To use this tool first open two or three images in the gray area gallery bar below the Compositing tab Depending upon the desired color to be composited drag an image from the gallery bar to the Drag image here area Each image s histogram pseudocolor and inversion...

Page 34: ...oc ItTS3 and ChemiDoc ItTS3 Imagers 34 81 0360 01 Rev B chemiluminescent white light overlays For more information on using this tool see the Fluorescent Compositing Tool as described earlier in this manual ...

Page 35: ...nd enlarges the cropped portion to fill the imaging area on the screen Capture Mode Capture Modes Addditional Sequential Constant Time Select the number of frames to be captured as well as the total image capture time and the software will automatically capture the desired number of frames with evenly divided exposure times Sequential Variable Time Captures sequential images with user selectable e...

Page 36: ... histogram will automatically revert back to previously determined manual settings Note When a color image is present the histogram menu will show three separate slider bars allowing histogram settings for red green and blue channels NOTE Histogram settings also apply to the Gallery view discussed later in this manual Binning Interpolation Binning is the process of combining multiple image pixels ...

Page 37: ...le between off and on tap the Slider the Slider will autmatically move between the X off and the checkmark on Slider Bar Use the slider bar to adjust various settings including Exposure Aperture Histogram Focus and Zoom if applicable To adjust the settings do one of the following Press and drag the marker small triangle to the desired position Touch anywhere along the gray slider bar and the marke...

Page 38: ...GelDoc ItTS3 and ChemiDoc ItTS3 Imagers 38 81 0360 01 Rev B the Preferences section of this manual for more information ...

Page 39: ...ommended Fuses Fuse 3 15A for Darkroom 56 0022 04 Qty 2 Required Fuse 2A for Transilluminators 56 0002 01 Qty 2 Required Emission Filters Filter Ethidium Bromide 50mm Square 38 0220 01 Filter SYBR Green 50mm Square 38 0219 01 Filter SYBR Gold 50mm Square 38 0221 01 Transillumination Accessories LED White Light Plate 95 0476 01 White Light Converter Plate 21x26cm 38 0191 01 Visi Blue Converter Plat...

Page 40: ...switch Make sure that the green transilluminator power switch located on the front of the transilluminator is in the ON position 2 For UV protection and to extend the life of the UV transilluminator the system incorporates a customizable transilluminator shutoff timer built into the software For additional information refer to the Lighting section of this manual Error Messages Appear on the Screen...

Page 41: ...regular business days between 7 00 am and 5 00 pm PST Call 44 0 1223 420022 and ask for Customer Service during regular business days between 9 00 am and 5 30 pm E mail your message to info uvp com E mail your message to uvp uvp co uk Fax Customer Service and send it to 909 946 3597 Fax Customer Service and send it to 44 0 1223 420561 Write to UVP LLC 2066 W 11th Street Upland CA 91786 USA Write t...

Reviews: