Troubleshooting
Section
5-1
AB38 Work Platform
5.0 Introduction
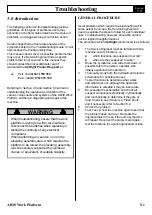
The following section on troubleshooting provides
guidelines on the types of problems users may
encounter in the field, helps determine the cause of
problems, and suggests proper corrective action.
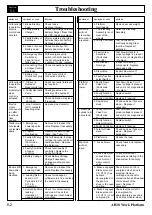
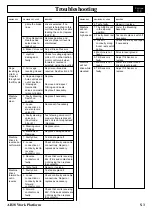
Careful inspection and accurate analysis of the
symptoms listed in the
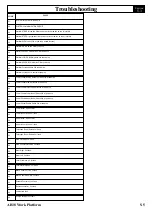
Troubleshooting Guide 5.1
will
help localise the trouble quickly than.
This manual cannot cover all possible problems that
may occur. If a Service Engineer finds a specific
problem that is not covered in this manual, they
should contact their local distributor and if
warranted the
UpRight
Product Support
at:
@
Tel: +44 (0) 845 1550 058
Fax: +44 (0) 1952 299 948
Referring to
Section 3.0
and
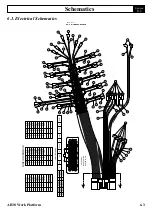
Section 6.0
will aid in
understanding the operation and function of the
various components and systems of the
AB38 Work
Platform
and help in diagnosing and repair of the
machine.
When troubleshooting, ensure that the work
platform is resting on a firm, level surface.
Disconnect the batteries when replacing or
testing the continuity of any electrical
component.
When performing any service on or in the
elevating assembly area, which requires the
platform to be raised, the elevating assembly
must be securely supported by overhead
cranes, or equivalent, of suitable capacity.
WARNING
GENERAL PROCEDURE
As all problems which require troubleshooting will to
some extent be unique, the Service Engineer will
need to evaluate the steps to follow for each individual
case. Troubleshooting, however, should be carried
out in a logical thoughtful manner.
The procedure which
UpRiight
recommend is as follows:
1.
The Service Engineer must be familiar with the
machine and its functions. i.e.
l
which functions are supposed to work?
l
when are they supposed to work?
2.
Know the symptoms, and write them down. If
possible talk to the person, operator, who
initially experienced the problem.
3.
Thoroughly study both the hydraulic and electric
schematics for possible causes.
4.
Test all functions to determine what works
and what does not. Although the operators
information is valuable it may be inaccurate.
5.
Re-evaluate the schematics and check all
suspect components electrically, hydraulically
and mechanically to determine if they are at
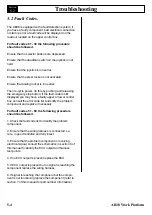
fault. Check to see if there is a ‘Flash Fault’,
and if necessary refer to Section 5.2.
6.
Correct the problem.
7.
Test, Test, & Test the machine again to see that
the problem does not recur. Recreate the
original problem to see if the same symptoms
will repeat. Recorrect the problem and again
test the machine for a prolonged period of time.
5.0
Summary of Contents for AB38
Page 2: ...ii AB38 Work Platform NOTES...
Page 4: ...ii AB38 Work Platform NOTES...
Page 6: ...iv AB38 Work Platform NOTES Foreword...
Page 10: ...Contents Section IV AB38 Work Platform i NOTES...
Page 14: ...Introduction Specifications Section 1 4 AB38 Work Platform NOTES 1 3...
Page 17: ...Machine Preparation Section 2 3 AB38 Work Platform NOTES 2 7...
Page 18: ...Machine Preparation Section 2 4 AB38 Work Platform 2 7 NOTES...
Page 29: ...Operation Section 3 11 AB38 Work Platform NOTES 3 5...
Page 30: ...Operation Section 3 12 AB38 Work Platform NOTES 3 5...
Page 59: ...Maintenance Section 4 29 AB38 Work Platform NOTES 4 21...
Page 60: ...Maintenance Section 4 30 AB38 Work Platform NOTES 4 21...
Page 66: ...Troubleshooting Section 5 6 AB38 Work Platform 5 7 NOTES...
Page 68: ...Schematics Section 6 2 AB38 Work Platform NOTES 6 0...
Page 72: ...Schematics Section 6 6 AB38 Work Platform 6 1 NOTES...
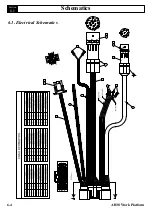
Page 73: ...Electrical Schematic Schematics 6 7 AB38 Work Platform Section 6 1...
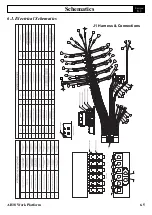
Page 74: ...Electrical Schematic Schematics 6 8 AB38 Work Platform Section 6 1 TOP VIEW...
Page 76: ...Schematics Section 6 10 AB38 Work Platform NOTES 6 2...
Page 78: ...Section 6 2 6 12 AB38 Work Platform Schematics NOTES...
Page 81: ...Illustrated Parts Breakdown Section 7 3 AB38 Work Platform 7 2...
Page 83: ...Illustrated Parts Breakdown Section 7 5 AB38 Work Platform 7 2...
Page 85: ...Illustrated Parts Breakdown Section 7 7 AB38 Work Platform 7 2...
Page 87: ...Illustrated Parts Breakdown Section 7 9 AB38 Work Platform 7 2...
Page 89: ...Illustrated Parts Breakdown Section 7 11 AB38 Work Platform 7 2 22...
Page 91: ...Illustrated Parts Breakdown Section 7 13 AB38 Work Platform 7 2...
Page 93: ...Illustrated Parts Breakdown Section 7 15 AB38 Work Platform 7 2...
Page 95: ...Illustrated Parts Breakdown Section 7 17 AB38 Work Platform 7 2...
Page 97: ...Illustrated Parts Breakdown Section 7 19 AB38 Work Platform 7 2...
Page 99: ...Illustrated Parts Breakdown Section 7 21 AB38 Work Platform 7 2...
Page 101: ...Illustrated Parts Breakdown Section 7 23 AB38 Work Platform 7 2...
Page 103: ...Illustrated Parts Breakdown Section 7 25 AB38 Work Platform 7 2...
Page 105: ...Illustrated Parts Breakdown Section 7 27 AB38 Work Platform 7 2...
Page 107: ...Illustrated Parts Breakdown Section 7 29 AB38 Work Platform 7 2...
Page 109: ...Illustrated Parts Breakdown Section 7 31 AB38 Work Platform 7 2...
Page 111: ...Illustrated Parts Breakdown Section 7 33 AB38 Work Platform 7 2...
Page 113: ...Illustrated Parts Breakdown Section 7 35 AB38 Work Platform 7 2...
Page 115: ...Illustrated Parts Breakdown Section 7 37 AB38 Work Platform 7 2...
Page 117: ...Illustrated Parts Breakdown Section 7 39 AB38 Work Platform 7 2...
Page 119: ...Illustrated Parts Breakdown Section 7 41 AB38 Work Platform 7 2 8 9...
Page 121: ...Illustrated Parts Breakdown Section 7 43 AB38 Work Platform 7 2...
Page 123: ...Illustrated Parts Breakdown Section 7 45 AB38 Work Platform 7 2...
Page 125: ...Illustrated Parts Breakdown Section 7 47 AB38 Work Platform 7 2...
Page 127: ...Illustrated Parts Breakdown Section 7 49 AB38 Work Platform 7 2...
Page 131: ...Illustrated Parts Breakdown Section 7 53 AB38 Work Platform 7 2 NOTES...
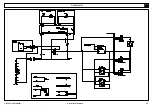
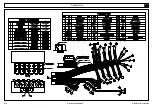
Page 133: ...Technician s Print AB38 Work Platform Electrical Schematic...

