Troubleshooting
Section
5-3
AB38 Work Platform
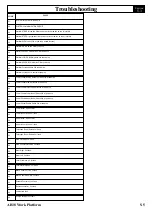
4. Tacho faulty.
Repair or replace.
Machine
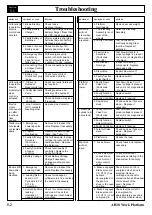
1. The AB38 is not
Lower the Elevating
will not
in the stowed
Assembly.
drive in
position.
high speed. 2. Faulty boom rest Test and replace switch if
switch.
necessary.
3. Loss of
Check continuity and repair
continuity along
if necessary .
boom rest switch
cable.
4. Machine is not
Drive to level ground.
level.
5. Tilt Sensor is
Adjust Tilt Sensor or
faulty.
replace.
Machine
1. Machine is not
Lower the Platform and
will not
level.
drive to level ground.
drive while
2. Tilt Sensor is
Adjust Tilt Sensor or
elevated.
faulty.
replace.
PROBLEM
PROBABLE CAUSE
REMEDY
PROBLEM
PROBABLE CAUSE
REMEDY
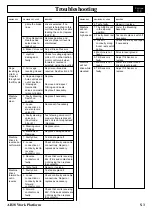
prime the brake
drive is selected. If no
lines.
current is being fed to this
coil then replace the cable
feeding the coil or replace
the P.C.B.
5. Drive Reduction
Replace gearbox and
Gearbox has
ensure proper oil level is
seized due to
maintained.
lack of oil.
6. Brake Valves out Adjust Brake Pressure
of adjustment.
Reduction Valve to 100 Bar.
7. Joystick
Check for voltage signal on
damaged or
pin 8 or 11 on the traction
faulty.
motor control unit when
forward or reverse is
selected using the joystick.
Cage
1. Air in cage
Reprime or bleed as
levelling is
levelling closed
required. See Section 4.19.
erratic or
circuit.
irregular
2. Cage damaged, Replace.
throughout
hole centres are
the lift cycle.
out of position.
3. Damaged
Remove and inspect
Overcentre
O-Rings and seals.
valves on master Replace if necessary.
/slave cylinders.
Machine
1. Faulty Steering
Replace if necessary.
will not
Switch on
steer.
Joystick.
2. Loose
Reconnect if necessary.
connection on
steer solenoid
valve V5.
3. Faulty steering
Test steering valve coil. If
valve coil.
proper voltage is present
(Fault code :
and coil is not magnetised
59 or 61)
-Replace.
4. Steering valve
Replace valve.
V5 stuck.
5. Mechanical
Replace damaged parts.
Damage.
Machine
1. Faulty drive
Test and replace if
drives in
switch.
necessary.
reverse but
2. Loose
Check continuity and cable
not forward.
connection or
connections. Repair or
continuity lost to
replace as necessary.
reverse
contactor coil.
3. Reverse
Check that coil is receiving
contactor coil
48v. If it is and contacts are
faulty.
not closing then replace
the contactor.
4. Tacho faulty.
Repair or replace.
Machine
1. Faulty drive
Test and replace if
drives
switch.
necessary.
forward but
2. Loose
Check continuity and cable
not in
connection or
connections. Repair or
reverse.
continuity lost to
replace as necessary.
forward
contactor coil.
3. Forward
Check that coil is receiving
contactor coil
48V. If it is and contacts are
faulty.
not closing then replace
the contactor.
5.1
Summary of Contents for AB38
Page 2: ...ii AB38 Work Platform NOTES...
Page 4: ...ii AB38 Work Platform NOTES...
Page 6: ...iv AB38 Work Platform NOTES Foreword...
Page 10: ...Contents Section IV AB38 Work Platform i NOTES...
Page 14: ...Introduction Specifications Section 1 4 AB38 Work Platform NOTES 1 3...
Page 17: ...Machine Preparation Section 2 3 AB38 Work Platform NOTES 2 7...
Page 18: ...Machine Preparation Section 2 4 AB38 Work Platform 2 7 NOTES...
Page 29: ...Operation Section 3 11 AB38 Work Platform NOTES 3 5...
Page 30: ...Operation Section 3 12 AB38 Work Platform NOTES 3 5...
Page 59: ...Maintenance Section 4 29 AB38 Work Platform NOTES 4 21...
Page 60: ...Maintenance Section 4 30 AB38 Work Platform NOTES 4 21...
Page 66: ...Troubleshooting Section 5 6 AB38 Work Platform 5 7 NOTES...
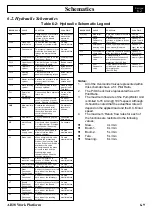
Page 68: ...Schematics Section 6 2 AB38 Work Platform NOTES 6 0...
Page 72: ...Schematics Section 6 6 AB38 Work Platform 6 1 NOTES...
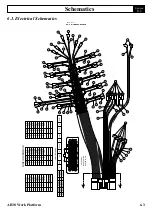
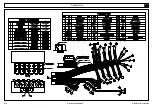
Page 73: ...Electrical Schematic Schematics 6 7 AB38 Work Platform Section 6 1...
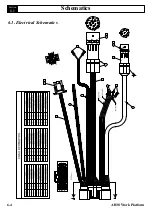
Page 74: ...Electrical Schematic Schematics 6 8 AB38 Work Platform Section 6 1 TOP VIEW...
Page 76: ...Schematics Section 6 10 AB38 Work Platform NOTES 6 2...
Page 78: ...Section 6 2 6 12 AB38 Work Platform Schematics NOTES...
Page 81: ...Illustrated Parts Breakdown Section 7 3 AB38 Work Platform 7 2...
Page 83: ...Illustrated Parts Breakdown Section 7 5 AB38 Work Platform 7 2...
Page 85: ...Illustrated Parts Breakdown Section 7 7 AB38 Work Platform 7 2...
Page 87: ...Illustrated Parts Breakdown Section 7 9 AB38 Work Platform 7 2...
Page 89: ...Illustrated Parts Breakdown Section 7 11 AB38 Work Platform 7 2 22...
Page 91: ...Illustrated Parts Breakdown Section 7 13 AB38 Work Platform 7 2...
Page 93: ...Illustrated Parts Breakdown Section 7 15 AB38 Work Platform 7 2...
Page 95: ...Illustrated Parts Breakdown Section 7 17 AB38 Work Platform 7 2...
Page 97: ...Illustrated Parts Breakdown Section 7 19 AB38 Work Platform 7 2...
Page 99: ...Illustrated Parts Breakdown Section 7 21 AB38 Work Platform 7 2...
Page 101: ...Illustrated Parts Breakdown Section 7 23 AB38 Work Platform 7 2...
Page 103: ...Illustrated Parts Breakdown Section 7 25 AB38 Work Platform 7 2...
Page 105: ...Illustrated Parts Breakdown Section 7 27 AB38 Work Platform 7 2...
Page 107: ...Illustrated Parts Breakdown Section 7 29 AB38 Work Platform 7 2...
Page 109: ...Illustrated Parts Breakdown Section 7 31 AB38 Work Platform 7 2...
Page 111: ...Illustrated Parts Breakdown Section 7 33 AB38 Work Platform 7 2...
Page 113: ...Illustrated Parts Breakdown Section 7 35 AB38 Work Platform 7 2...
Page 115: ...Illustrated Parts Breakdown Section 7 37 AB38 Work Platform 7 2...
Page 117: ...Illustrated Parts Breakdown Section 7 39 AB38 Work Platform 7 2...
Page 119: ...Illustrated Parts Breakdown Section 7 41 AB38 Work Platform 7 2 8 9...
Page 121: ...Illustrated Parts Breakdown Section 7 43 AB38 Work Platform 7 2...
Page 123: ...Illustrated Parts Breakdown Section 7 45 AB38 Work Platform 7 2...
Page 125: ...Illustrated Parts Breakdown Section 7 47 AB38 Work Platform 7 2...
Page 127: ...Illustrated Parts Breakdown Section 7 49 AB38 Work Platform 7 2...
Page 131: ...Illustrated Parts Breakdown Section 7 53 AB38 Work Platform 7 2 NOTES...
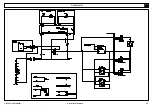
Page 133: ...Technician s Print AB38 Work Platform Electrical Schematic...

