Maintenance
Section
4-12
AB38 Work Platform
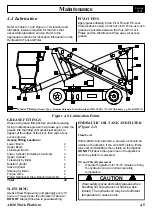
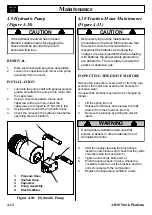
4.9 Hydraulic Pump
(Figure 4-10)
If the hydraulic reservoir has not been
drained, suitable means for plugging the
hoses should be provided to prevent
excessive fluid loss.
REMOVAL
1.
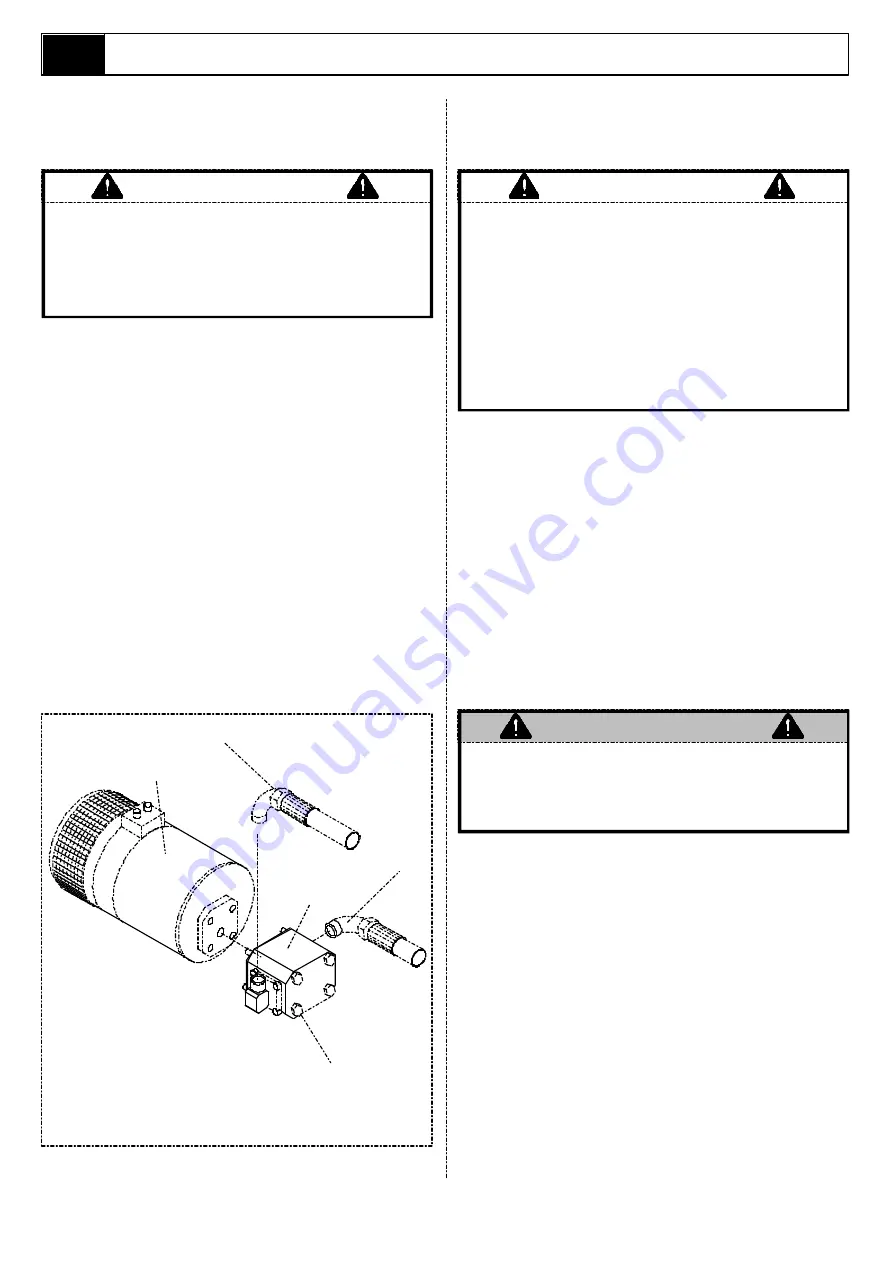
Mark, disconnect and plug hose assemblies.
2.
Loosen the capscrews and remove the pump
assembly from the motor.
INSTALLATION
1.
Lubricate the pump shaft with general purpose
grease and attach the pump to the motor with
the capscrews.
2.
Using a crisscross pattern torque each
capscrew a little at a time until all the
capscrews are torqued to 27 Nm (20 ft. lbs).
3.
Unplug and reconnect the hydraulic hoses.
4.
Check the oil level in the hydraulic tank before
operating the work platform.
CAUTION
1.
Pressure Hose
2.
Suction Hose
3.
Capscrew
4.
Pump Assembly
5.
Electric Motor
5
1
2
4
3
Figure 4-10: Hydraulic Pump
4.9
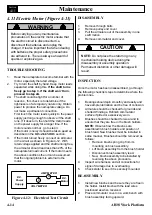
4.10 Traction Motor Maintenance
(Figure 4-11)
Before carrying out any maintenance
procedures on the Drive Motors ensure that
the electric circuit is disconnected i.e.
disconnect the batteries and unplug the
charger. It is also important that when dealing
with batteries the proper safety precautions
are adhered to. There is always a hazard of
sparks or explosive gas.
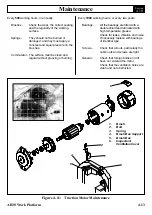
INSPECTING THE DRIVE MOTORS
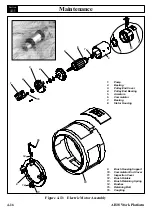
Remove the inspection covers (Item 6) from the rear
section of the motor and examine the brushes for
excessive wear.
If required the brushes may need to be changed as
follows:
1.
Lift the spring (Item 3)
2.
Release the brushes and unscrew the bolts
(Item 2) from the brush box (Item 5)
3.
Remove the brushes by pulling the electric
leads.
During these operations take care that
screws, washers or other materials do not
fall inside the motor.
4.
After thoroughly cleaning the brush boxes,
insert the new brushes and check that they slide
correctly inside the seat (Item 5).
5.
Tighten and lock the bolts (Item 2).
6.
Push the springs back in place. Check the
constant pressure on all the brushes, and the
correct contact with the commutator.
7.
Replace the inspection/ventilation covers.
CAUTION
WARNING
Summary of Contents for AB38
Page 2: ...ii AB38 Work Platform NOTES...
Page 4: ...ii AB38 Work Platform NOTES...
Page 6: ...iv AB38 Work Platform NOTES Foreword...
Page 10: ...Contents Section IV AB38 Work Platform i NOTES...
Page 14: ...Introduction Specifications Section 1 4 AB38 Work Platform NOTES 1 3...
Page 17: ...Machine Preparation Section 2 3 AB38 Work Platform NOTES 2 7...
Page 18: ...Machine Preparation Section 2 4 AB38 Work Platform 2 7 NOTES...
Page 29: ...Operation Section 3 11 AB38 Work Platform NOTES 3 5...
Page 30: ...Operation Section 3 12 AB38 Work Platform NOTES 3 5...
Page 59: ...Maintenance Section 4 29 AB38 Work Platform NOTES 4 21...
Page 60: ...Maintenance Section 4 30 AB38 Work Platform NOTES 4 21...
Page 66: ...Troubleshooting Section 5 6 AB38 Work Platform 5 7 NOTES...
Page 68: ...Schematics Section 6 2 AB38 Work Platform NOTES 6 0...
Page 72: ...Schematics Section 6 6 AB38 Work Platform 6 1 NOTES...
Page 73: ...Electrical Schematic Schematics 6 7 AB38 Work Platform Section 6 1...
Page 74: ...Electrical Schematic Schematics 6 8 AB38 Work Platform Section 6 1 TOP VIEW...
Page 76: ...Schematics Section 6 10 AB38 Work Platform NOTES 6 2...
Page 78: ...Section 6 2 6 12 AB38 Work Platform Schematics NOTES...
Page 81: ...Illustrated Parts Breakdown Section 7 3 AB38 Work Platform 7 2...
Page 83: ...Illustrated Parts Breakdown Section 7 5 AB38 Work Platform 7 2...
Page 85: ...Illustrated Parts Breakdown Section 7 7 AB38 Work Platform 7 2...
Page 87: ...Illustrated Parts Breakdown Section 7 9 AB38 Work Platform 7 2...
Page 89: ...Illustrated Parts Breakdown Section 7 11 AB38 Work Platform 7 2 22...
Page 91: ...Illustrated Parts Breakdown Section 7 13 AB38 Work Platform 7 2...
Page 93: ...Illustrated Parts Breakdown Section 7 15 AB38 Work Platform 7 2...
Page 95: ...Illustrated Parts Breakdown Section 7 17 AB38 Work Platform 7 2...
Page 97: ...Illustrated Parts Breakdown Section 7 19 AB38 Work Platform 7 2...
Page 99: ...Illustrated Parts Breakdown Section 7 21 AB38 Work Platform 7 2...
Page 101: ...Illustrated Parts Breakdown Section 7 23 AB38 Work Platform 7 2...
Page 103: ...Illustrated Parts Breakdown Section 7 25 AB38 Work Platform 7 2...
Page 105: ...Illustrated Parts Breakdown Section 7 27 AB38 Work Platform 7 2...
Page 107: ...Illustrated Parts Breakdown Section 7 29 AB38 Work Platform 7 2...
Page 109: ...Illustrated Parts Breakdown Section 7 31 AB38 Work Platform 7 2...
Page 111: ...Illustrated Parts Breakdown Section 7 33 AB38 Work Platform 7 2...
Page 113: ...Illustrated Parts Breakdown Section 7 35 AB38 Work Platform 7 2...
Page 115: ...Illustrated Parts Breakdown Section 7 37 AB38 Work Platform 7 2...
Page 117: ...Illustrated Parts Breakdown Section 7 39 AB38 Work Platform 7 2...
Page 119: ...Illustrated Parts Breakdown Section 7 41 AB38 Work Platform 7 2 8 9...
Page 121: ...Illustrated Parts Breakdown Section 7 43 AB38 Work Platform 7 2...
Page 123: ...Illustrated Parts Breakdown Section 7 45 AB38 Work Platform 7 2...
Page 125: ...Illustrated Parts Breakdown Section 7 47 AB38 Work Platform 7 2...
Page 127: ...Illustrated Parts Breakdown Section 7 49 AB38 Work Platform 7 2...
Page 131: ...Illustrated Parts Breakdown Section 7 53 AB38 Work Platform 7 2 NOTES...
Page 133: ...Technician s Print AB38 Work Platform Electrical Schematic...

